Do you want to rank your website with minimal effort on your side? Enter FCS Networker! This amazing SEO software will build high quality backlinks on all of the most famous Web 2.0, social bookmarking, social networking, and document sharing sites, all of which have high page rank and domain authority.
The Structure of this Genuine FCS Networker Review
- FCS Networker features preview – just to let you know what this SEO software is about.
- An in-depth look at the functionality of FCS Networker – an element-by-element look at each of the menus, pages and tools that FCS Networker provides.
- FCS Networker best practices – the best tips and tricks that we employ when using FCSN.
- Information on the way we do FCS SEO – see how we perform high quality link building using FCS Networker.
- FCS Networker vs RankWyz – battle of the high quality link building tools. Who is going to win this epic SEO battle?
- An honest FCS review – a final verdict of the software (scroll down to this section if you are here just for the FCS Networker discount).
- And finally, we will give you a hefty discount for all of the packages offered by FCS Networker.
In a sense, you will be able to take a glance at all the functionality of FCS Networker before you get to decide if you really need this link building tool. Shall we begin? Make sure your seat is in its upright and locked position, so we can tell Houston that we will soon have liftoff.
FCS Networker Features Preview
So, what are the features of this link building tool which supposedly will take your website to top positions?
- FCS Networker is one of the few fully automated link building tools our there that actually builds high PR/DA backlinks that are trusted by Google and the other search engines.
- FCS Networker comes with a shit load of tools which will help you generate and manage the content of your projects. With its advanced FCS Networker web software, your future private blog network will become completely undetectable.
- FCS Networker’s user interface is very, very intuitive. It is extremely well structured and easy to manage.
- FCS Networker will save you a lot of time by taking care of both the account creation and submission process on all of the supported sites.
- FCS Networker is a real money saver. With the biggest plans available, you can run hundreds of projects every month and the submissions won’t run out. However, keep in mind that you better hurry up and purchase one (if it is available), because a lot of people got interested in FCS SEO and last time I checked, the bigger packages were all sold out. If one is available, I would suggest grabbing it immediately. Don’t worry, you will find what to build high quality backlinks to and utilize all of your monthly submissions (just a friendly suggestion, the choice is yours).
- FCS Networker will never go out of fashion. The guys who made this software first used it for their personal projects, but when they saw the potential, they created this brand. Because of the nature of the websites that are supported (code is changed constantly), the developers of FCS Networker constantly put out updates, add new options, remove dead sites, add new sites, and fix bugs. So, you can be confident that in the event of a problem, it will be dealt with and fixed in the blink of an eye.
FCS Networker In-Depth Tutorial
As we saw, this link building tool will let you build high quality backlinks on high authority sites. Now, there’s two parts to FCS Networker:
- The FCS Networker Account Creator – this is the desktop application that you will download right after you purchase your FCS SEO package of choice. It will take care of all the account creation with just a little manual touch required by you.
- The FCS Networker Web-Based Submission Tool (Web Interface) – This is the website of FCS Networker, where the accounts created by the Account Creator will be uploaded. After that, you will be able to setup projects that will post articles with backlinks on these accounts.
Let’s dig into each of the two main parts of FCS Networker.
The Account Creator
After you install the Account Creator which you can download for free from the official FCS Networker website, you will be asked to enter your credentials and then, you will be taken to the “homepage” of the tool:
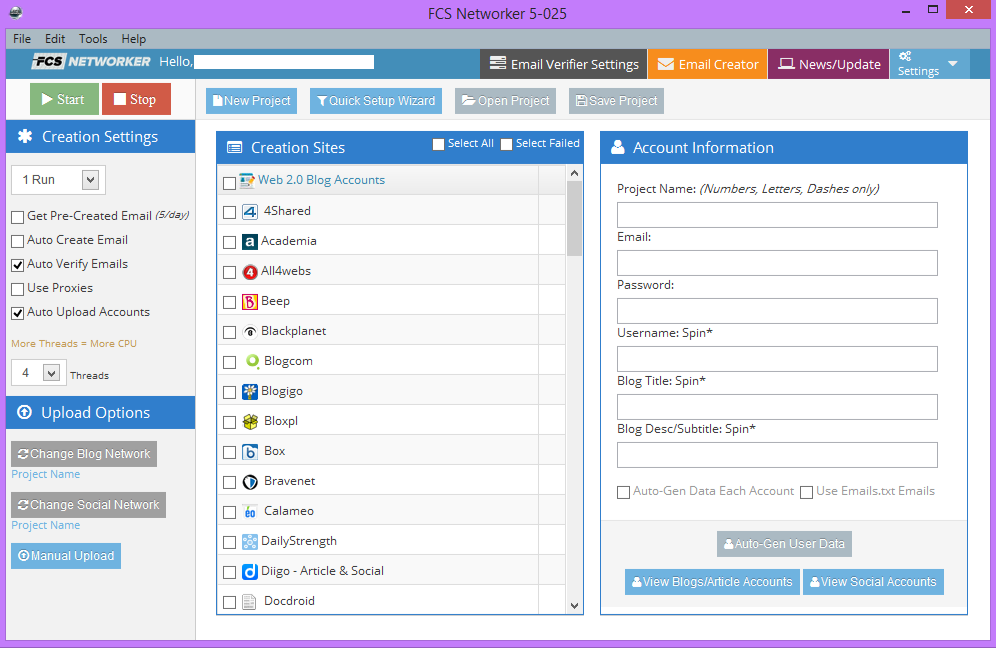
Yes, the white blank line is where my email resides. Anyway, let’s break down the Account Creator’s different sections from left to right.
Top Left Menu
Let’s start with the top menu. The “File” and “Edit” menus contain the usual actions such as close, undo, redo, cut, copy, paste, etc. The “Tools” menu has 2 sub-menus – “Web Based Submitter” and “CAPTCHA Service Accounts…”.
The first one will open the “Web Based Submitter” as a desktop application, so you can use it directly from your computer. The “CAPTCHA Service Accounts…” will open a window where you will be able to enter your captcha solving service credentials. Supported captcha solving services are:
- Death by Captcha – recommended one
- Decaptcher
- Bypass Captcha
- Captcha Sniper
We use Death by Captcha as it seems to be the most effective out of them. And you don’t even need to load that much cash into your DBC account. The smallest package offered by Death by Captch will be more than enough to create hundreds of accounts. Moving on.
Tools and Settings Sub-Menu
Below the top left menu, you can see the FCS Networker logo with the welcome text and 4 buttons to the right:
- Email Verifier Settings – Clicking this button will open a window where you can enter your email credentials, test the email, and let the software login to that email and verify all accounts that actually require verification. Don’t worry, you won’t be using this one, because FCS Networker has n option, which when selected, will make the software automatically verify all links after the account creation process finishes.
- Email Creator – This will open a window which has two inputs – number of accounts to create and email provider – supported ones are Zoho, Hotmail and GMX. Then you can just click the “Create Emails” button and wait for your email accounts to be created. Each account created will be inserted into the “Emails.txt” file in the root folder where you installed FCS Networker.
- News/Update – This is where you will find the latest news and updates concerning the FCS Networker world.
- Settings – The “Settings” button will show 4 sub-menus when clicked:
- Settings – This will take you to a screen where you will be able to enter your FCS Networker credentials and various other configuration settings such as number of retry attempts during account creation, delay before auto email verification, and multi-set creation delay in seconds.
- Proxies – In this window, you will be able to enter your proxies. I do recommend the dedicated proxies by BuyProxies, but that’s up to you. Even without proxies, you can still make a substantial amount of accounts, however, keep in mind, that after the first 2 – 3 runs, a lot of the sites will start to fail the creation process till the next day comes.
- User Manual – Takes you to the “User Manual” page of FCS Networker.
- Video Tutorials – Takes you to all the video tutorials on using the FCS Networker Account Creator.
The Actions Menu
This is the menu you will be using mostly. It consists of 6 buttons:
- Start – This will start the account creation process.
- Stop – This will stop the account creation process (who would have guessed right?).
- New Project – This will allow you to make a new account creation project.
- Quick Setup Wizard – This will quickly get you to fill in the mandatory information required to start your new account creation project.
- Open Project and Save Project – These will, well, open one of your previous account creation projects, or save your newly created one.
To the right of the buttons is the log where you will be able to see what the Account Creator is actually doing.
Creation Settings
As we said, from left to right. The creation settings have optimal configurations so pay attention to this section as I will share them with you below the explanations of the input fields:
- The drop-down menu – This is where you select how many times you wish the Account Creator to run.
- Get Pre-Created Email – If, for some reason, you don’t have captcha solving service and you don’t have time to solve captchas manually, you still get 5 emails per day which you can use to run the Account Creator, well, 5 times. Note that you need just one email account to register on all the supported sites, so one email will get you around 80 accounts depending on success rate. But, if you don’t have a captcha solver, you would still have to solve the registration captchas manually for each account.
- Auto Create Email – When checked, the Account Creator will create an email account on the specified email provider in the “Email Creator” menu, and then use it to create the Web 2.0, social bookmarking, and social networking accounts.
- Auto Verify Emails – As I stated a little above, you can just tick this checkbox, and it will force the Account Creator to verify all the links in the email after the account creation process ends.
- Use Proxies – Obvious. There is also a testing functionality that makes sure your proxies are actually working from inside the Account Creator.
- Auto Upload Accounts – When ticked, the Account Creator will automatically upload all the accounts that were created and they will instantly become available on the Web-Based Submission Tool.
- Threads – The number of threads that the Account Creator will run at.
And here is the optimal configuration that I have found to work best with the least account creation failures:
- If you still haven’t used the Account Creator today, set the runs to 3, and if you have, 1 at a time is best, because there is something buggy with the multiple consecutive runs. I even recommend letting the software rest for a while, or even performing a restart of the Account Creator for more success rate on the next run.
- Auto Verify Emails, Use Proxies, and Auto Upload Accounts are always ticked on my screen.
- The number of threads I use is usually 3 when I have selected automatic solving of captchas, and 1 when I will be solving the captchas manually. Why would you choose to solve them manually? Because that way, you will get 95%+ success rate on the account creation process, while the automatic creation will get you around 80% success rate. Also, when you set the captcha solving to manually, go to the “Settings” menu and set the number of retries to 5.
- Keep in mind that the Account Creator is a chameleon that changes its skin all the time, so playing with the configuration yourself is mandatory for finding the optimal settings at the time you use the software, but the suggestions above will do you great as a start.
Upload Options
In order to understand the “Upload Options”, you first need to know how FCS Networker groups its accounts. Basically, there are two types of accounts:
- Web 2.0 blog accounts – These are Web 2.0 blogs which you will use later in the Web-Based Submission Tool to post articles on.
- Social posts and bookmarking accounts – These are accounts on social networking and bookmarking sites which you will use to post your, well, social bookmarks. Social signals are important for the SEO of our age so do not forget about these.
These 2 types of accounts are grouped into blog and social networks in the web interface of FCS Networker. So, the Web 2.0 blog accounts go to the blog networks, and the social posts and bookmarking accounts go to the social networks. You can define your networks through the web interface of FCS Networker. Please make sure to name them accordingly! You wouldn’t want to login to your account one day and wonder what in the bloody hell did you create the “75693795 Blog Network” for. For example, if I am making a private blog network that will target the “insurance” niche, I would obviously name it “Insurance Blog Network”. Same goes for social networks.
Now, you have 3 buttons in the “Upload Options” section:
- Change Blog Network – This will show a popup window from which you will be able to select one of your existing blog networks to which the accounts will be added when creation is finished. If you do not select any blog network, the Account Creator will create a new blog network and name it as the name of the project in the “Account Information” section of the FCSN Account Creator.
- Change Social Network – Same as with the blog network, but for social networks.
- Manual Upload – This button will allow you to manually upload the created accounts to the web interface of FCS Networker. This is very useful if you have unchecked the “Auto Upload Accounts” option or if the auto uploading process fails for whatever reason.
Creation Sites
In this section, you will be able to select all the sites on which the Account Creator will try to register. Here is a list of the websites supported at the time when FCS Networker was launched:
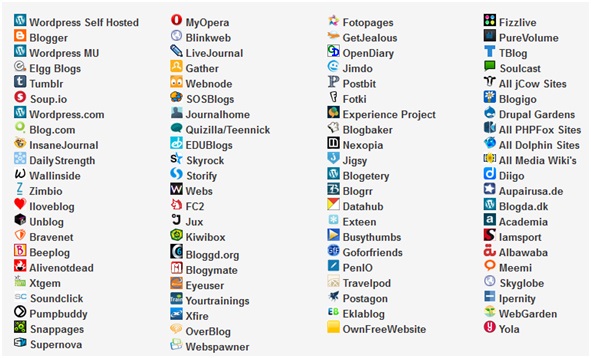
Nowadays, there are a number of additional websites supported such as Twitter. There are also sites that have been removed such as Xfire which was shit down recently. Here are all the sites that are currently supported:
FCS Networker Currently Supported Sites
So basically, you select the websites you want accounts created on and move on to the final section of the FCS Networker Account Creator. We usually select all of the websites and make a little more accounts than the number we are shooting for, but more on that later.
Account Information
This is the section which will require the attention and focus of your manual powers in order to make your blog and social networks more effective. The input fields are self-explanatory. No brain teaser there. Just to note, the email field is filled in automatically or manually. There are three ways to fill it in automatically:
- You have checked the “Get Pre-Created Email” option.
- You have checked the “Auto Create Email” option.
- Or you have checked the “Use Emails.txt Email” option in the Account Information section.
You could also uncheck all these and just copy and paste an email manually.
Now let’s look at the two checkboxes below the text inputs.
The “Auto-Gen Data Each Account” checkbox, when ticked, will force the Account Creator to auto generate a username spin, a blog title spin, and a blog description/subtitle spin for each of the selected sites. This option has a good, but also a bad side. The good side is that you won’t have to do any manual work. All you do is click the “Auto-Gen User Data” button at the bottom and you are good to go. In order to show you the bad side, let me paste you a sample auto generated user data:
Username: aloofjungle57{1|2|3|4|5|6|7|8|9|0}{1|2|3|4|5|6|7|8|9|0}
Blog Title: {{Interesting|Fascinating|Intriguing|Exciting|Useful|Helpful|Unique|Significant|Important|Remarkable|Attention-grabbing|Engaging|Captivating|Insightful|Beneficial|Compelling|Fantastic|Unusual|Worthwhile|Quite Interesting|Informative|Amazing|Stimulating|Enlightening|Thrilling|Cool|Great|Challenging|Motivating} {Thoughts|Ideas|Feelings|Views|Thought Processes|Opinions|Beliefs|Thoughts And Feelings|Insights|Musings|Reactions|Concepts|Points|Thinking Patterns|Insights And Beliefs}|{|The} {Article|Post|Write-up|Report|Document|Content|Posting|Information|Blog Post|Writing|Editorial|Commentary|Story|Publish|Material|Blog|Item|Articles|Paper|Text|Essay|Statement|Topic} {Collection|Selection|Assortment|Series|Variety|Group|Set|Gallery|Catalogue|Gathering|Accumulation|Arrangement|Compilation|Collections|Stockpile|Library|Archives|Path|Array|Chain|Wire|System|Block}|Jessicas {Blog|Weblog|Website|Blog Site|Web Site|Site|Blog Page|Webpage|Web Log|Web Page|Blog Website|Web-site|Journal|Web Blog|Page|Writings|Thoughts|Web Resource|Ideas|Articles|Opinions|Thoughts|Ideas|Feelings|Views|Thought Processes|Opinions|Beliefs|Thoughts And Feelings|Insights|Musings|Reactions|Concepts|Points|Thinking Patterns|Insights And Beliefs}}
Blog Description/Subtitle: {{Blog|Weblog|Website|Blog Site|Web Site|Site|Blog Page|Webpage|Web Log|Web Page|Blog Website|Web-site|Journal|Web Blog|Page|Writings|Thoughts|Web Resource|Ideas|Articles|Opinions} {On|About|Regarding|Concerning|Relating To|On The Subject Of|With Regards To|On The Topic Of} {Anything|Something|Anything At All|Everything|Nearly Anything|Whatever|Just About Anything|All Sorts Of Things|Things|Most Things|Almost Everything|Almost Anything|Every Little Thing|Every Thing|All Things}|{Articles|Posts|Content|Reports|Article Content|Articles And Reviews|Content Pieces|Web Content|Well Written Articles|Publications|Information|Blog Posts|Expert Articles|Articles And Other Content|Stories|Reviews|Written Content|Resources|Writing|Blogposts|Blog Posts And Articles|Information Articles|Writings|Superbly Written Articles|Useful Resources|Useful Guides|Expertly Written Content|Pages|Articles And Blog Posts|Essays} {For|With Regard To|Regarding|Pertaining To|Intended For|Designed For|Meant For|Just For|Available For|Suitable For|Concerning|Relating To|To Suit} {Everyone|Everybody|Every Person|Anyone|All People|Absolutely Everyone|All Of Us|Most People|Almost Everyone|Anybody|Every Body|Nearly Everybody|Each Person|Everybody Under The Sun|Each Of Us|Just About Everyone|Just About Every Person|Every Single Person|Each And Every One|Every Individual|Men And Women|One And All|You|All Of You|Any One}}
Let’s start with the bad news for this auto generated username. You can see that it is a very generic username randomly containing some keywords or no keywords at all. A good practice when creating your accounts is to put your niche keyword into the username. Actually a very good practice! So if I were to do this manually, I would enter something like this for the username (let’s say our niche is “fashion”):
Username: fashion{1|2|3|4|5|6|7|8|9|0}wz{1|2|3|4|5|6|7|8|9|0}
And now we will have our niche keyword right there in the account username. That is how extremely niche relevant blog networks are born. Same thing goes for the blog title and the blog description. Make sure to write something manually, or have, for example, Kontent Machine generate an about me for you, which you can then manually edit, but your niche keyword should appear there as well!
The manual method has a good and a bad side as well. We already covered the good part. The bad part is the fact that, on the more famous sites, there is a big chance that the account creation will fail, because someone already has taken that username. Even if you set the retries to 5, it might still fail 5 times, because these sites have a huge number of users.
This is the reason why, when I am creating a blog network, I always run the Account Creator using both automatically generated and manually written user data at a ratio of 50/50. Let there be balance or Mother Nature will get mad!
The final two buttons, “View Blogs/Article Accounts” and “View Social Accounts”, are again self-explanatory. They will simply show you the accounts that were created by the FCS Networker software.
Account Creator Summary
Basically, that is it for the FCS Networker Account Creator. Bottom line is, the software is extremely useful and I really appreciate what the developers have done, because I know how hard it is to create engines for sites and to keep them working all the time. Yes, the software is buggy at times, but I wouldn’t worry much about it. Most of the time, I have never had any problems with it.
The Web Based Tool (Web Interface)
Al right! We have created our awesome blog and social accounts. It is time to do some high quality link building. The Web Based Tool will quite simply help you make projects which will create quality backlinks on the blog and social networks of your choice.
The “Dashboard” Page
Here is the dashboard page you will be taken to once you login to FCS Networker's web interface (obviously I have covered sensitive data):
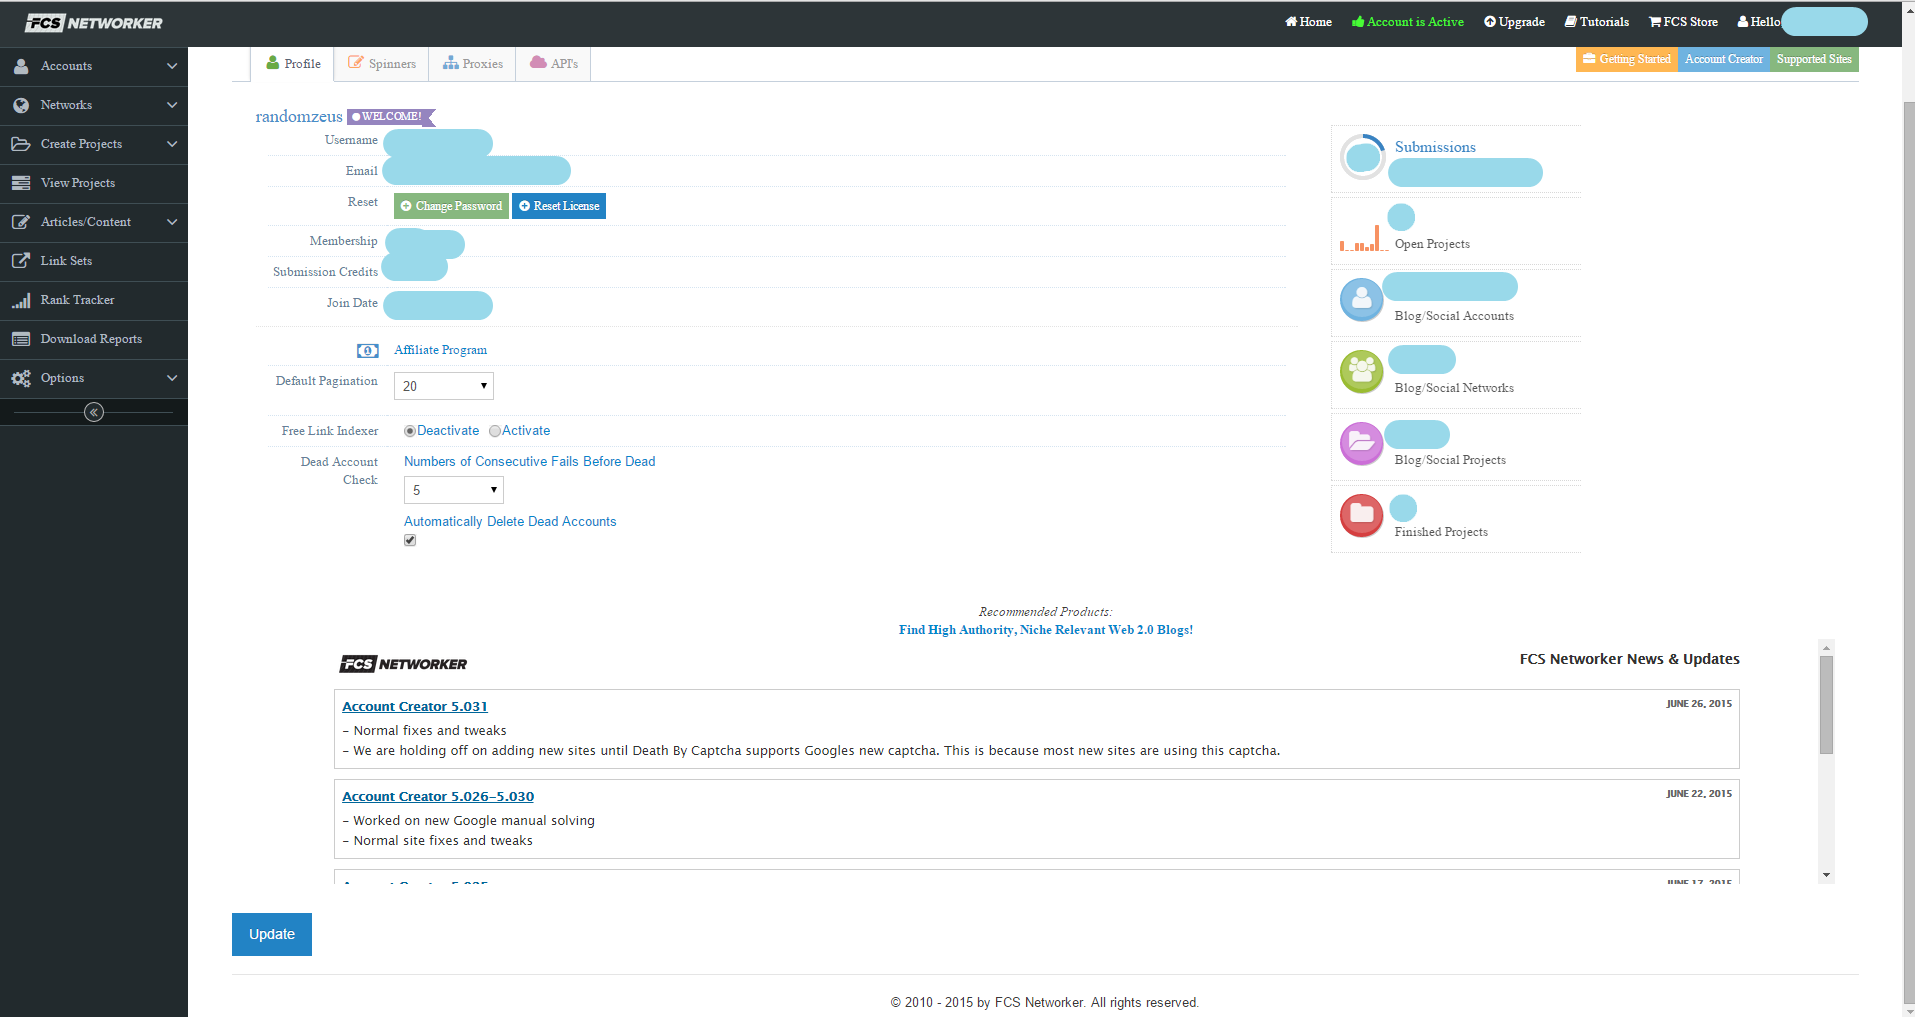
Quite naturally, this is the place where you will see a summary of all that’s happening throughout your blog and social networks, global FCS Networker settings, and a feed with the latest news and updates. Let’s look at the menus and options that actually need explanation. We start with the top right menu.
The ones that need a few words are the “Upgrade” menu, and the “FCS Store” menu:
- Upgrade – Clicking this will open a window with all the FCS Networker plans so you can choose an upgrade from your current plan. You see, the only difference between the various FCS Networker packages are the number of submissions allowed per month. Submissions basically equal a successful blog post or social bookmark, or any other type of content posted on any of the blog and social accounts you have created. I want to note again that FCS Networker has had a tremendous rise in interest as of late so the bigger plans are rarely available and I suggest you buy them if you happen to catch one available.
- FCS Store – This will take you to a page where you will be able to buy blog and social accounts directly, so if you are too lazy to create them on your own using the FCS Networker Account Creator, this one is for you.
That’s it for the top right menu. Now, lets take a look at the different tabs that you see at the top left corner of the dashboard page:
Profile Tab
This tab is the currently selected one from the picture above. As you can see, it simply shows summarized information about your account i.e. number of submissions so far this month, number of open projects, number of blog/social accounts, number of blog/social networks, number of blog/social projects, number of finished projects, etc.
There is something here that I wish to point out, and it is the “Dead Account Check” option. Now, you would want this turned on, because after all, you wouldn’t want to waste time trying to post to dead accounts. 5 consecutive failures to post on a particular account is an optimal configuration to mark an account as dead.
Now, divert your attention to the “Automatically Delete Dead Accounts” option. I want you to be careful with it and here’s why. If your FCS Networker account was just created, you would want this ticked so it will automatically delete dead accounts, however, if you already have older blog/social networks with accounts that might have gotten a nice PA from the time of their existence, you would want to uncheck it. Why? So you can see these supposedly authority accounts that have died, and re-register them manually, before someone else does. Just a tip.
Spinners Tab
This is where you will enter your spinner credentials which FCS Networker will use throughout your projects. Supported spinners are:
- Free Spinner – the in-built spinner (default)
- Best Spinner
- Spinner Chief
- Spin Rewriter
- WordAI
When you enter you spinner credentials you will also be able to choose some options for each of them that are provided by their respective APIs.
Proxies Tab
This is where you will be able to enter the details of your proxies. Don’t worry though. The good people at FCS Networker have created in-built proxies which are used if you don’t explicitly add your own, so this is not mandatory. However, if you have some nice private proxies from, for example, BuyProxies, it wouldn’t hurt to use them, but only for the account creation process. I have found that there is no need for proxies when you are submitting to your blog/social networks. The in-built ones already do a great job.
API’s Tab
This tab is where you will be entering third-party API keys from various other link building tools for SEO such as:
- Instant Link Indexer
- Incredible Indexer
- Express Indexer
- One Hour Indexing
- ArticleBulder
- Kontent Machine
- GSA Search Engine Ranker
The one you will surely be taking advantage of is the Kontent Machine API, but more on that later. I have already explained how we integrate Kontent Machine generated content with our FCS Networker projects by simply copy-pasting the campaign ID from Kontent Machine (Check out our Kontent Machine review for more information regarding this strategy, but it will be included here as well).
Basically, that is it for the “Dashboard” page. Now, let’s look at the main menu on the left hand side. Some of these, when clicked, drops down several other sub-menus and we will take a look at each one of them as well.
The “Accounts” Menu
The “Accounts” menu has two sub-menus – “Blog Accounts” and “Social Accounts”. Basically, each of these pages lists all of your blog or social accounts in a paginated table with the following columns:
- Checkbox – used for the “Bulk” actions menu
- Site
- Email used for the registration
- Username
- Password
- Direct URL to the account i.e. randomzeus.wordpress.com
- Number of posts that the account has received from your projects
- Actions bar which includes the following options:
- Edit – where you can edit all account info mentioned above including resetting the number of failed posts, so that you give it some chance of survival before the FCS Networker Grim Reaper comes for its soul. Remember that after 5 failures it goes to the accounts’ underworld to fight demon lords such as pandas, penguins and hummingbirds. Boy, are those scary or what?
- Login – clicking this will directly log you into the account, if you have installed a browser add-on that FCS Networker provides.
- Delete – send it to the accounts’ underworld.
- Remove From Network – remove the account from its respective blog/social networks.
- Networks – this will show the blog/social networks that the account is included in.
Above the table of accounts you have a few options that will help you perform actions on your creations:
- Add Account – manually add a new blog/social account.
- Import Bulk Accounts – import many accounts from a file (text or .zip) and select which network to add them to.
- A Drop-Down Box – you can choose to show accounts only from a certain blog/social network.
- Bulk Menu:
- Delete – send multiple accounts to the next life.
- Accounts Download – download all available information about the selected accounts.
- Remove From Network – remove selected accounts from their respective blog/social networks.
- Download Homepage URL’s – download only the homepage URLs of the selected accounts i.e. kerry0dawson89.wordpress.com (no it’s not a real account, or is it?).
- Search – search for accounts by username or email.
The “Blog Accounts” and “Social Accounts” pages are basically identical with the difference that one performs actions on blog accounts and the other on social accounts.
The “Networks” Menu
The “Networks” menu has two sub-menus – “Blog Networks” and “Social Networks”. Again, both identical with the same difference as with the “Blog Accounts” and “Social Accounts” menus.
Basically, the “Blog Networks” and “Social Networks” will list your blog and social networks in a paginated table style with just 3 columns – Checkbox (used for the “Bulk” actions menu), name, actions bar.
The actions bar allows you to perform the following actions on your blog/social networks:
- Download Homepage URL’s
- Download Network Accounts
- Edit – edit the name of the blog/social network.
- Notes – this is useful if you have way too many blog/social networks and bad habits of naming.
- Delete Network and Accounts – this will delete the entire network along with all the accounts contained in it.
- Delete Just Network – this will delete just the network, leaving all the accounts that were in it as “free agents”.
- Delete Dead Accounts – this will delete all the accounts from the network that were marked as dead and is useful if you have unchecked the “Automatically Delete Dead Accounts” option from the “Dashboard” page.
Above the table you have an input field where you can enter the name of a new blog/social network and a button called “Create Network” which will, yes you guessed it, create your new network. There is also a “Bulk” menu which can:
- Add Network Accts. To Network – this option will take all the accounts from the network(s) that you have selected and send them to another blog/social network of your choice. There is also an option to delete the selected network(s) which means that this basically can migrate blog/social accounts from one network to another.
- Download Network Accounts – downloads all the information for all the accounts in the selected networks.
- Delete – this will delete the networks that you have selected, but not the accounts contained in them.
Beside the “Bulk” menu you have a checkbox titled “Show Network Counts” which will quite simply add a new column to the table with the number of accounts in each of the listed networks. And again, you have a search bar to help you find your blog/social networks easier.
The “Create Projects” Menu
This is where it gets interesting as we are about to create a new project which will post some nice quality backlinks to our websites and help them rank in search engines. The “Create Projects” Menu has two sub-menus – “Create Blog Project” and “Create Social Project”. These have some differences so we will look at each of them separately. Let’s start with the “Create Blog Project” page.
The “Create Blog Projects” Page
Here is a view of the page so you won’t have to use your imagination for this one:
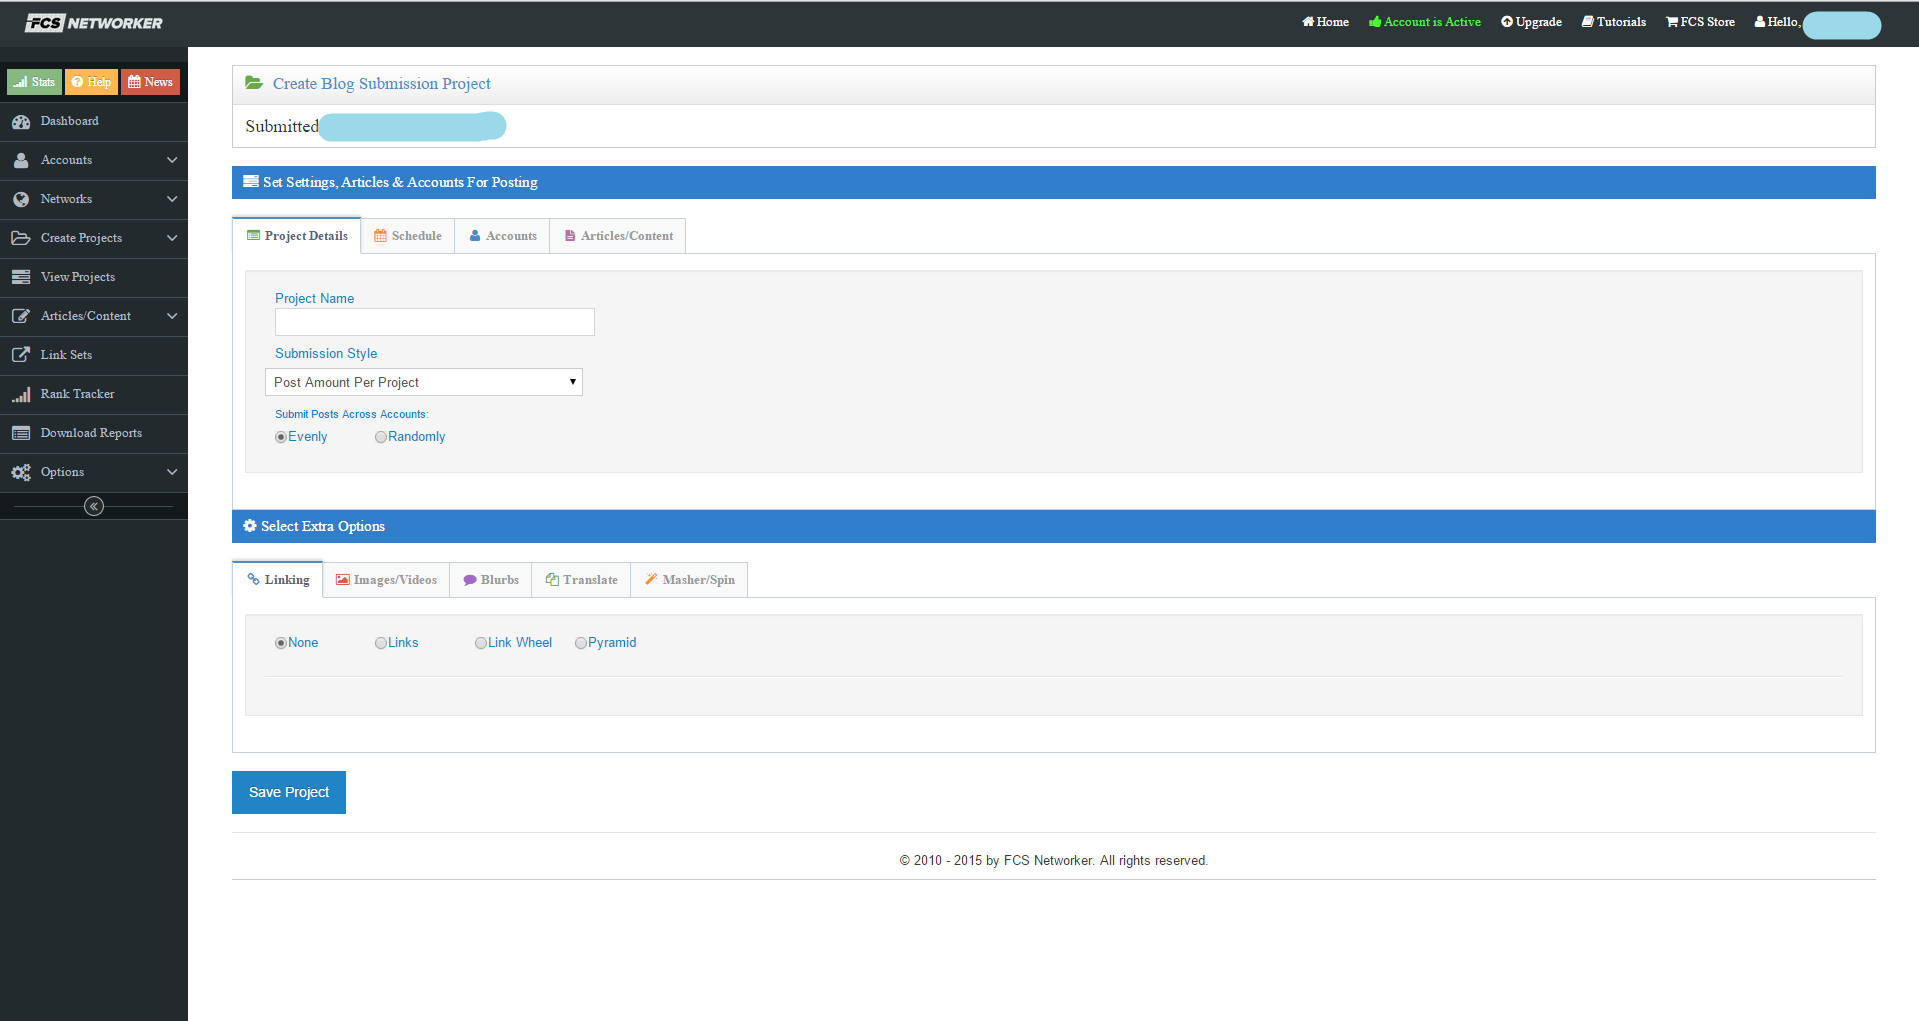
So as you see, there are two sections – “Set Settings, Articles & Accounts for Posting” and “Select Extra Options”. Let’s start with the first one.
The “Set Settings, Articles & Accounts for Posting” Section
We shall look at each of the tabs in this section and what they are all about.
The “Project Details” Tab
This is where you would enter the name of your project and the submission style. When it comes to the project’s name, again, I strongly advise that you come up with a convention for your projects’ names and use that from the get-go. That way you will build a habit and be able to quickly recognize the purpose of each of your projects.
Let me give you an example. Let’s say that I will be running a blog project on a network named “Insurance Blog Network” and this will be filler content for all the accounts on that network (I don’t want these sites to think that I’m using them only for quality backlinks, or they will feel slutty and leave me). In such a case, I would name this project something like this: “Insurance Filler Content BP #0”. The “BP” stands for blog posts (who would have figured right?) and, yes, I start counting from zero, because I am a coder as well (and I do ride the occasional bicycle too in case you were wondering).
Now, the “Submission Style” drop-down menu has the following options (for each, the small section right below it, where in the snapshot above you see “Submit Posts Across Accounts”, changes):
- Post Amount Per Project – this will basically allow you to set a certain number of submissions that you would like and when these are done, the project will be marked as finished. You can see that for this option, you have a choice between “Evenly” and “Randomly” distributing the posts throughout the accounts that you will select in the “Accounts” tab.
- Post Amount Per Account Per Day – with this option, you will be able to enter the number of posts you would like for each account every day in a box right below the drop-down menu (as I told you, it changes with the selection).
- Post Amount Per Account Per Week – same as above, just change the word “day” with the word “week”.
The “Schedule” Tab
You have three input fields on this one:
- Days or Weeks To Drip – number of days or weeks the project will be running. Depends on the “Submission Style” you selected from the “Project Details” tab. This option will simply spread the number of links that you want created, equally over the number of days the project will be running so that you don’t cause any link spikes and risk penalties for your website.
- Project Start Date
- Project Start Time
The “Accounts” Tab
On this tab you will be able to select the target accounts on which the project will be posting articles with quality backlinks. You can select individual accounts or whole networks. You also have a checkbox titled “Activate Guaranteed Posting”, which will allow you to select another blog network (could be the same) as a backup for your project. In the case when the project fails to post to an account from the main selection, it will go and take another account from the backup blog network and try and post on it.
The “Articles/Content” Tab
This is where you will supply the content for your campaign. You have the chance to choose from the following strategies, if you will:
- Saved Articles – this will allow you to choose from articles that you have imported into FCS Networker (we will look at the “Articles” menu later).
- 1 Spun article – this will show 4 input fields – title, content, tags, and categories (for WordPress blogs). You can fill these manually, using either already spun content, or spin content from within FCS Networker which will use the spinner that you selected from the “Spinners” tab in the “Dashboard” page. You also have the option to preview the article which will generate an unspun version of it.
- Auto-Content Syndication – selecting this will allow you to choose from various sources such as CNN, FoxNews, Yahoo Answers, etc and FCS Networker will automatically go there and scrape relevant content. Relevant to what? You will be able to enter your keywords in an input field and also specify whether you want to keep the links in the scraped article and whether you want to add a citation at the end.
- Auto-Gen Content – you enter a keyword, select a category, choose the quality you would like (least readable, mid readable, most readable), choose the number of paragraphs you would like and you are good to go. FCS Networker will now automatically generate content for your project.
- Upload Articles – this will open a window where you will be able to select a text or a .zip file with your articles and upload them into your FCS Networker account. You will then be able to choose how these articles are submitted among the accounts imported into the project – each article once to each account, each article a number of times and whether you want to delete the article after submission.
- Article Builder – if you have configured the Article Builder API from the API’s tab on the “Dashboard” page, this is where you can take advantage of that.
- RSS Feeds – this will allow you to use content from RSS feeds, which you can fill in (each on a new line) and select, again, whether you would like to keep the scraped article links, and add a citation at the end.
- Kontent Machine – this is the one we actually use and is the simplest, because it will allow you to leave the “Select Extra Options” section as it is because it will all be ready. The way it works is explained here (search for cloud). Basically, we build content using Kontent Machine 3, add contextual links directly from Kontent Machine, add images/videos, and we then upload the campaign to the cloud. It gets a unique campaign ID, which we simply copy and paste into the field that is opened once you select this method for FCS Networker project content generation. That’s it. Now, the project will take content from that campaign which already has all the links, images and videos inserted into it.
At the bottom of the “Articles/Content” Tab, there is a checkbox – “How Many Submission?”. The default value that is selected means that the campaign will post to each of the accounts that were selected in the “Accounts” tab once. If you uncheck it, you will be able to manually enter the number of submissions you want. That’s it for the “Set Settings, Articles & Accounts For Posting” section.
The “Select Extra Options” Section
We usually surpass this one, but in cases when we need different types of quality link building structures such as link wheels or link pyramids, this section is useful. Let’s look at each of the tabs in the section
The “Linking” Tab
Now, if you haven’t inserted your contextual links directly into your content, this is where you can add them manually. You have three options that you can choose from.
The first one is “Links”, which will open a section below where you will be able to select your URLs, main and secondary anchors, ratio between them, percentage of articles that will get links, percentage of naked URLs, positioning (random, replace keywords, between paragraphs and bottom, or just bottom), and the amount of links per each article.
The second one is a “Link Wheel” structure. For those who are not aware what a link wheel is:
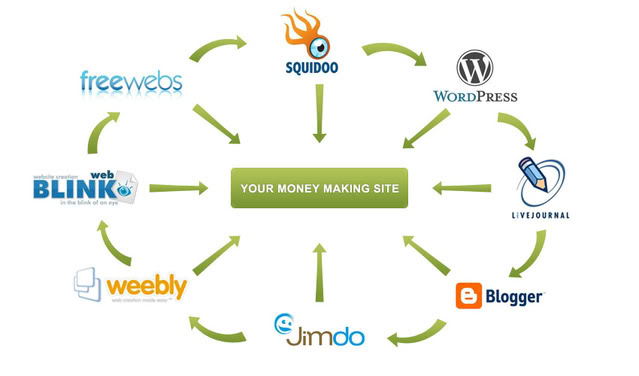
As you see, each blog post will not only link to your website, but also to another blog post from your FCS Networker project. That way, it not only passes juice to your website, but also to another blog post that points to your website, and it does the same, virtually empowering the link juice that is transferred to your main website. Is this safe? Does it still work? I will say yes and no. It might work, but it also might not work. Search engines, and more specifically, Google, have become good at picking up strategies like this. I would recommend good old quality direct link building, but hey, there is always an exception. There are so many factors at play in SEO that it is almost impossible to be certain of something. The SEO environment is changing daily you know?
Okay, back to the “Link Wheel” option. Now that you know what it is, you will, again, be able to select your target links i.e. URLs from your website, their anchors, the anchors of the link wheel links i.e. the anchors for the links that will point to other blog posts from the project, the positioning of the links in the content, and the number of links per article.
The last option you have is to create a link pyramid. Again, for those unaware:

This option will allow you to select another of your FCS Networker projects as target URLs, meaning that the current project which you are creating is going to act as Tier 2 or Tier 3 respectively depending on the parent project you have selected. You will also have the option to select whether this project should wait for the project with the target URLs to finish, so it can build baclinks to all the links from it, and not just a sub-set. You can again choose pyramid anchors, positioning, and amount of links per article.
There are two common checkboxes for all the three structures:
- Secondary Links – this will allow you to import another set of links and their anchors, specify the percentage of articles that should get these links, their positioning, and the amount per each article.
- Authority links – this will allow you to enter a keyword, percentage of articles that will get authority links, positioning, and number of authority links per article. This is usually done for a more natural looking blog post.
That’ it for the “Linking” tab, however, as I told you, we usually do not even tweak here as all is done through Kontent Machine 3. Moving on.
The “Images/Videos” Tab
On this tab, you will be able to configure options for images and videos to be inserted into your articles. These include:
- Using your own images or videos
- Keywords for images and videos to be scraped by FCS Networker
- Positioning
- Amount of images and/or videos per article
- Alignment of images
The “Blurbs” Tab
A blurb is basically content that will be inserted randomly into your articles. This is for the purpose of making articles more unique. You can choose from the blurbs that you have manually added through the “Blurbs” page (we’ll get to that soon enough), select the positioning (random, just top, just bottom, or between paragraphs and bottom) and let FCS Networker insert some unique content into your articles. You have the option to choose no more than 2 blurbs which is more than enough. The blurbs themselves can also be spun content, so there will be millions, if not billions unique versions of your article with these inserted into it.
The “Translate” Tab
This is where you can let FCS Networker automatically translate your content from a number of languages. Supported ones are:
- English
- Arabic
- Azerbaijani
- Belarusian
- Bulgarian
- Catalan
- Czech
- Danish
- German
- Greek
- Spanish
- Estonian
- Finnish
- French
- Hebrew
- Croatian
- Hungarian
- Armenian
- Indonesian
- Italian
- Georgian
- Lithuanian
- Latvian
- Macedonian
- Dutch
- Norwegian
- Polish
- Portuguese
- Romanian
- Russian
- Slovak
- Slovenian
- Albanian
- Serbian
- Swedish
- Turkish
- Ukrainian
The “Masher/Spin” Tab
You basically have three checkboxes to select from here:
- Shuffle Paragraphs
- Shuffle Sentences
- Spin
The functionality of each of these is clear as a whistle.
At this point, we are basically done with the blog project and it is time for one final re-check to make sure everything is flawless before you click the “Save Project” button, which will create and start the project. Not too shabby huh? This was a lot of writing, but if you simply generate content using Kontent Machine, you will be setting up projects in a matter of seconds.
The “Create Social Projects” Page
I will not be teasing your imagination in this section as well:
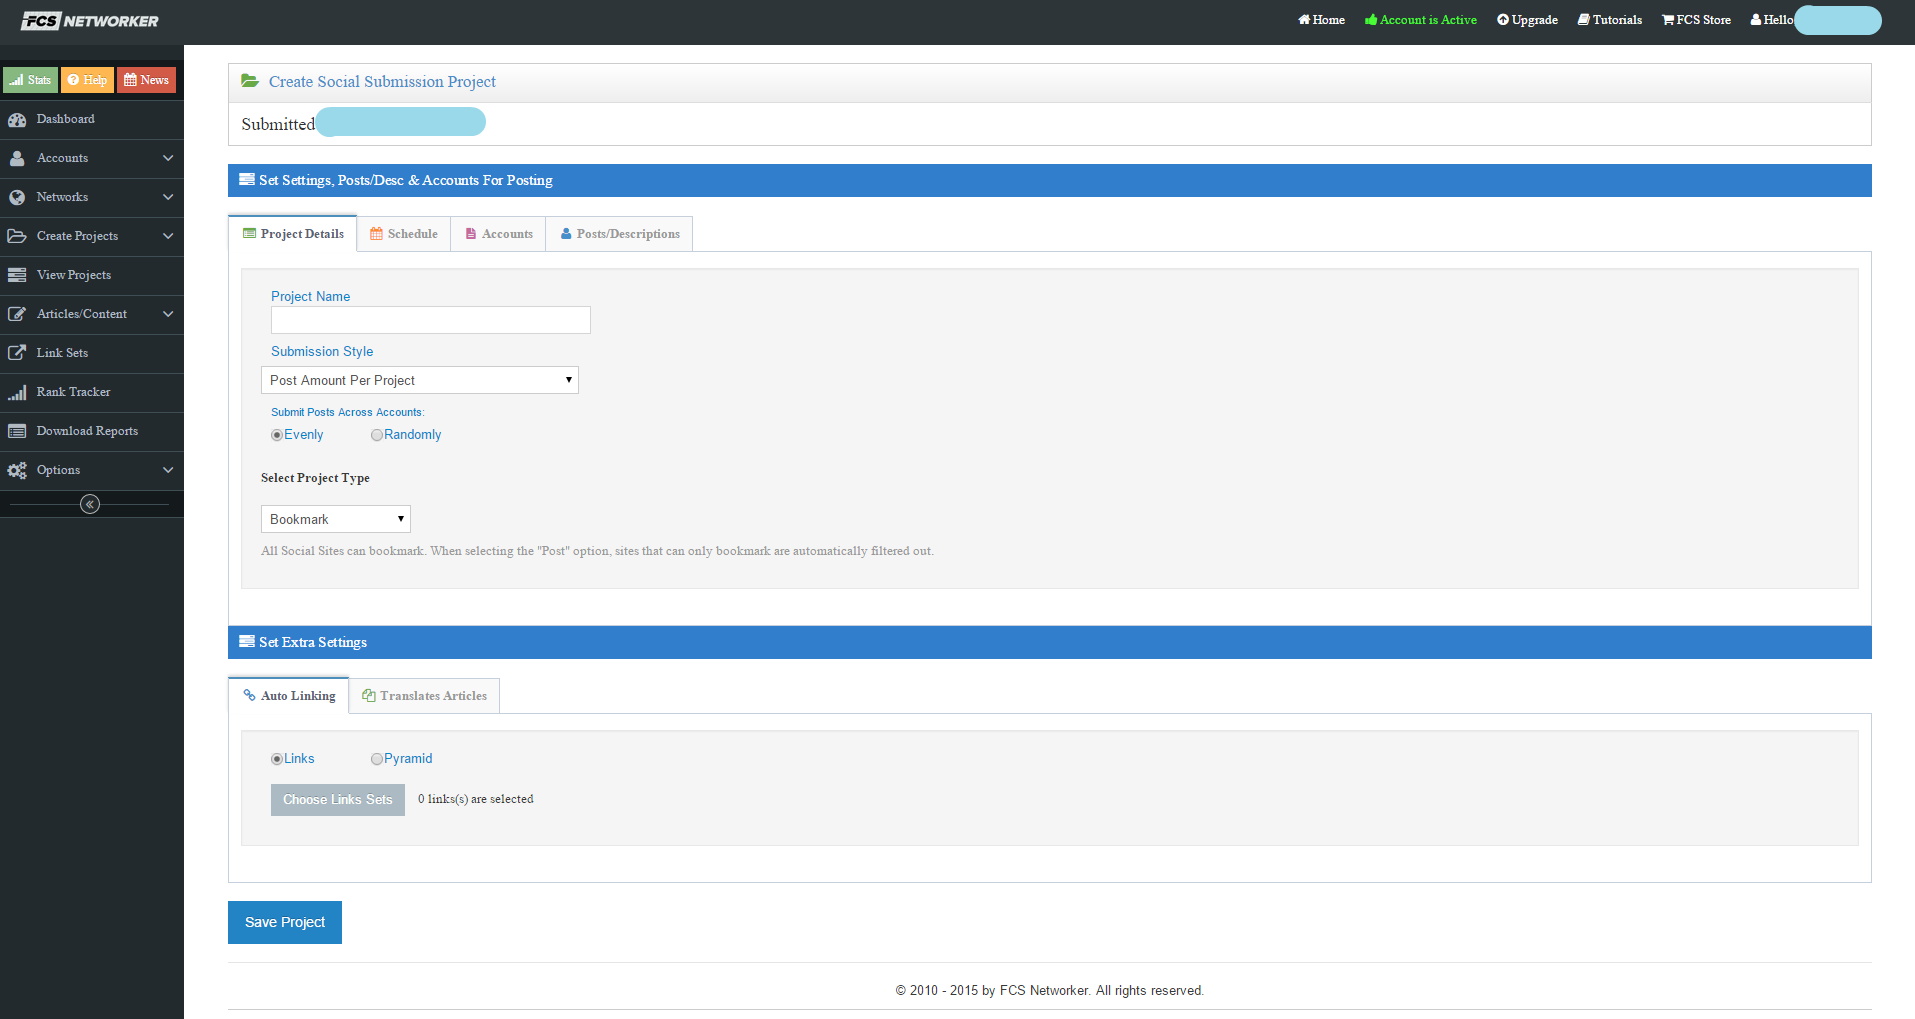
As you can see, again, we have the two sections: “Set Settings, Posts/Desc & Accounts for Posting” and “Set Extra Settings”. We will look at each of them again and explain only the ones that differ from the “Create Blog Projects” page.
The “Set Settings, Posts/Desc & Accounts For Posting” Section
This section again has 4 tabs as was the case with the “Create Blog Projects” page. Here are the things that differ from the tabs in the “Create Blog Projects” page:
- In the “Project Details” tab there is an additional drop-down which you can use to select the type of posts (bookmarks, or posts). Keep in mind that not all social accounts support posts so if you select this option, the bookmark ones will be filtered out.
- The “Schedule” tab is identical
- The “Accounts” tab is identical
- The “Posts/Descriptions” tab is where you can add the content for the project and you have three options:
- Posts – this will allow you to select from your pre-defined articles in the “Articles/Content” menu (we will get to that a little down the road).
- 1 Spun Post – same as with the “Create Blog Projects” page.
- Auto-Gen Content – again, same as with the “Create Blog Projects” page.
The “Set Extra Settings” Section
This section has only two tabs for the “Create Social Projects” page:
- Auto Linking – this is where you can select between a normal linking strategy or a link pyramid, again same options or less than the “Create Blog Projects” page.
- Translates Articles – again, identical with the “Create Blog Projects” page.
Now, as you saw, there is no integration with Kontent Machine 3 for social projects, which would make things, again, a lot easier. However, I have discussed this with the support of FCS Networker and they said that they are working on it and it should be available very soon. So hold on tight.
And now, you are ready to do a re-check and click the “Save Project” button to create and start the brand new social project. Happy bookmarking mate.
The “View Projects” Menu
This is an overview page of your running and finished projects. Here is a sneak peek:
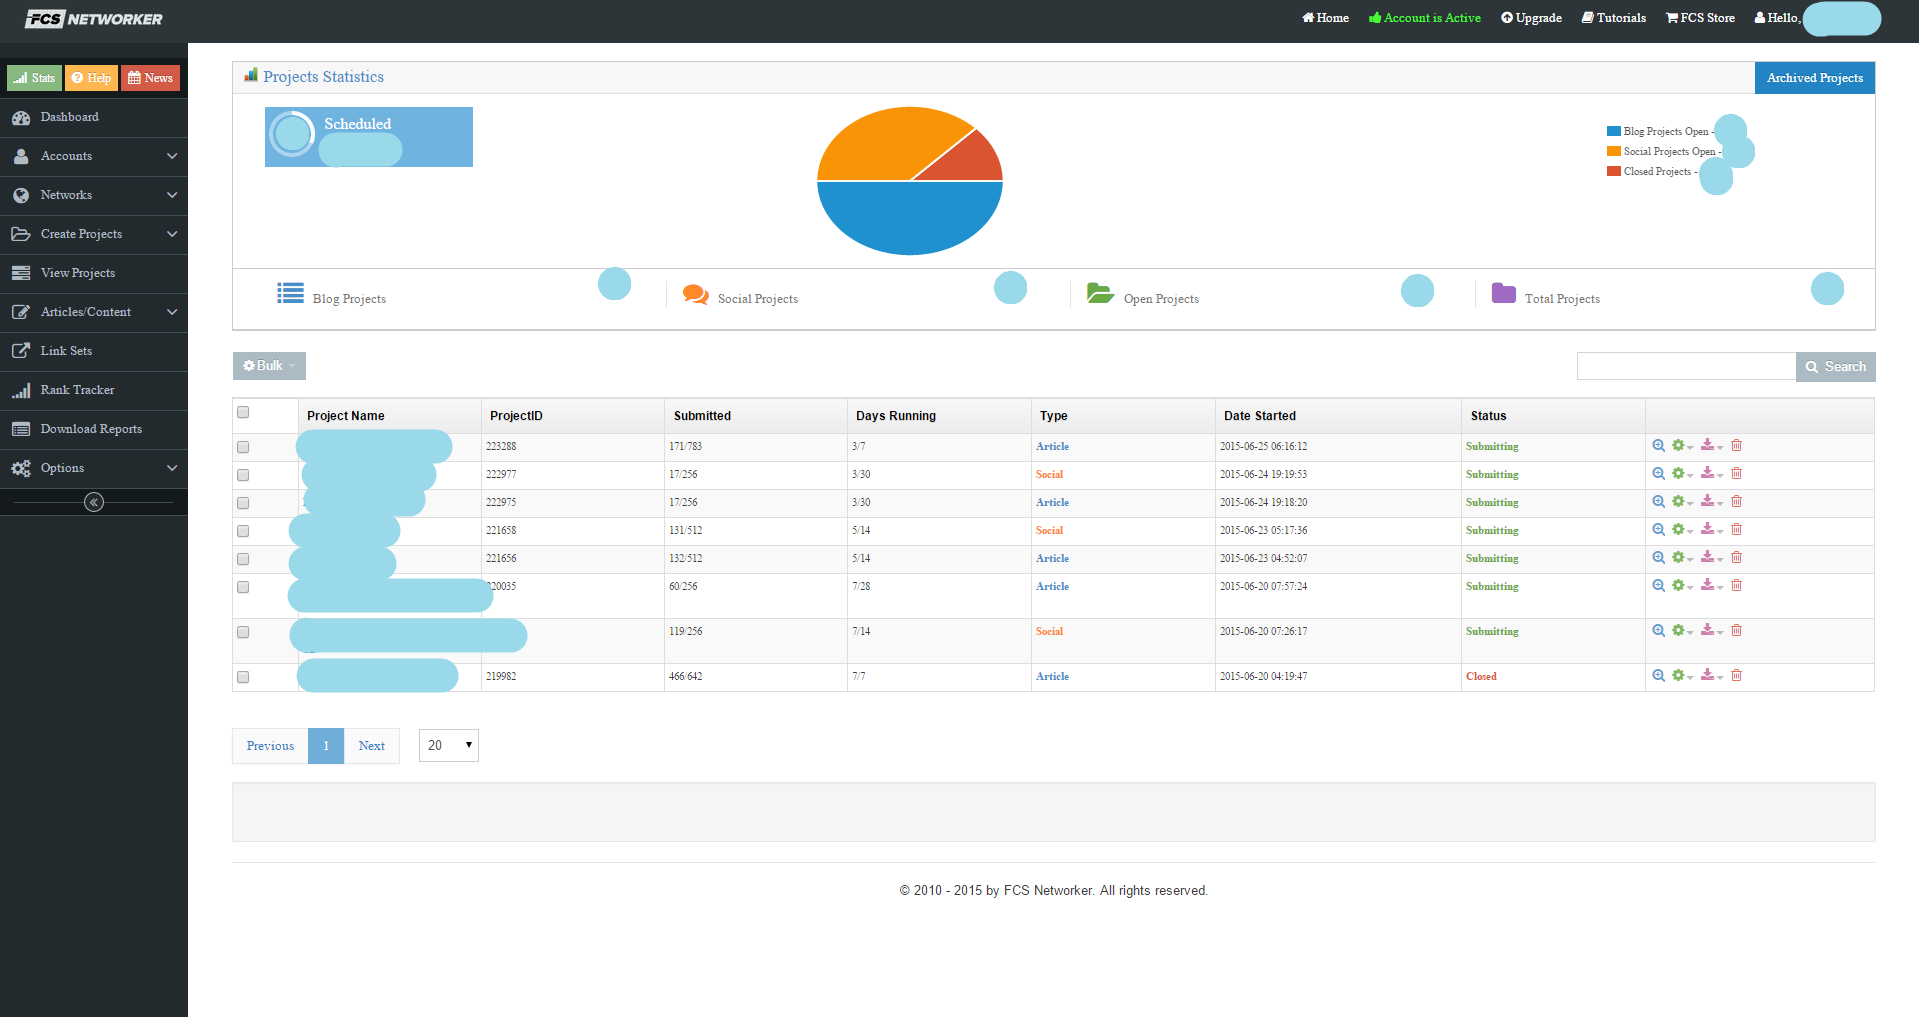
As you can see, the “View Projects” page basically lists all of your projects in a table format. All is self-explanatory except for the last column of the table. Let me take you through the actions you can perform on your projects. As you can see, there are 4 buttons. The last one is easy – it deletes the project. Let’s focus on the remaining three that are still in the world of the living.
The “Search Icon” Action Button
Clicking this will take you to the page of the project itself. On that page, you will find detailed information about the project at hand:
- Percentage of posts completed
- Number of days passed and number of days the project is scheduled to run for
- Number of submitted posts
- Number of successful posts
- Number of live links
- Number of posts that are scheduled
- A pie chart showing statistics for the above 4
- Action buttons for stopping, deleting, duplicating, adding a tiered project, viewing project settings, verifying the links (instantly), and downloading the live links (plain text, CSV, or whitelabel report).
All of the above are in one section – very compact. Below that is a table with all the scheduled posts which contains the following columns:
- Account username
- Site
- Network – this is a bit misleading as it does not represent the blog/social network of the account, but rather the domain the account is on i.e. WordPress.
- Article to be posted
- Status – if the scheduled post has already been executed, this is where you will see a link to the post itself.
- Submitted – date of submission, or status “Pending” if it is yet to be submitted.
- Action – this will show, again, date of submission or an action bar if the post is in status “Pending”. The action bar contains the following options:
- Preview Article
- Delete Article
- Delete Account
That wraps it for this page.
The “Settings Icon” Action Menu
This will show a number of options when clicked:
- Stop Project
- Re-try Failed Accounts
- Delete Dead Accounts
- Delete Failed Accounts
- Edit Name
- Edit Notes
- Duplicate Project
- Project Settings
- Edit Project
- Quick Tier
- Archive Project
All are self-explanatory. I just want to note that if you wish to, later on, edit the number of days a certain project is to be drip fed for, you cannot lower the number, you can only increase it. Keep this in mind.
The “Save to Disk Icon” Action Menu
This will allow you to download live links from the selected project in the following formats – a simple text file, homepage URLs (the URLs of the accounts that the links were posted on), CSV Excel report, and white label report, which is basically a PDF with a table which includes all the links and info about them.
At the top right of the “View Projects” page there is a button – “Archived Projects” – where you can see your, well, archived projects. And basically, that is all there is to this page. Forward.
The “Articles/Content” Menu
This is where all of your projects’ content will reside if you choose to manually add it instead of using a third-party source. There are 5 sub-menus here:
- Articles
- Article Sets
- Social Posts
- Post Sets
- Blurbs
The “Articles” Page
This page is where you will be managing and performing actions on the articles stored in your FCS Networker account:
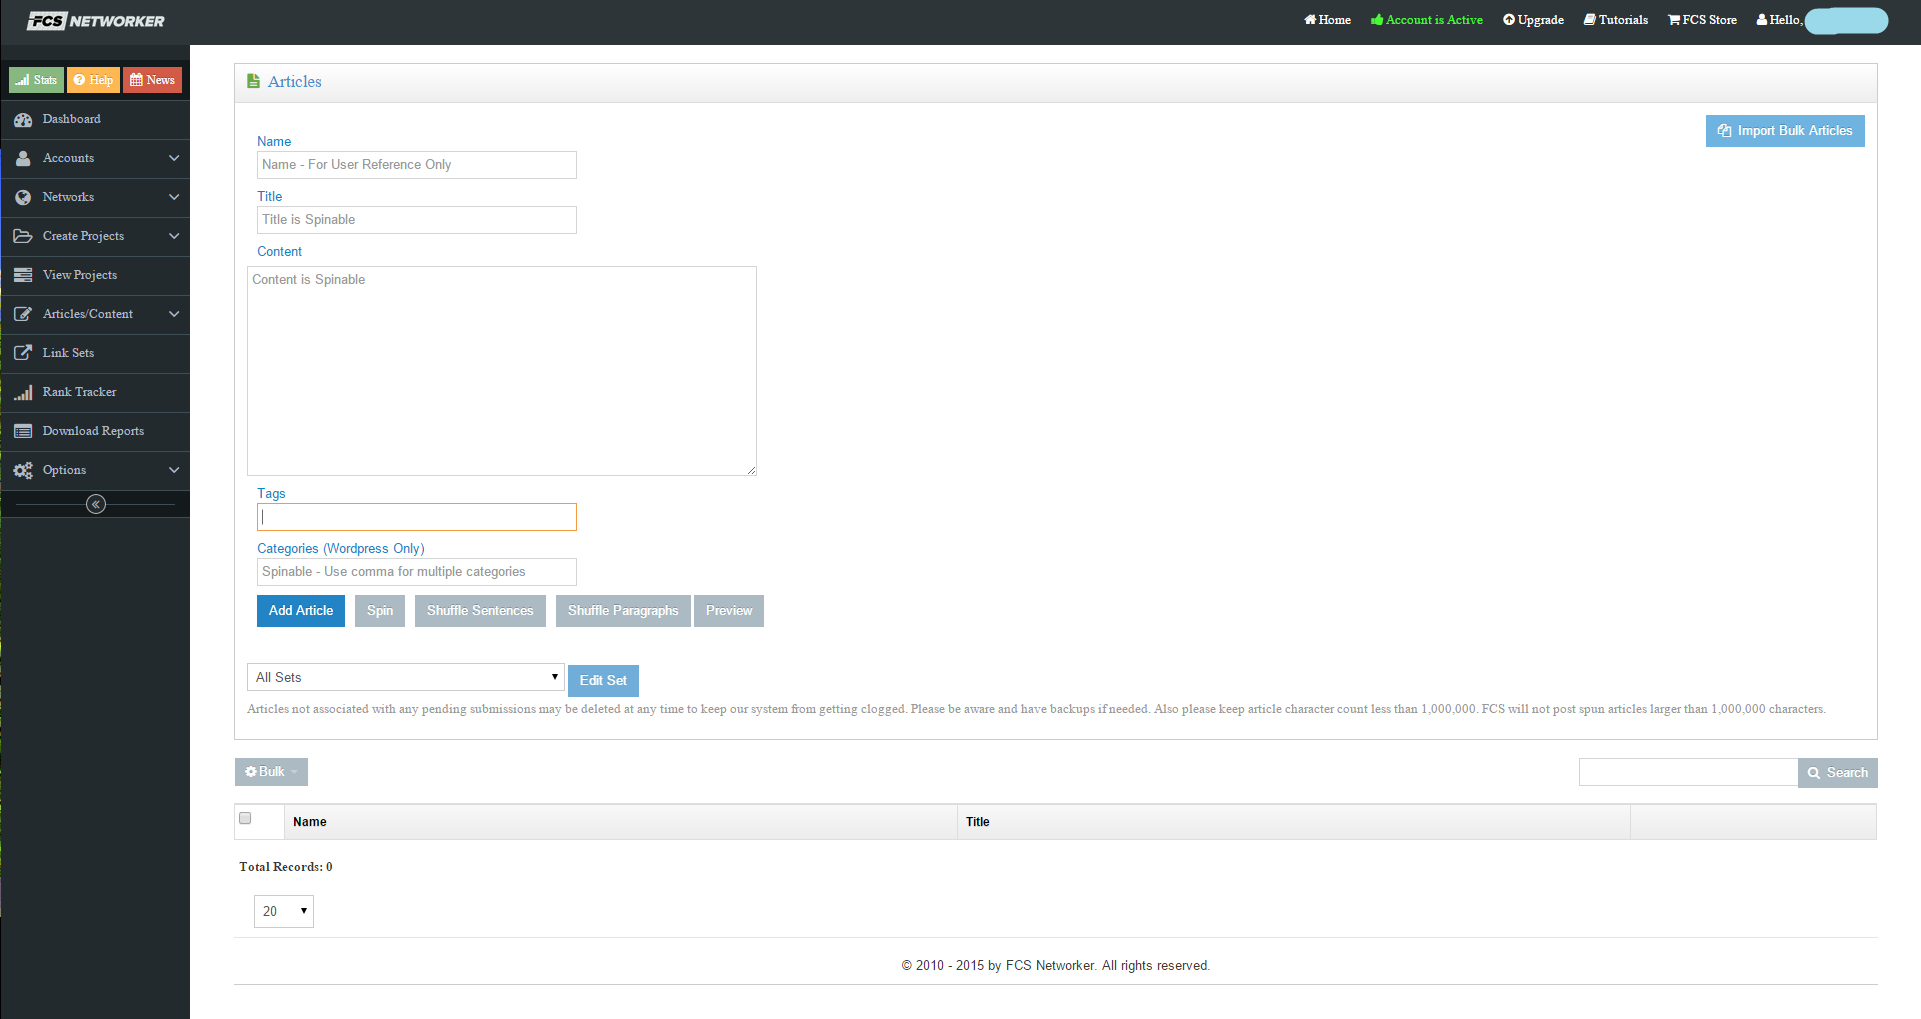
As you can see, you simply fill in the fields, name you article accordingly (critical importance), spin, shuffle, or preview, and then click the “Add Article” button to add it to the database. Also, please look at the little grey words below the “Edit Set” button. Keep this in mind when adding articles.
The top right has the “Import Bulk Articles” button which opens a window where you will be able to select a .zip or text files, choose an article set to import them into, add tags and categories, and import the articles into FCS Networker. This is useful if you are generating content from a third-party source that does not have an API integrated with FCS Networker, but has a template to export for FCS Networker. You just put the articles into a .zip archive and you import them. Green light.
The table below the add or import section will simply list your articles. The final column, when you have articles, will show you an actions menu with the following options:
- Preview
- Edit
- Download Article
- Spin
- Shuffle Paragraphs
- Shuffle Sentences
- Remove From Set
- Delete
And that’s it for the “Articles” page.
The “Article Sets” Page.
The article sets in FCS Networker are simply a way of grouping articles for an easier use in projects later on:
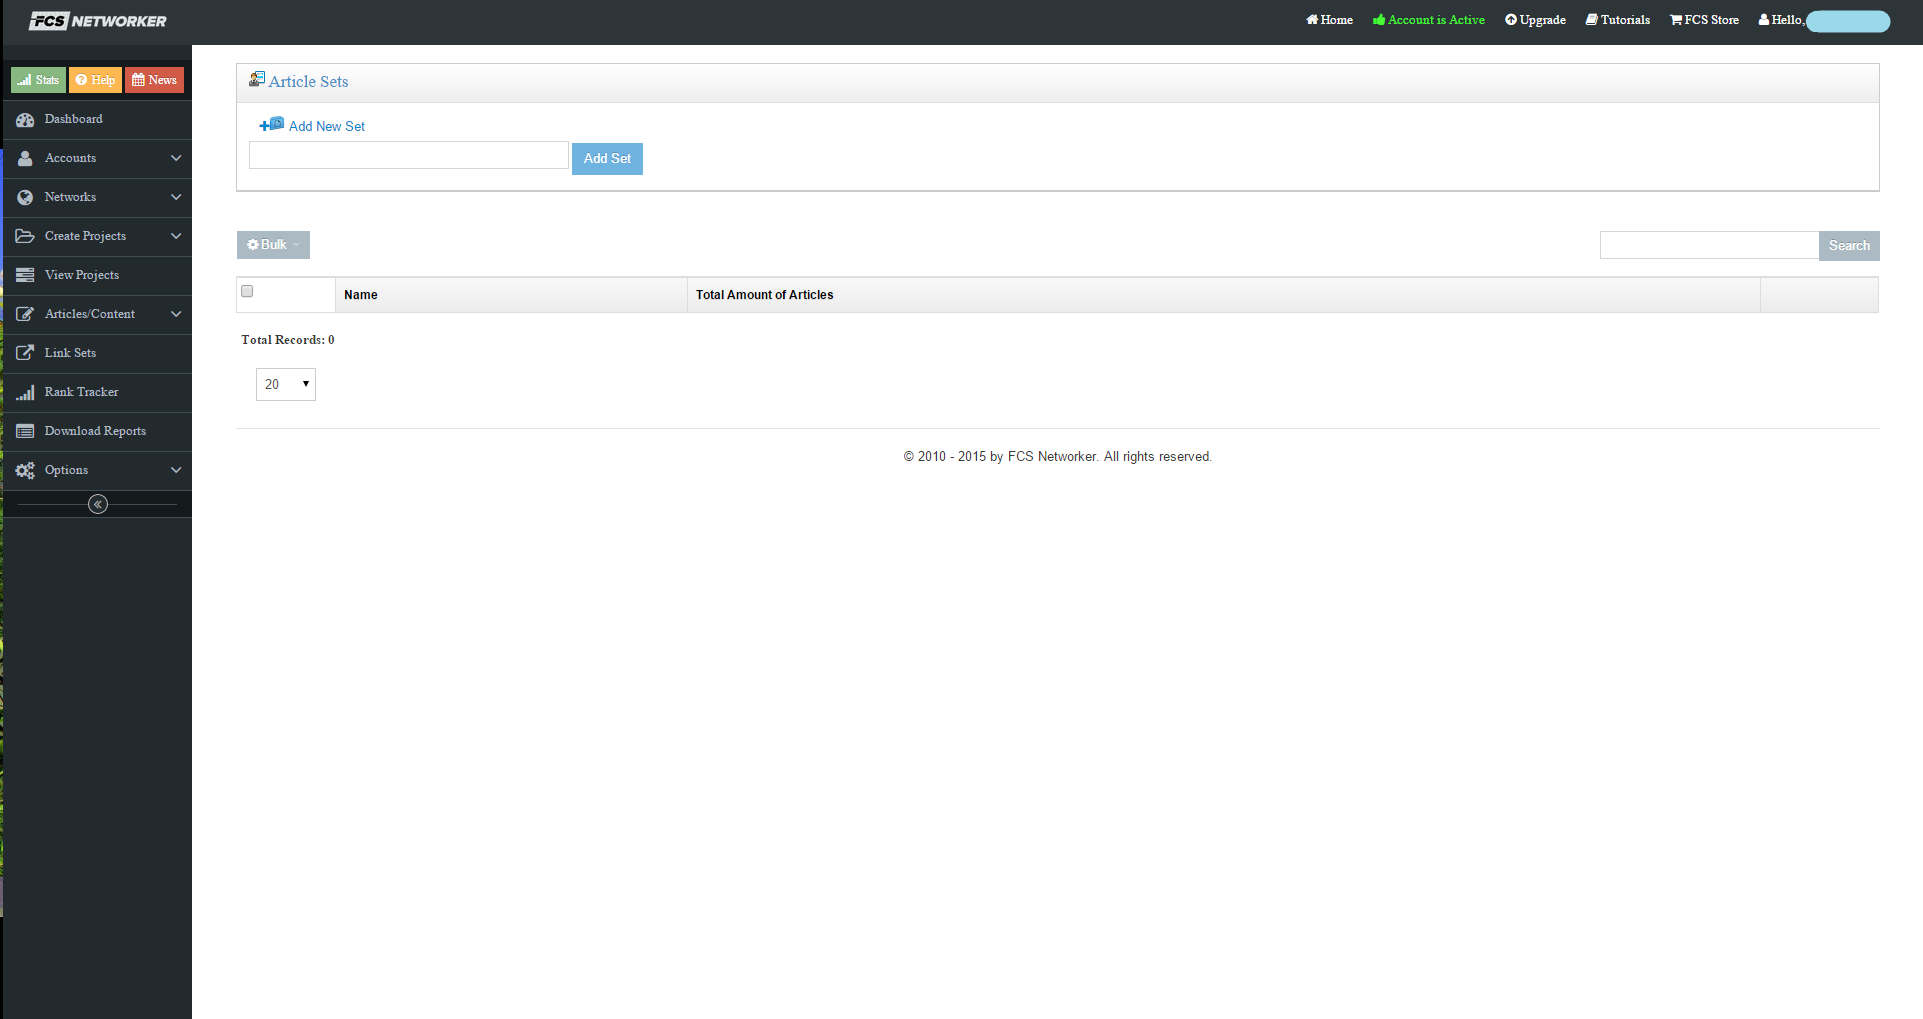
As you can see, you simply enter the name of your article set and you are good to go. Then, when you add new articles from the “Articles” page, you can choose which article set to add them to. Simple as that. When you add a new article set, the final column, again, is an actions menu with the following options:
- Articles – this will show the articles in the article set
- Edit – this will simply allow you to edit the article set’s name
- Delete Set & Articles – this will delete both the article set and the articles contained in it
- Delete Just Set – you know it
The “Bulk” menu above the table with the article sets has two options – “Add Sets to Set” and “Delete”. The “Delete” action will delete only the article sets you selected and not the articles inside of it. The “Add Sets to Set” will import all the articles from the article sets that you have selected using the checkboxes in the first column to the article set of your choice.
The “Social Posts” Page
Next, we move onto the social posts managing page:
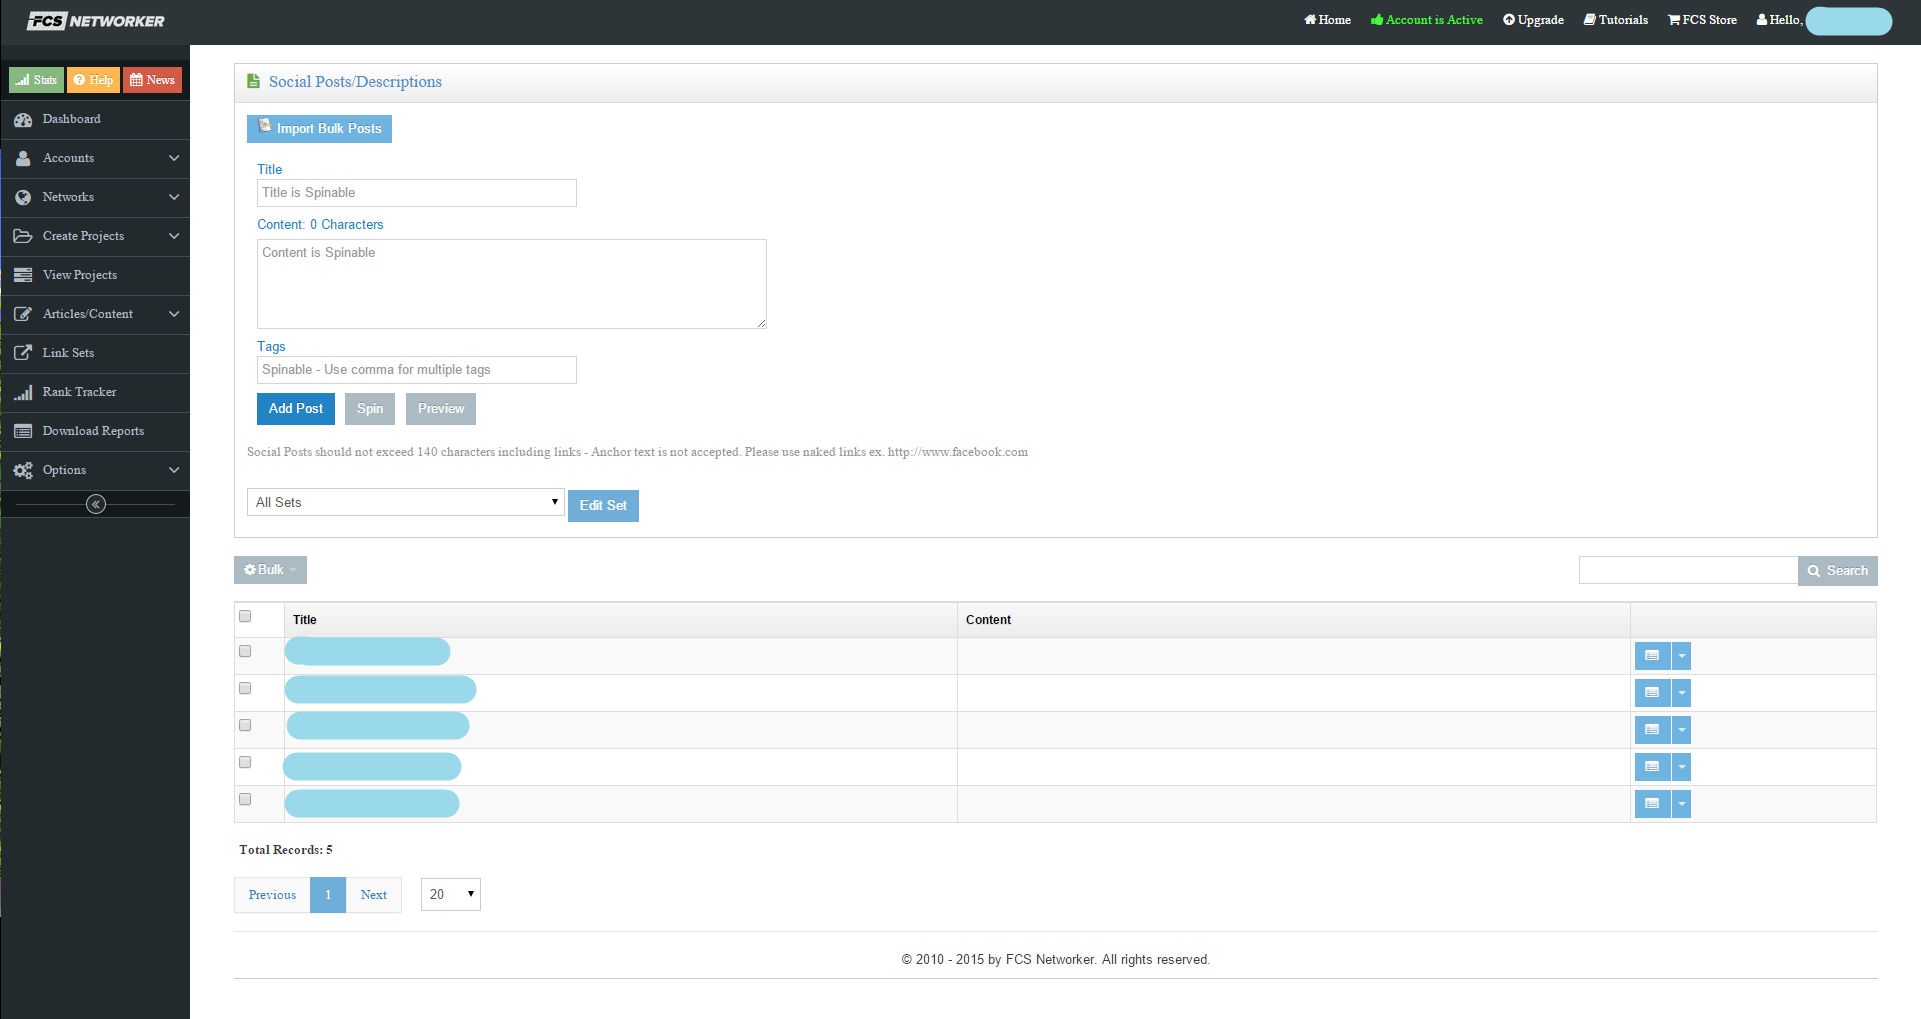
As you can see, everything is similar to the “Articles” page, but instead, here we will be adding social posts to use for out social projects. Just one thing to note here. Because there is no “name label” field that you can add to your post, it is not very convenient as is with the “Articles” page. The “Title” column in the table below shows a spintax and if you have one too many social posts, it can get difficult to navigate through them. The thing you can do in order to solve this is to always add the social posts to post sets (we’ll get to that in the next section). Because you can leave names to the post sets, it will be a lot easier to manage your social posts that way. Just saying.
The final column with the actions menu has the following options:
- Preview
- Spin
- Edit
- Remove From Set
- Delete
The “Post Sets” Page
This page is almost identical to the “Article Sets” page and does pretty much the same thing, but for social posts:
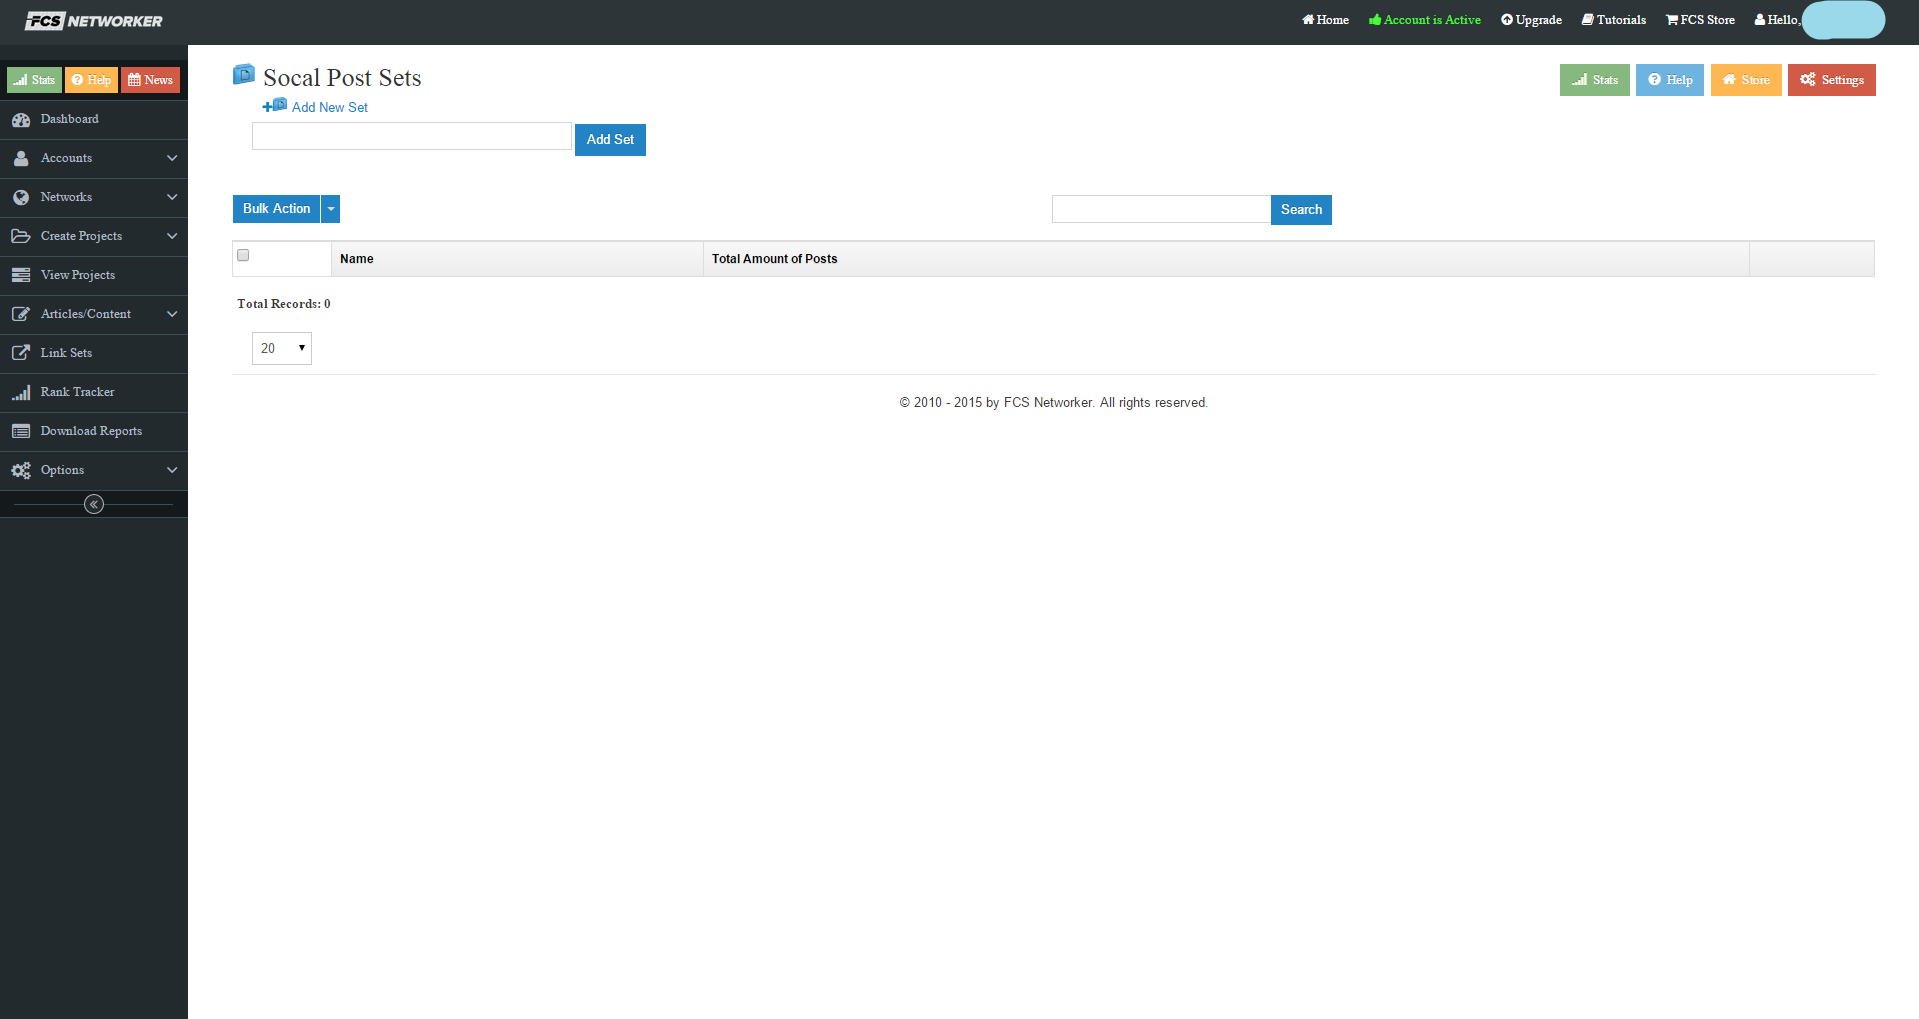
You just enter the name of the post set and click the “Add Set” button. Then you can use your new social posts set as a group to which you can add social posts. The “Bulk Action” button above the table with post sets has the same functionality as the one in the “Article Sets” page.
The “Blurbs” Page
This is where you add and manage your blurbs. Now, there are no blurbs sets so name them accordingly. You have the power:
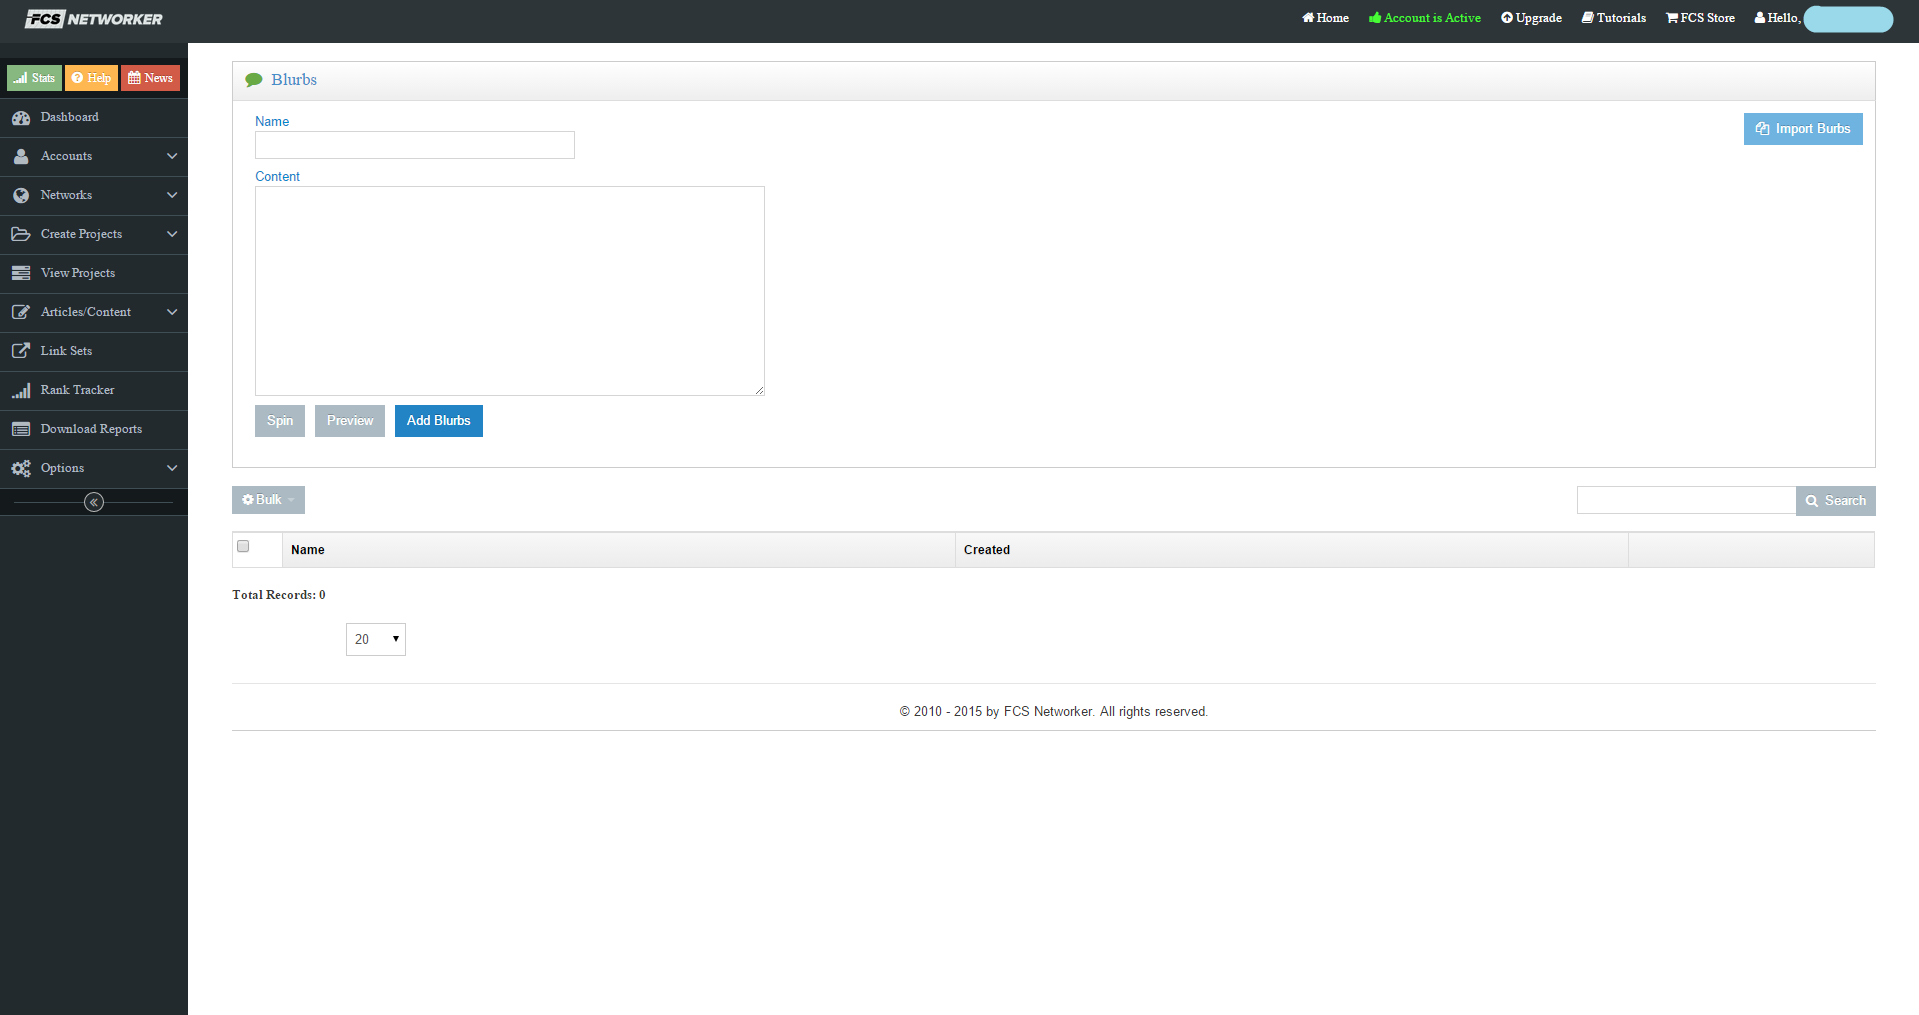
Again, you can add blurbs manually, or have them generated by a third party software such as Kontent Machine, and import them using the “Import Blurbs” button in the top right of the screen. The “Bulk” menu above the table allows you to either delete the selected blurbs, or download them all. The final column of the table with the action bar has the following options:
- Preview
- Download blurb
- Edit
- Delete
And that was the “Blurbs” page.
The “Link Sets” Menu
There are no sub-menus here. On this page, you will be able to add your links with their respective anchors or group URLs with keywords if necessary. So, let me clarify this. A link set is a set of URLs and their respective keywords (primary and secondary anchors). If such a set is used, when an URL is inserted into an article, a random keyword from all the keywords of the link set will be selected and put in as an anchor text. In the case of group link sets, we have the following format:
{URLs}{Anchors}
So for example:
{https://inetsolutions.org|https://www.inetsolutions.org|http://fuark.com}{keyword1|keyword2|keyword3}
This way, you can group URLs with their respective anchors, and you can add as many lines of the above format as you’d like. This is very useful if you have, for example, a lot of URLs from the same domain, but you want different anchors for each of the URLs.
When you are adding a link set, not a group link set, you have the options of entering your URLs of course (you can also use an RSS feed if you insert the following into the URLs textarea – ***http://example.com/feed), entering your main anchors, your secondary anchors, and the ratio between them i.e. 70%/30%.
The “Bulk” menu has just one option here – delete the selected link sets. Each row’s action menu has the following options:
- Edit
- Delete
Again, I would urge you to name your link sets smartly in order to optimize the time you spend searching for your target link set or group link set – Optimus Prime
We are done with the link sets as well.
The “Rank Tracker” Menu
Now, I have never used FCS Networker‘s rank tracker, because we use another software, so there isn’t much I can tell you here. All I know is that it works well enough.
The “Download Reports” Menu
This is the page where you will be able to select a project and download a report for it:
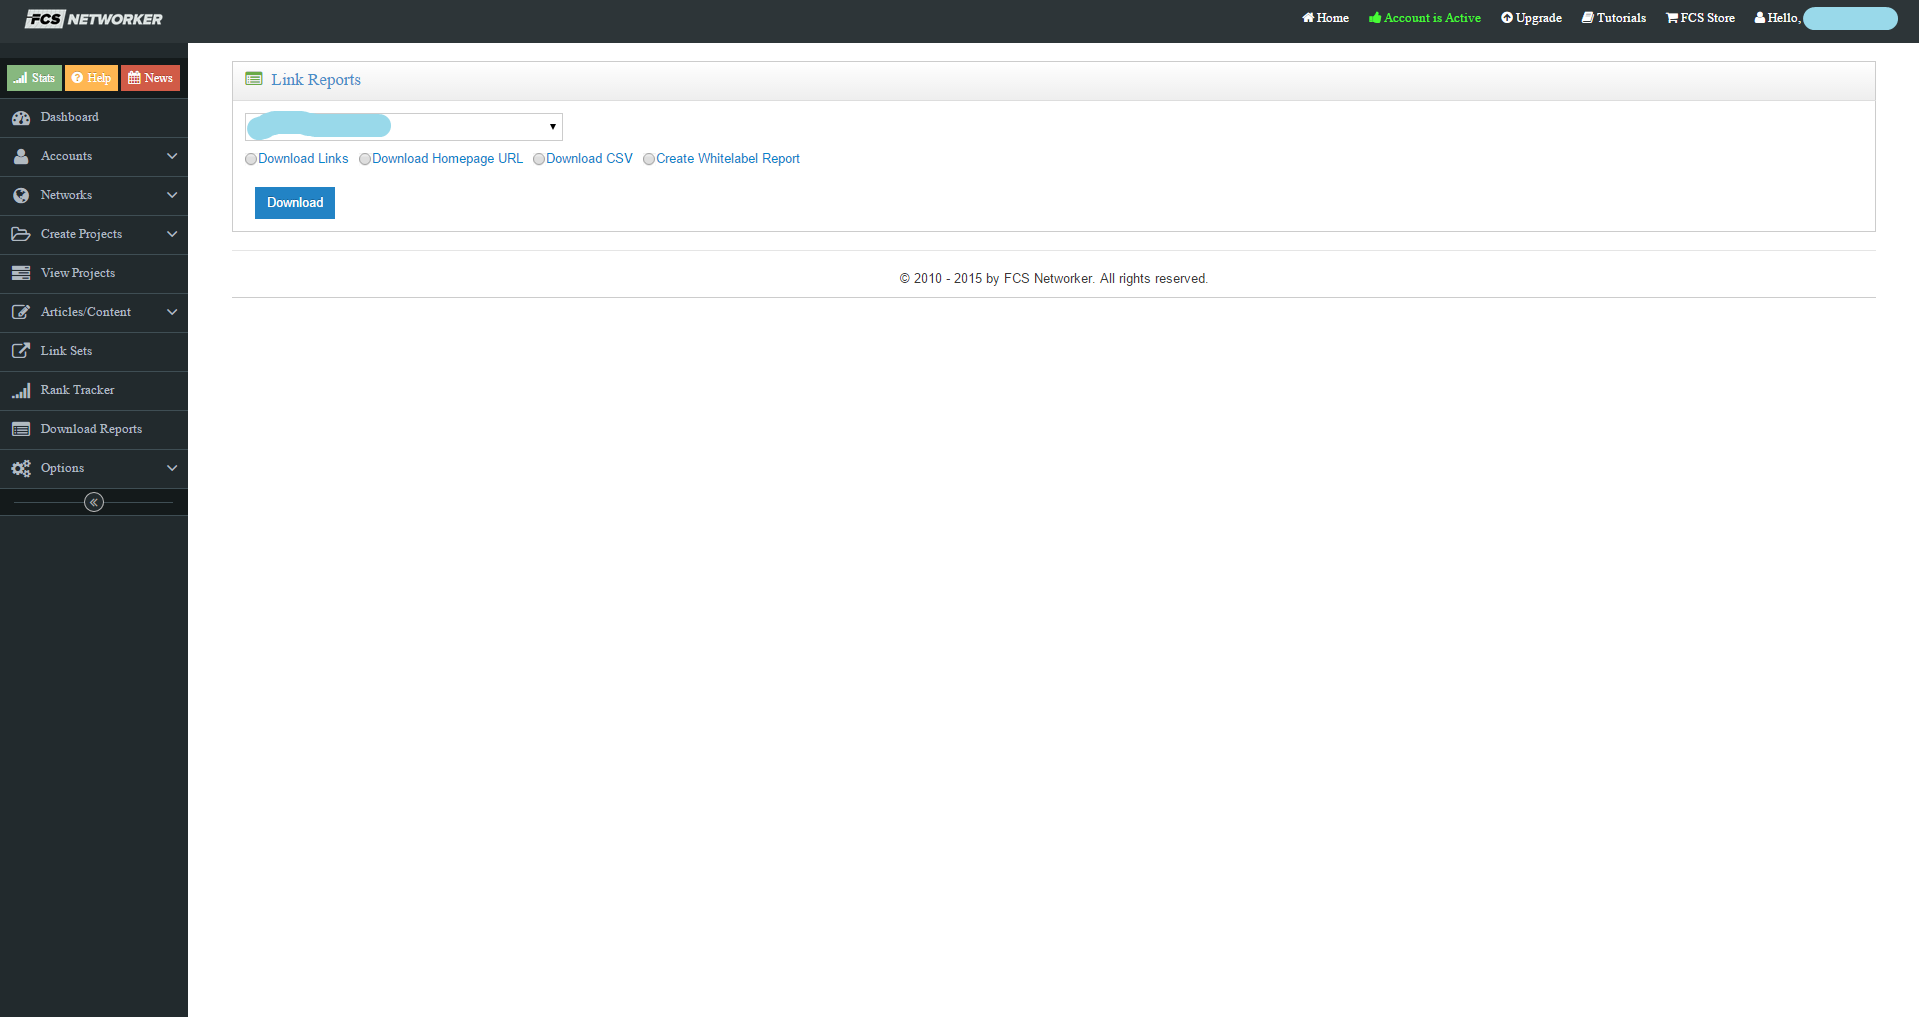
The drop-down is filled with your projects. The options are self-explanatory.
The “Options” Menu
We are at the end of the web interface of FCS Networker. Just one final menu. The “Options” menu has 6 sub-menus:
- FCS Forum – there is some really useful information on this forum and people are posting their strategies all the time.
- User Proxies – this is where you enter and manage your proxies if you do not want to use the in-built ones, which as I said, work like a charm.
- Reset License – no need for explanation
- Tutorials – this will take you to the “Tutorials” page where all the FCS Networker video tutorials reside.
- Support – the support center. FCS Networker’s support is awesome and really helpful and they answer quite fast.
- Affiliate Program – takes you to the FCS Networker’s affiliate program page.
And we are done with the Web Interface of FCS Networker. Now, let’s move onto the best practices, how we use FCSN, an epic battle of two of the best high quality link building tools, and finally, a fat FCS Networker discount for everyone. But first, a quick recap of the two main parts of FCS Networker.
FCS Networker Account Creator and Web Interface Recap
FCS Networker is comprised of two parts – the Account Creator and the Web Interface.
Account Creator Recap
- Creates blog and social accounts on the top Web 2.0 platforms, document sharing and social bookmarking sites.
- Can create multiple accounts on each website.
- Can automatically create and verify emails.
- Can automatically send all the created accounts to the FCS Networker’s Web Interface.
- Is compatible with the best captcha solving services.
- Supports custom proxies.
Web Interface Recap
- Organizes your accounts by blog and social networks.
- Many possibilities to get content ready for your projects.
- Many possibilities to make each submission unique – spinning, mashing, blurbs, etc.
- Ability to insert images/videos into the project’s content automatically.
- Various linking strategies such as link wheels and link pyramids.
- Drip feeding functionality.
- Access to private SEO forums.
- Third-party integration with GSA Search Engine Ranker and Kontent Machine 3.
- In-built proxies.
So these are the two main parts of FCS Networker in a few words. But what are the best practices? Throughout this SEO review we have already pointed out best practices, but let’s gather them all in once place.
FCS Networker Best Practices
FCS Networker has a vast range of functionality so it would be in your best interest if you knew how you can take advantage of it in an optimal manner. Both the Account Creator and the Web Interface have their little tricks and tweaks required to make them work better. Without a further a due, here they are…
Account Creator
- Manually write your usernames, blog titles, and blog descriptions
- Insert your niche keyword in all of the three above
- Set delay for email verification to 300 seconds which is the maximum
- Run two types of account creation campaigns
- The first one should be with all of your custom usernames, blog titles and descriptions which should also be done in two stages:
- One manual – with you solving the captchas at 5 retries per site – 90+% success rate at 1 thread
- And one automatic – with you letting the software do its thing – 80%+ success rate at 3 to 4 threads and retries set to 3
- The second one should be with auto-generated usernames, blog titles, and blog descriptions for each of the accounts. This will also raise success rate (run it at 3 – 4 threads with 3 retries) as well as randomness of your off-page portfolio. You wouldn’t want all of your backlinks to be from sites with your niche keyword. Let there be chaos. We usually do not run this type of account creation campaign manually, but if you have the time, do it. More success rate for ya.
- The first one should be with all of your custom usernames, blog titles and descriptions which should also be done in two stages:
- Use Death by Captcha as a captcha solving service
- Use several private proxies – 5 to 10 should do the trick for hundreds, if not, thousands of accounts (BuyProxies is our choice)
- Name your account creation projects smartly
- Always make sure you have the latest version of the FCS Networker Account Creator
- Read the news and updates
Web Interface
- No need to waste money on proxies, the in-built ones will do just fine
- Set the number of consecutive fails before an account is marked as dead to 5
- If you don’t have any old blog/social network, make sure you check the “Automatically Delete Dead Accounts” option
- Read the News and Updates
- Add your own spinner preferably Spin Rewriter or WordAI (you can only choose one)
- Name your blog/social networks smartly and clean them up from dead accounts regularly
- For old blog/social networks, make sure you save the dead accounts, re-register them manually and import them back into FCS Networker’s Web Interface
- Name your blog/social projects smartly
- For Tier 1 blog projects:
- User highly spun, human readable content that you have preferably spun manually
- Drip feed the projects for 7 to 30 days
- Strongly diversify anchors
- Use images/videos at a random configuration
- Use blurbs to make the content even more unique
- For Tier 2 and Tier 3 blog projects, you should lower the quality of the content, build more links, and drip feed for at least twice as more time as the drip feed time in the tier above. Have patience or you will lose in the game of rankings. We usually do not build Tier 2, let alone Tier 3 links to the Tier 1 projects. We just focus on the quality of Tier 1, but hey, that’s just us.
- For social projects:
- Again, use highly spun, human readable, preferable manually spun content. You don’t need much since the social bookmarks cannot have a lot of words.
- Drip feed again for 7 to 30 days
- Run filler content for your important blog networks – 1 to 2 articles without links per month for each of the accounts in a blog network will lower the rate of accounts dying and even completely stop it as we have with ours.
- Name your articles, article sets, post sets, link sets, and pretty much everything smartly using some sort of a naming convention!
- Read some of the latest threads from the private FCS Forum and look for some new ideas and SEO strategies.
These are the FCS Networker best practices that we usually employ. Going the extra mile with this high quality link building software will really pay off. Believe it.
How do we use FCS Networker?
We use FCS Networker to create and manage high PA and DA blog/social networks and build quality backlinks to our websites and our clients’ as well. The screenshots you saw above are from a relatively new account, which we registered because we needed more monthly submissions. Don’t be fooled by the small amount of blog/social projects. The great part is that, because you can export all of your account information, and then import it into a new FCS Networker account, you can have as many as you want and all of them will be submitting posts on the same high PA and DA blog/social accounts. So basically, here’s how we use the software…
For example… let’s say that we will be ranking a website in the “insurance” niche. We would go out and create a private blog and social network specifically for that website (if we don’t already have blog and social networks for that niche). Creating the accounts is easy (following the best practices for the FCS Networker Account Creator) and we usually let the software run 5 times to make a nice amount of both blog and social accounts. At 5 runs you will be looking at something like ~230 blog accounts and ~80 social accounts – more than enough. Then, we wait several days – something like 3 to 7 days before starting to submit posts with links on these new accounts.
Before we start posting articles with links on our new “insurance” blog and social networks, we run a project that will insert some filler content on the blog network i.e. some articles in the niche without any backlinks. Just plain text with some images and videos – 1 to 2 posts per each of the new accounts will do greatly. This will make sure that the amount of accounts that are marked as dead later on is the lowest possible and will also filter out dead accounts right at the start (don’t worry, not a large percentage of the newly created accounts dies if you do it right, and we have shown you the way). Starting to submit posts with backlinks right after an account is created is a red flag for some of these platforms – the most authoritative ones. I know this takes time, but nowadays, if you do not have patience, you will never win in the game of rankings.
And now that we have setup our blog and social networks for our website in the “insurance” niche, and they all have some filler content on them, it is time to do some high quality link building. We setup both a blog and a social project using our blog and social network accounts, generate content using Kontent Machine, setup the number of links and the number of days the projects will be running, and let it rip. We usually run projects for 30 days or so to assure some nice and steady high quality link building. The number of backlinks will depend on the competition for the target keywords, the age of the site, and other SEO factors. You know the deal. At least I hope you do.
So for the next 30 days or so, we are certain the the website will be getting high quality backlinks on a daily basis plus social bookmarks to ensure these backlinks are “justified”. I’ll let you think on that one. And that’s pretty much how we use FCS Networker. After the blog and social projects are done, we will check the rankings of the site and tweak from there on. We might create some more accounts for the blog and social networks, or run a Tier 2 to the homepage URLs (notice that Tier 2 is to the homepage URLs, not the Tier 1 backlinks) of this “insurance” blog and social network to increase their PA, which will make the backlinks on these accounts stronger and more authoritative. Basically, now this website has joined the game of rankings. If played right, it might, just might, rule the seven search engines.
On a quick side note, we create a huge blog and social networks with thousands of accounts which we use as Tier 2. These will be building links towards the homepage URLs of all of our blog/social networks in order to raise their PA as fast and as much as possible.
Okay, where were we? Oh yea, here is some more detailed information on the process we use to setup FCS Networker blog and social projects. Let’s start with the blog projects which are created in the following fashion:
- Content is generated using Kontent Machine 3
- We add contextual links and their respective anchors in a flawless anchor texts ratio
- We add relevant images/videos in a random configuration – position, alignment, and number
- Sometimes we also add image links to naturalize the off-page portfolio even more
- We build a huge database of content by running the content creation campaign in KM
- We add a manual touch to the content to make sure everything is Tier 1-worthy
- We upload the campaign to the Kontent Machine cloud and copy-paste its campaign ID into our FCS Networker project’s “Article/Content” tab
- Both the Kontent Machine campaign and the FCS Networker project are named smartly according to our naming conventions
- We schedule the blog project for the desired days/weeks
- We choose the blog network that the project will submit posts to
- We always check the “Activate Guaranteed Posting?” option
- And finally, we start the project and let FCS Networker do its thing
The setting up of the project in the FCS Networker's Web Interface takes no more than 15 – 30 seconds. The most time-consuming part is the manual touch in the Kontent Machine 3 part of the process. All in all, all of this can take anywhere between 5 minutes and 1 hour depending on the project’s info and requirements. Not too bad huh? Setting up an extremely high quality link building project in less than an hour.
When it comes to social projects, because we are still waiting for FCS Networker to integrate these types of projects with the Kontent Machine API, we simply use 1 highly spun post for the project, that is again, manually touched. That sounded wrong. Anyway, that’s it pretty much, everything else is the same as in with the blog projects process.
When the blog/social projects run their course, we download the links report, and archive the project. Who knows, maybe we will need some info from it later on. We usually delete archived projects older than a month. And that’s basically it. If you have any questions, just shoot us a message.
FCS Networker VS RankWyz – Battle of the High Quality Link Building Automated Tools
Now, before we decided to go with FCS Networker, we had a sit-down to overlook all the best link building tools that can create quality backlinks. Around that time, there was a lot of debate going on about which one is better – FCS Networker or RankWyz. FCS Networker was established in 2010 and RankWyz in 2012, however, the more sophisticated one is RankWyz. They offer a lot more than just “simple” account creation and posts submission. However, and this is a big however, the word around the internet marketing forums and the RankWyz forums was all going in favor of FCS Networker. Why?
Mainly because FCS Networker has a much, much better customer support. Other reasons are that RankWyz is a lot more difficult to manage because it is quite complex. There are many tools and the interface is not very intuitive. Keep in mind that I have never used RankWyz, however, I have reason to believe the sources that made me think so, because, to me, they are authoritative. You can check this thread and this thread for more info on this battle of the high quality link building automated tools. If you are too lazy to go through these, here are some cliffs (why FCS Networker is the better choice according to some of the posts):
- FCS Networker can create accounts easily
- The interface is much more intuitive and well managed
- It seems much easier to manage and manipulate articles in FCS Networker
- You can retry failed links
- FCS Networker has in-built proxies
- Fast support reply
These are just some of the cliffs gathered from the top posts in these threads. Overall, 90% of the people seem to favor FCS Networker. And to top all that, its packages are a lot cheaper too. The one thing that FCS Networker lacks is the number of submissions per month. The most you can get is 30,000 while with RankWyz, there are a lot bigger packages. But, 30k, considering you are not representing some extremely huge agency, will do you just fine. I mean come on, that’s 30,000 backlinks per month.
So after all is said and read, we decided to go with FCS Networker and it was the right choice as I now look again at some threads concerning this battle of the high quality link building tools. You just can’t go wrong with FCS Networker.
Final Verdict and FCS Networker Discount
At the end of this genuine FCS Networker review and in-depth tutorial, we can easily conclude that this is one of the best link building tools for SEO. Why do you think we wrote such an extensive SEO tool review? This high quality link building tool has helped us so much in our endeavors that we just had to do a full SEO review. Believe me, you will be very happy with the results you’ll get from this software. And the prices are extremely affordable. Even more with our FCS Networker discount.
You don’t even have to risk anything! There is a 7 days trial period which you can use to test out the software and decide whether it is worth your green stacks.
And we will make it easy for you as well. There are no promotional codes, discount coupons, FCS Networker coupon codes, a special discount code, a discount voucher, online discount codes or any of that. It’s just a simple link that you can click and you will get an FCS Networker discount on all of the monthly packages. Yes, all of them! And here they are (all the buttons lead to the FCS Networker membership page so it doesn’t matter which one you click):
- Starter
- $
19 - $17
- ✔ Unlimited Projects
✔ Unlimited Accounts
✔ 3,000 Submissions/Month
✔ Keywords Tracked – 10
✔ Content Generators ✔ White Label Reporting
✔ API Access
- Professional
- $
34 - $27
- ✔ Unlimited Projects
✔ Unlimited Accounts
✔ 8,000 Submissions/Month
✔ Keywords Tracked – 20
✔ Content Generators
✔ White Label Reporting
✔ API Access
- Power
- $
49 - $39
- ✔ Unlimited Projects
✔ Unlimited Accounts
✔ 15,000 Submissions/Month
✔ Keywords Tracked – 30
✔ Content Generators
✔ White Label Reporting
✔ API Access
- Elite
- $
89 - $74
- ✔ Unlimited Projects
✔ Unlimited Accounts
✔ 30,000 Submissions/Month
✔ Keywords Tracked – 50
✔ Content Generators
✔ White Label Reporting
✔ API Access
We also have an FCS Networker discount on the lifetime licenses for both the “Professional” ($399 down from $449) and the “Power” ($579 down from $649) packages. Click here to check them out. You just pay once and access to FCS Networker software is yours for life.
There are also yearly packages on the “Starter” and “Elite” plans which respectively cost $199 and $899.
Now here we are, at the end of this detailed FCS Networker review. Hope you have picked out the right plan for you with the appropriate FCS Networker discount and I wish you happy high quality link building. Also, may you have the seven blessings bestowed upon you and your websites.
You will need all the help you can get if you want to win in the game of rankings. Think of FCS Networker as your most trusted adviser, but also as your most skilled assassin. Yes that’s right, FCSN will assassinate your competitors, steal their crowns and bring them to you. All you have to do is point it in the right direction.