Content, content, content! Everywhere you look there is content! So why not make a machine that generates said content? Good idea right? Yes it is, however, it’s not that easy. And today, we will honor Albert Einstein by making a general relativity review of Kontent Machine 3 and, at the end, give out a quantum Kontent Machine discount for those who need it, and those who simply exists.
The Structure of this Kontent Machine 3 Honest Review
Here’s what you can find in this article:
- A preview of all the features of Kontent Machine 3
- An in-depth tutorial of Kontent Machine 3
- Our honest review of this content generation software
- How we use Kontent Machine 3
- Kontent Machine 3 vs SEO Content Machine – which one is better?
- An exclusive Kontent Machine 3 discount
Who is Kontent Machine 3?
Who is this content creation software that people are talking about and banners are promoting? Is it that good? I’m afraid it is all true guys. Alright. Kontent Machine 3 is an SEO software tool for internet marketing warriors which will scrape content from the Internet, spin that content, and then combine it in such a way, that it will create brand new unique content for search engines to enjoy. That’s KM in one sentence. But there is a lot more to it.
In this “general relativity” review, you will find, at the end, a 40% Kontent Machine discount. I strongly suggest that you read through the words leading up to that so you’d know what Kontent Machine is, how you can use it, and how we use it.
So, let’s walk through the functionality that Kontent Machine 3 provides. This content creation SEO software is tops in our book! And here is why…
Kontent Machine 3 Features Preview
You may still be oblivious, but you have stumbled upon one of the best internet marketing tools. Kontent Machine 3 is used by thousands of SEO experts and sets the standard when it comes to SEO software and content creation. There is a rival tool called SEO Content Machine, but we will talk about that later down the road and in a separate honest review and tutorial.
Back to KM. Isn’t it every online marketer’s dream to just input a keyword into a field and have hundreds of new 100% unique niche relevant articles ready for use? And all that in just minutes. Yes, it was a dream once, but not anymore. And Kontent Machine 3 does more than just create articles – this SEO software generates dozens of niche related titles, tags, categories, summaries, resource boxes, PDFs, and bookmark descriptions.
And we haven’t revealed the cherries on top yet. Reveal:
- Lightning fast top tier content – Kontent Machine 3 will actually parse and then check the content for quality and try to correct it automatically if needed. So, the content while still unspun, has passed several validation techniques to make sure search engines regard it as human readable.
- Perfectly designed for link building with tiers – KM3 knows how to build content for each of your link pyramid tiers, whether it is tier 1, tier 2, or tier 3+. I will discuss the critical importance of different content quality on each of the tiers. Hang on.
- Smart and automatic, state-of-the-art niche relevancy algorithm – The content creation part of KM has in-built functionality which will make sure that all the generated content is extremely relevant and full of LSI keywords.
- Easy-to-use content template builder – You can build your own content templates, which means that you can export the results generated by Kontent Machine 3 in any format you like. And it is very easy. So it doesn’t matter what internet marketing tool you plan on using the content for, KM3 has the solution at hand. This SEO software also has pre-defined templates for the most popular tools such as GSA Search Engine Ranker, SEnuke, Article Marketing Robot, Ultimate Demon, Article Kevo, TurboRanker, Sick Submitter, and Magic Submitter.
- Automatic generation of 100% relevant categories and additional tags – The days of the manual typing and figuring out of what categories you should select are over. Kontent Machine 3 has robust mechanisms built right in it which will generate laser-targeted categories and tags while it is building your content.
- Generation of engaging titles, summaries, and resource boxes – Kontent Machine 3 will always make sure that it selects the right titles, summaries, and resource boxes according to your keywords.
- Extremely relevant images and videos – KM will select the best matching images and videos related to your keywords and insert them perfectly aligned into the content .
- Powerful nested spintax – Kontent Machine makes use of nested spintax as opposed to normal spintax. This allows the content creation software to create thousands of completely unique and different articles.
- Perfectly placed contextual links – Contextual link building is a vital part of SEO. KM makes sure that it places your links at the perfect spots where they will be surrounded by the most relevant content. The software picks random spots in the content every time to make sure there are no footprints that search engines can track. It also supports naked URLs, resource box links, anchor images, custom tokens, and co-citation. KM can also find and insert links to third-party authority resources.
- Intuitive auto-blogger – Kontent Machine 3 can schedule and post content directly to your blogs. You can also use this SEO software to post directly to your private blog networks created by link building software such as Rankwyz. Building and maintaining blog networks has never been easier!
- Constant improvement – The good people over at the KM “factory” work every day to make sure that their software gets better and better and stays on top of content creation trends and methodologies. Updates are constantly rolled out to all of the Kontent Machine users and are also completely free.
So there you have it. 11 of the major features of KM3. Not too shabby as a start for our Kontent Machine review right? Yes, this is just the start. Now it’s time for a quick recap of what Kontent Machine provides, and then a quantum tutorial and info on the way we use this top notch content creation software.
A Quick Recap of What you are Getting with Kontent Machine 3
Just a quick note. You can check out the Kontent Machine 3 thread at BHW where you will find testimonials and reviews. Anyway, the recap:
- One of the best SEO softwares for automatic content creation.
- One of the few internet marketing tools that automatically makes sure your content is extremely niche relevant.
- A complex and easy-to-use article scraper.
- One of the few content creation softwares that can export files for any backlinking tools out there.
- Comes with an easy and intuitive template builder.
- One of the few content creation softwares that automatically selects just the right tags, keywords, and categories.
- The only SEO content generation software that actually builds not only articles, but titles, resource boxes, summaries, and bookmark descriptions.
- The only SEO software that provides functionality for mixing scraped content with your own in order to create thousands of brand new and unique articles.
- All future upgrades and updates for free.
You can also check out this video tutorial of Kontent Machine 3 by the infamous Matthew Woodward and his awesome accent. Bloody hell!
How do we use Kontent Machine – Quantum Tutorial and Honest Review
First, let’s go through Kontent Machine 3‘s UI, user experience and functionality. Right off the bat, you are welcomed by a clean and simple home screen:
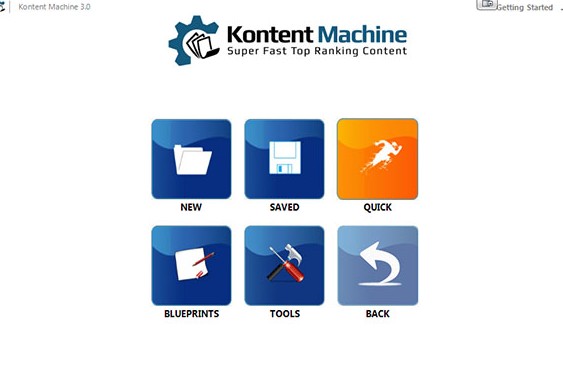
Very easy and intuitive user interface. The menus are self-explanatory, but still, let’s say a few words about each of them. Just a “few”…
The “New” Menu
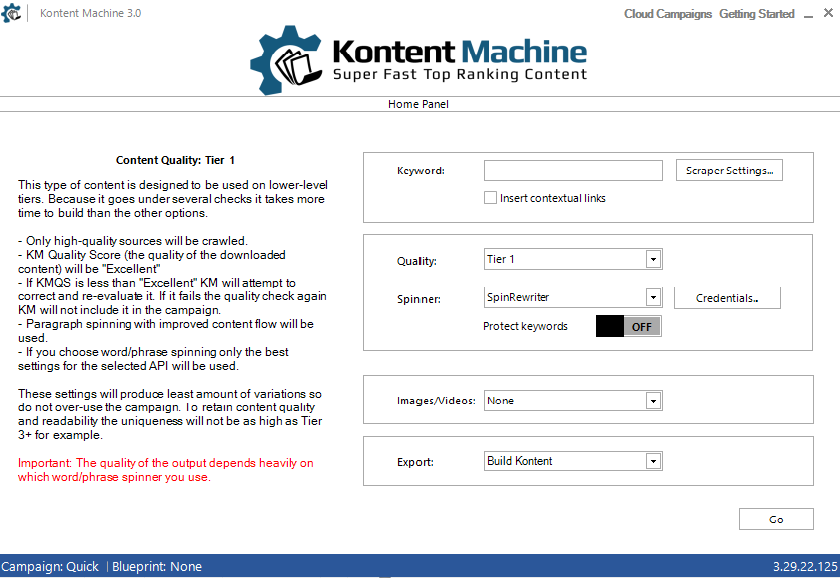
This one will take you to the new campaign screen:
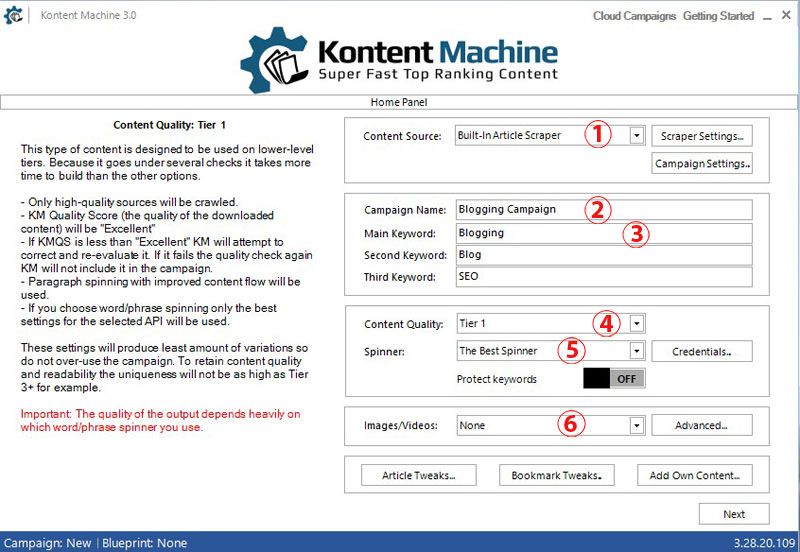
Take a look at the numbers in red. Here is what each one of the fields is for:
- From the drop-down menu, you can choose the way your content will be scraped. You can choose between the Built-in Article Scraper, the Built-in Article Scraper + Local Files, “The Leading Articles”, or you can choose to use your own locally saved files.
- The “Scraper Settings” button to the right will take you to the settings for the content source you chose such as scraper threads, scraper timeout, and an input where you can add your proxies (we use KM without proxies and never had a problem).
- The “Campaign Settings” button bellow will open a window from which you can tweak specific campaign settings such as paragraph variations, sentence variations, avoiding adult content, bookmark variations, “about me” variations, and character spinning options. We leave those at their default values except for some really custom campaigns that either need much less or much more content.
- This is the name of the campaign as it will be saved into the database later. Do not underestimate the importance of good naming conventions! Give your campaigns names that will easily remind you what it is for.
- First we have the main keyword which we always choose to be as specific and targeted as possible. Then the second keyword which is a more general keyword than the main one. And finally the third keyword which we usually choose to be the most abstract to the target niche this campaign is for.
- This one is very important. First of all, this drop-down menu will have different options for the different content source you choose. For example if you chose the Built-In Article Scraper, the content quality menu will have 3 pre-defined options – tier 1, tier 2, and tier 3+. Depending on the tier for which this campaign will be generating content for i.e. tier 1, tier 2, or tier 3+, we select the appropriate pre-defined content quality template. There is an explanation for each of these pre-defined templates to the left as you can see. Why is this so important? Because having the same content quality on all your link building campaign’s tiers is a huge footprint. Search engines might pick up on that and send you to the digital desert of nothingness. There is nothing there, but nothing!
- This is where you pick the spinner for your campaign. In the FAQ of the official Kontent Machine website, it is duly noted how important for the quality of the content a good spinner is. We use WordAI or Spin Rewriter depending on the content we need, and we strongly recommend using at least on of these. You can check out our WordAI review and our Spin Rewriter review for more information about these content spinning softwares.
- The “Credentials” button will open a window where you can enter your spinner credentials and allow Kontent Machine 3 to connect to the spinner’s API.
- And finally, you can select a combination of images and videos to be inserted throughout the content.
- Through the “Advanced” menu to the right, you can select various image and video settings such as random settings for each article, which is the default configuration, alignment, and width. We usually leave it at the default setting. Randomness is order!
At the bottom of the “New” screen, as you can see, there are three buttons, each of which will open a window where you can, well, tweak various properties of the articles and bookmarks to be generated, or add your own content. These properties include spinning type i.e. word spinning, paragraphs count, paragraph spacing, article and bookmark tags, and “about me” snippets. We usually leave this at their default selections and tweak only on custom occasions.
Once you have your new campaign’s configuration setup, you can click on the “Next” button only to see this simple yet aesthetic screen:
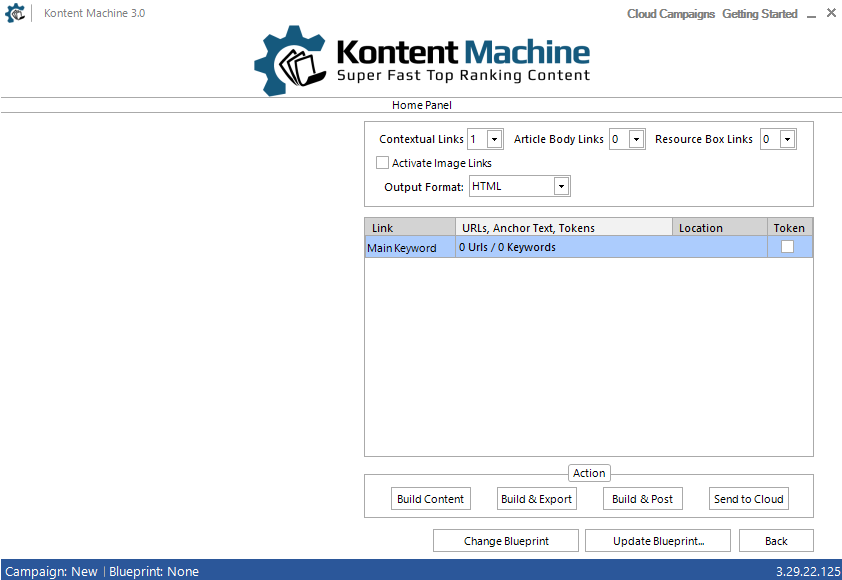
We are almost ready to let KM do what it does. Now all that’s left to do is to setup your links and corresponding keywords. As you can see, these can be contextuals, article body links, resource box links, or even, image links. Why would you tick image links? Because it’s only natural sometimes to have image links in your off-page portfolio.
You will be able to enter your URLs and keywords by clicking on each of the rows, which will be equal to the total number of links you have selected from the above drop-down menus.
The “Token” column, if ticked, will put in placeholders instead of anchors and URLs. For example, if the content generated by KM3 will be exported with the GSA Search Engine Ranker template, it will have %anchor_text% and %url% inside of it. That way, these placeholders can be replaced by GSA SER with anchors and links from the project’s configuration at the time of posting. This gives you more dynamic control over the campaign if you wish to change some links or anchors later on.
The action box’s 4 buttons act as follows:
- Build Content – This will basically run your campaign, and build a huge database of content for it. You can then export articles at any time and they will all be unique and highly spun.
- Build & Export – This option will build a database of content, and when finished, export a certain build from it to a target location of your choice. When we are generating content for GSA Search Engine Ranker campaigns, this is the option that we use. It will export content in a file that is ready to be imported into GSA Search Engine Ranker. We have our own PHP script that does that automatically instead of us opening and importing it by hand, but that is a topic for another day.
- Build & Post – This will again, build a database of content and when it’s done, KM will post to the selected blogs from the window that pops up when you click the button.
- Send to Cloud – This feature is relatively new to Kontent Machine 3, but it is extremely helpful. You see, what you can do with this one is, easily upload your content creation campaigns to the cloud, which will generate a campaign ID. You can then copy this ID to seamlessly use this campaign’s content in third-party tools such as FCS Networker and GSA Search Engine Ranker. For example, because there is no way to automate the importing of content to the web interface of FCSN, we simply build content with KM3 and then upload the campaign to the cloud. We then take the campaign ID that is generated by the upload process and simply paste it into our FCSN project. That’s it! The project will then take content from the clout and we do not have to upload any articles at all. Quite nice huh?
So, pretty much that is it for the “New” menu. You see how easy this is? Click, click, click and you are done. And this seamless integration with the top link building tools is making things a lot easier. Oh, I forgot to note that you cannot have more than 100 campaigns uploaded to the cloud. However, there is an option to automatically delete campaigns older than ‘x’ number of days, so that takes care of that.
When you run the campaign, you will see the progress window show up on the left-hand side. Just so you don’t freak out, if you are using WordAI or Spin Rewriter as a spinner, prepare to wait at least a good 15 – 20 minutes for the content creation to finish. Because KM3 creates such huge content databases by default, it takes quite a while for the spinners to do their job. The good ones are very slow. We cannot give a time estimate for other spinners as WordAI and Spin Rewriter are the only ones we use.
I have run KM for you and will attach the resulting content files below (tier 1, tier 2, and tier 3), so you can inspect the content yourself. I have used the following keywords: tier 1 – payday loan, tier 2 – loans, tier 3 – finance. The output format used for the export of the content was the pre-defined GSA Search Engine Ranker template and I also checked the box for PDF generation, so each of the tiers has a PDF file exported with it. Check it out:
Kontent Machine 3 also comes with an in-built spinner called KM Spinner which will spin the content in an instant. However the results you have with it, while not bad for a free spinner, will not be even close to what WordAI and Spin Rewriter can do. Back to the home screen.
The “Saved” Menu
This is where you will find all your campaigns that have run successfully. At the top, there is a search input field which you can use to find a particular campaign by its name. You can also delete old campaigns from here, or send new ones to the cloud and copy their campaign IDs. That’s pretty much all there is to this menu.
The “Quick” Menu
The quick menu is very similar to the “New” menu:
However, here, you don’t have the choice of content source. Kontent Machine will implicitly use the default Built-In Article Scraper. Also, as you can see, you are given an input field for only one keyword. You also don’t have some of the settings you can tweak for images and videos, for the content quality and for different articles and bookmark configurations found at the bottom of the “New” menu.
This “Quick” page is specifically designed for, well, quickness. You just fill in your keyword, select content quality, spinner and a combination of images/videos, and you are green for a “Go”. The resulting campaign will be named by the convention QC – “your keyword”. That way you can later recognized it from the “Saved” menu if you need to export more content from it.
The “Blueprints” Menu
First of all, what are these blueprints? And why are they blue? Anyway, the blueprints in Kontent Machine 3 are extremely useful if you are creating the same content creation campaigns over and over again. I mean, if their “skeletal” structure is the same of course. The blueprints in KM3 are like campaign templates.
When you go to the “Blueprints” menu, you will see a window with all of your blueprints. You can then edit your old ones, or create new ones. When creating a new blueprint for a content creation campaign, you will be able to set default values for:
- Content source
- Content quality
- Word spinner
- Combination of images and videos and their properties
- Article tweaks
- Bookmark Tweaks
- The numbers and types of links
- Advanced link settings such as the ration between Dofollow and Nofollow links and the ration between naked URLs and exact match anchors
Then you can just save your blueprint and when you are creating your next campaign, you can simply go to the “Blueprints” menu and double-click the blueprint of your choice. Name them wisely! Then you just fill in your keywords and URLs and you are good to go. Happy content creating!
The “Tools” Menu
The final menu from the Kontent Machine 3 home screen is the “Tools” menu. You see, Kontent Machine 3 is more than just a simple content creation tool. It is a software for SEO like no other. Why? Not only does it have such an intuitive UI, but it also comes with a number of useful tools. Here is the “Tools” screen:
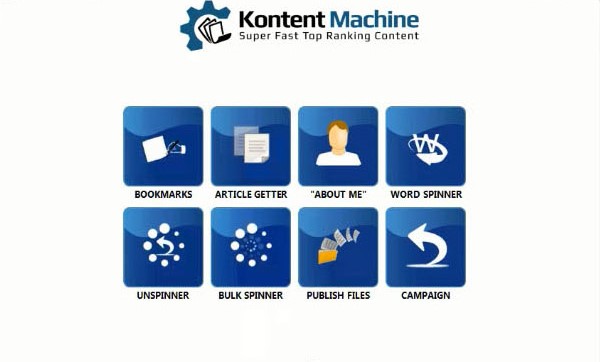
As you can see, Kontent Machine 3 comes with 7 built-in tools designed to help internet marketing ninjas remain unnoticed by search engines suppressors.
Bookmarks Tool
With this tool, Kontent Machine 3 generates unique, highly spun bookmarks which you can use for you social marketing campaigns. Here is what the “Bookmarks” page looks like:
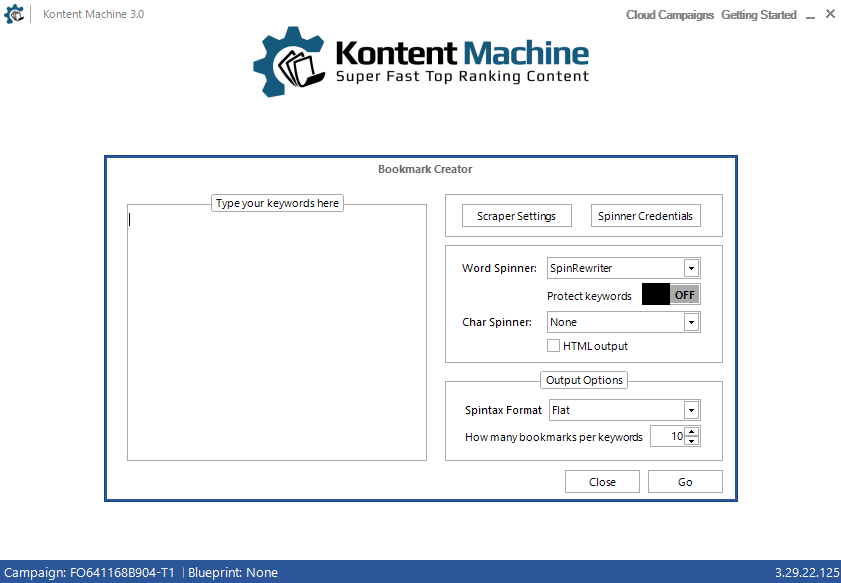
As you can see, you can enter your keywords to the left-hand side and then configure the scraper, the spinner, the output format, and the number of bookmarks per each keyword. Simple enough right?
Article Getter Tool
The built-in Article Getter tool is very useful when you want to find niche relevant unspun articles which you can later manipulate as you please:
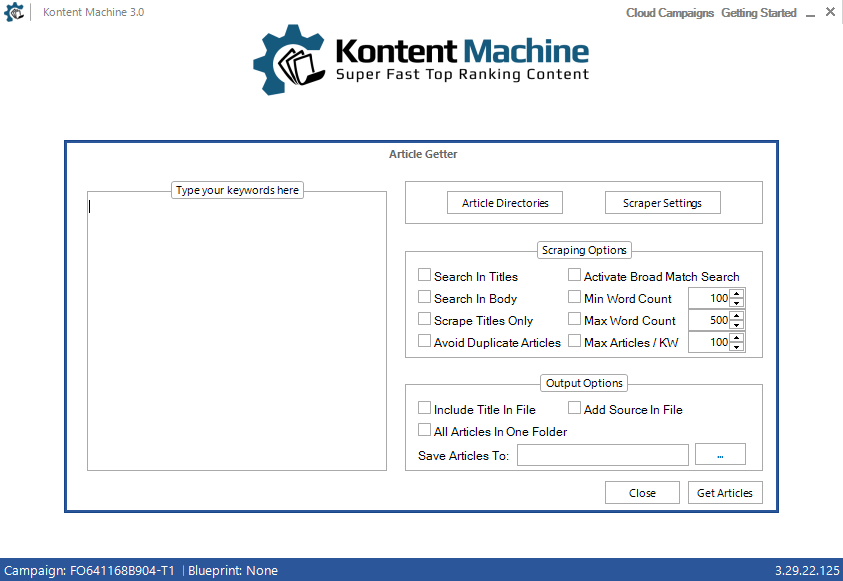
Again, you enter your keywords in the input field to the left, choose which article directories you would like the scraper to use, select the optimal configuration from the scraping options, and save the article to your desired location in the appropriate format. If you plan on scraping extremely niche relevant articles, we recommend checking the following scraping options:
- Search in titles
- Search in body
- Avoid duplicate articles
- Min word count to 500
- Max word count to 1200
As for the output files, you can check the option to include title in the file, because most top link building internet marketing tools import articles thinking the first line is the title, plus it’s more tidy and neat that way.
About Me Tool
This one doesn’t even need a picture. It quite simply lets you choose if you want links in the about me content, select a spinner, choose a number of variations and let it roll. The end result will be shown in the text area below the input fields. You can copy and paste the about me and import it directly into your favorite SEO software.
Word Spinner Tool
You have a piece of content that you need to spin? No problem. Kontent Machine 3 has you covered for that as well:
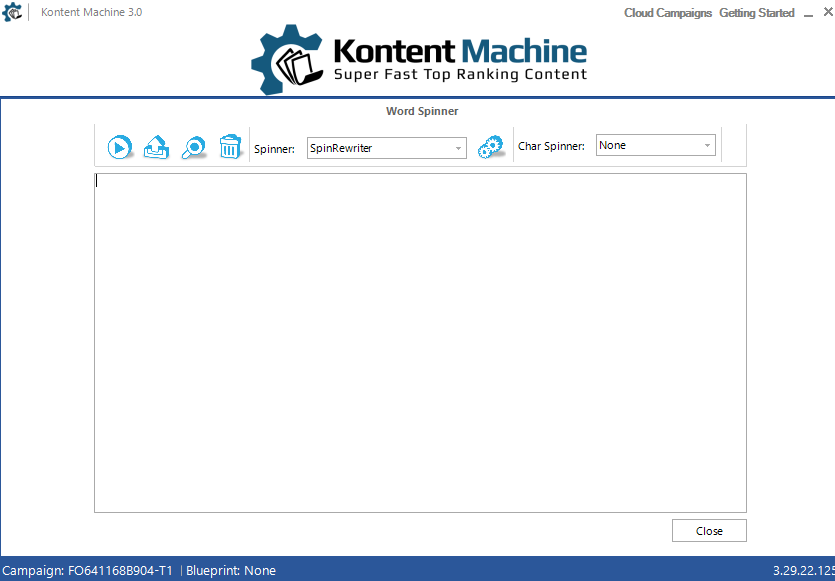
Let’s recap the button images from left to right:
- The “play” button going to start the spinning process.
- The second button will open a browse window where you can select a file which you would like to spin.
- The third button will search in the content.
- And the “recycle bin” button will clear the content.
Then you can choose your favorite spinner, configure its credentials and options from the settings icon to the right, and click the “play” button. Get some popcorn and watch the show.
Unspinner Tool
This Kontent Machine 3 tool is very simple and has two fields:
- A text area for your spun content
- A text area for the resulting unspun content generated by Kontent Machine
You can keep clicking the unspin button at the bottom of the “Unspinner” page, and it will keep on generating variations from the spun content you entered.
Bulk Spinner Tool
The bulk spinner tool is very beneficial if you have some article that are unspun or partly spun and need a high level of spinning. Kontent Machine 3’s Bulk Spinner tool will let you drag and drop your articles to the window that opens after you click the “Select…” button, enter a keyword (which will be used if you plan on inserting images and videos into the content of the articles), choose a spinner, and let the tool do its job:
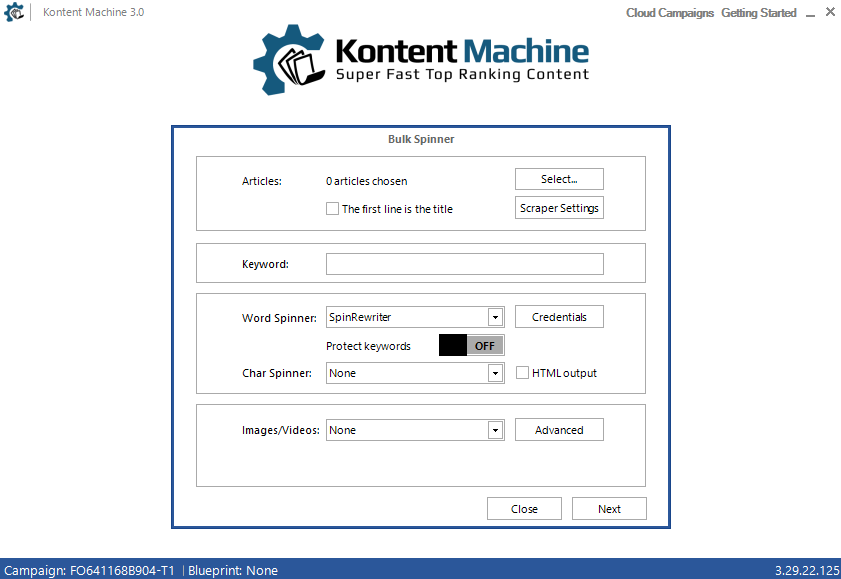
There is one important checkbox that must be clicked otherwise your articles will not be spun correctly, namely that is the “The first line is the title” checkbox. No need for a clarification. It is self-explanatory. If not checked, when spinning the articles, Kontent Machine will not take special actions towards the first line with the title as it usually does, which will result in a not so spin-optimized article title.
When you click next, you are taken to the final screen before the spinning process begins. There you will be able to choose whether you want contextual links, article body links, or image links in your articles. Finally, before you click the “Go” button, you will need to select an output format, and whether you want an output in spintax. Houston we have lift-off!
Publish Files Tool
This tools is especially useful for private blog network enthusiasts. All you have to do, is drag and drop articles to be posted (same as with the Bulk Spinner tool), tell KM3 how to find the title (first line or name of the file), select tags and categories, and schedule your blog posts for a nice and gradual blogging. Then you would have to select the blog accounts on which you want to post, make a schedule of the posts and let it rip! Happy private network blogging!
How do we Dance with Kontent Machine 3?
We do not dance with SEO software guys. I mean come on! But seriously, what do we use KM for?
At this particular point in time and space, we use Kontent Machine 3 mainly for two purposes:
- Generating unique and highly spun, human readable content for our GSA Search Engine Ranker campaigns.
- Generating unique and highly spun, human readable content for our FCS Networker projects.
And since I have written a GSA Search Engine Ranker projects generator in PHP, we create GSA SER campaigns extremely quickly. The slow part is the content creation, because as we said, the good spinners take their time, but it’s totally worth the wait.
As for the integration with FCSN, we just upload the Kontent Machine campaign to the cloud, get its campaign ID, and paste it into the FCSN project. That’s it!
On more custom projects, we will make use of Kontent Machine’s tools to add a manual touch of perfection to the content creation process.
When it comes to results, Kontent Machine has done wonders for our projects and our clients’ projects. Thanks to the pre-defined content quality templates and all the content quality validation that happens on the back-end, Kontent Machine can generate a ranking combination of words for your tier 1, tier 2, and tier 3+ campaigns.
However, when it comes to using content generated by KM for your money site, I wouldn’t recommend it. While the content is great, it is not money site-worthy. You can probably get away with some of the generated content, but don’t risk it. Write the content for your money site yourself so that you are 100% sure it is unique and high quality.
And finally, we do take advantage of Kontent Machine’s autoblogger functionality to schedule filler content for our PBNs. While, as we said, the content is not money site-worthy, it is acceptable for your private blog network websites.
The Battle of the Content Creation Giants – KM vs SCM
To be honest, the first content creation software that we started to use was SEO Content Machine. Don’t get me wrong, it does wonders as well, however, Kontent Machine’s ease-of-use is just unmatched. The thing that SCM has and KM doesn’t is the functionality to scrape content in any language while Kontent Machine can only scrape content in English.
This is the only advantage in my opinion. So if we were to decide the outcome of this epic battle of SEO software, the winner would be Kontent Machine 3, again, mostly because it is just too damn easy to use.
Final Verdict
If you have read through all of this, by now, you would clearly see that Kontent Machine 3 is an extremely useful content creation SEO software. I hope this Kontent Machine review has helped you understand this software and its functionality as much as possible without even using it yet. Bottom line is, KM3 is an SEO software that is in the pocket of almost any internet marketing warrior, especially the ones that use link building tools. It integrates with all the top SEO link building software out there and has pre-defined outputs for all of them.
So how much will all of this cost you? Not even close to what you might think. And the Kontent Machine 3 discount on the lifetime license is sitting at a whopping 40%! Plus, there is no risk for anyone. The Kontent Machine guys offer a 30 days no questions asked money-back guarantee, so there is absolutely no risk in trying this tool. But trust me, you won’t get to a refund. There is also a monthly subscription plan which you can make use of if you are on a budget:
- Kontent Machine Monthly Subscription (20% discount)
- $29
- The monthly subscription is perfect if you are on a budget. All this functionality that Kontent Machine 3 provides is well worth the 29 bucks.
But that’s just me. And thanks to our honest Kontent Machine review and tutorial, you can now make an informed and smart decision.
- Kontent Machine Lifetime License (40% discount)
- $217
- The one-time payment option is by far the more cost-effective plan of the two. You pay for it once, and you are done. That’s it.
You have license to use Kontent Machine for life including all the upgrades that come with it. If you can afford this one, it would be the better choice, because it will save you a lot of money.
Besides, remember the 30 day no questions asked money back guarantee?
The 40% Kontent Machine discount for the lifetime license is a huge opportunity, but the monthly plan will work just perfectly for you as a start. Don’t worry. In a few months, when you get the hang of it, and you become aware of the power of this SEO content creation software, you will be making more than enough money to afford the lifetime license and not worry about any monthly subscription fees. And remember, be careful with the content creation. With great SEO software comes great SEO responsibility!