It’s PBN time. Yea, you heard right – private blog networking. But, don’t get scared. You won’t have to create an entire PBN yourself. No, no. Instead, I will show you an amazing online marketing service which allows you to use other people’s PBN sites. Enter FightBack Networks a.k.a. FBN which is basically a peer-to-peer blog networking platform. Don’t worry, all will be clear in a moment. Here we go.
The Structure of the Ultimate FightBack Networks Tutorial and Review
- A brief introduction – simply put, I will explain to you (with an example) what this internet marketing service offers and why it is so great.
- Features preview – we will take a sneak peak at the functionality provided by FBN.
- A pixel-by-pixel FBN tutorial – I will get you behind the scenes of FightBack Networks and will show you all of the functionality of this amazing online marketing service.
- FightBack Networks best practices – the tactics you should be employing when using FBN.
- A genuine FightBack Networks review – after all is said and done, we will reveal our final verdict of FBN.
An Introduction to FightBack Networks
If you haven’t heard about private blog networks, then you are about to. Basically, a PBN is a privately owned network of websites – who would have guessed that right? However, building a quality PBN from ground zero is not what you would call a “piece of cake”. Not only does it require a lot of capital, but you will also have to invest a lot of your time on maintaining the PBN sites. And this is where FBN comes in.
I believe that the best way to explain something is through an example, so here goes. Let’s say that you bought a nice PR5 domain (www.maginafinishedfarming.com) from a GoDaddy auction for example and its stats are amazing – DA, TF, CF, all looks cool right?
Then, you setup a quick WordPress on the domain, upload a custom theme and then structure the site – give it some categories, menus, tags, design, etc. At this point the website is ready to join FightBack Networks. Now, if you were to not use FBN, you would be able to get links to you websites or to your clients’ websites only from one domain right?
But when you join FBN, you will be able to use other people’s PBN sites, because you would allow other people to use your PBN site in return i.e. www.maginafinishedfarming.com. Let me explain. You see FightBack Networks is divided into blog networks. And each network is unique in its requirements and member sites. Requirements can be, for example, a minimum PR of 5, a minimum number of TF (Trust Flow), only unique content and others which we will see in a minute. Let’s say that we found a blog network we like (FBN lists all public networks in a table once you login), and it is in our niche – anti-mage.
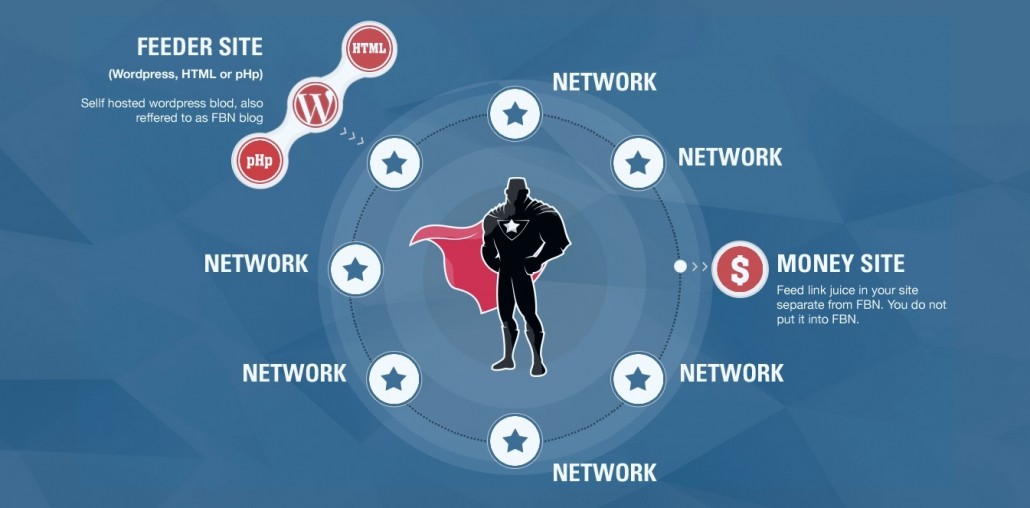
What we do is simply apply to join this network of blogs and then wait for the review and approval if the network doesn’t have the auto-approve feature enabled. The person who created the blog network is the one who approves or disapproves new websites. I also want to mention that there are networks created by the FBN team which have a 24 hour approval. Once approved, we will be able to schedule posts on every website in the blog network we just joined. On these posts, we can insert links to our money sites, to our clients’ money sites, to YouTube videos, to Facebook pages, you name it. Pretty cool right? Basically, if you didn’t get it from my little example, you will after looking at the image below:
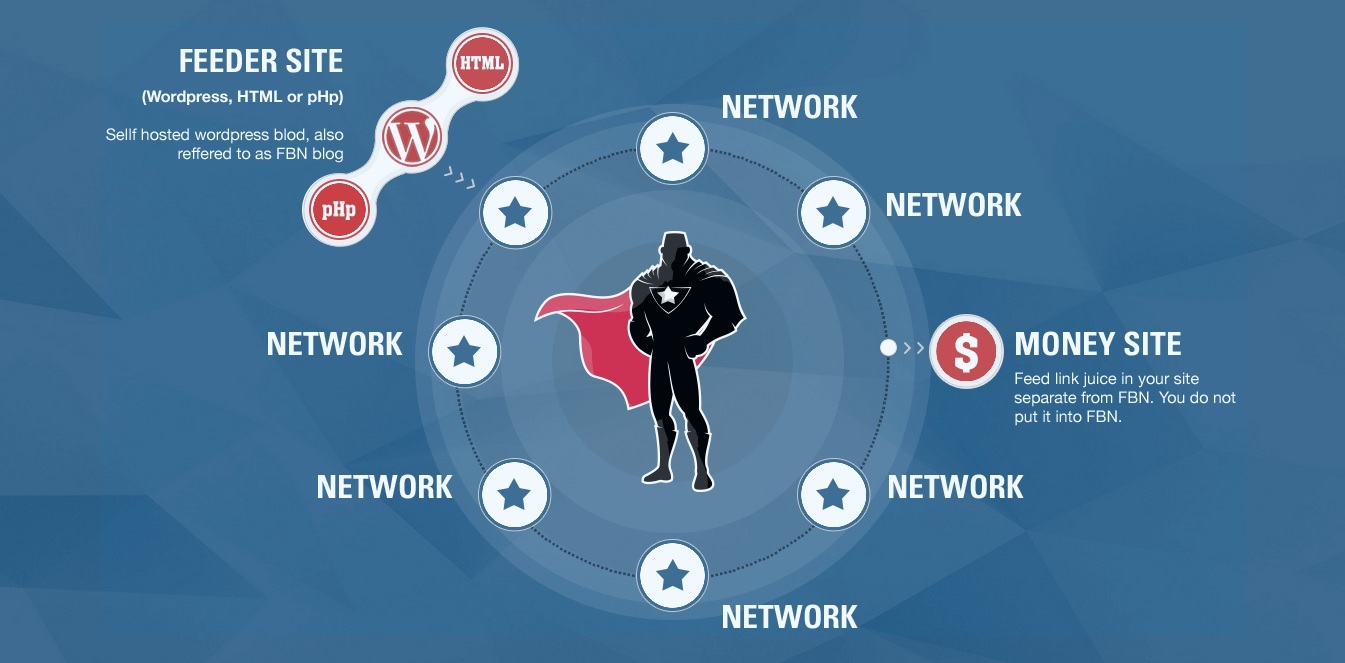
There you go. You have a feeder site which can be a WordPress blog or a PHP site written from ground zero (this one will be supported in the next version which is coming out in a few months, so for now, only WordPress sites are supported) – then you join an FBN network, and then you just place links to your target sites a.k.a. money sites on the sites in the networks you have joined. In exchange, other people will place contextual links on the sites you have joined the networks with. For each of your feeder sites you get 2 posts per day (the number is actually set by the network owner, and can go up to 5, but most networks go for 1 – 2 posts per day, which means that your link will stay on the homepage for quite a while). So for example, when you purchase the “Beginner” plan, you can add up to 10 sites which means that you can get up to 600 PBN links per month. Quid pro quo right? That’s basically it.
FBN Features Preview
- Access to a dozen (more than 100 so far) peer-to-peer blog networks – you can either join existing ones or create your own.
- The networks are divided into niches – this gives you the power of relevant backlinks. There are also networks that are more general and not so focused with more than 300 member sites on them.
- Free content generation functionality – FBN can provide unique content for those who have no other means of generating it.
- Strong safety – because there is no central authority that controls these blog networks, FBN is completely safe. Also, FBN blocks people from using too many networks for a single target site. They also prevent unnatural posts such as 3 links pointing to the same domain.
- Deletion of links – if at any point you decided that some links which you have submitted are no longer working for you, just delete them with a single click of a button.
- Saves you a lot of time and money – thanks to the peer-to-peer style of FightBack Networks, you won’t need the huge capital required to setup your own PBN and you won’t have to invest countless of hours into maintaining it. Divide and conquer as they say.
- Drip feed supported – you can drip feed your links in order to make them look even more natural.
- Human moderation of posts – the articles which are scheduled on a blog network first go through a moderation process that includes 10+ automated quality checks plus a human touch before they actually get approved and your link goes live. This keeps quality in check.
- Advanced reporting – FBN offers detailed link reports not only for the sites you posted on, but for the posts that have been posted on your feeder sites.
The Ultimate FightBack Networks Tutorial
Once you purchase one of FBN’s plans, and login, you will be greeted by the following page:
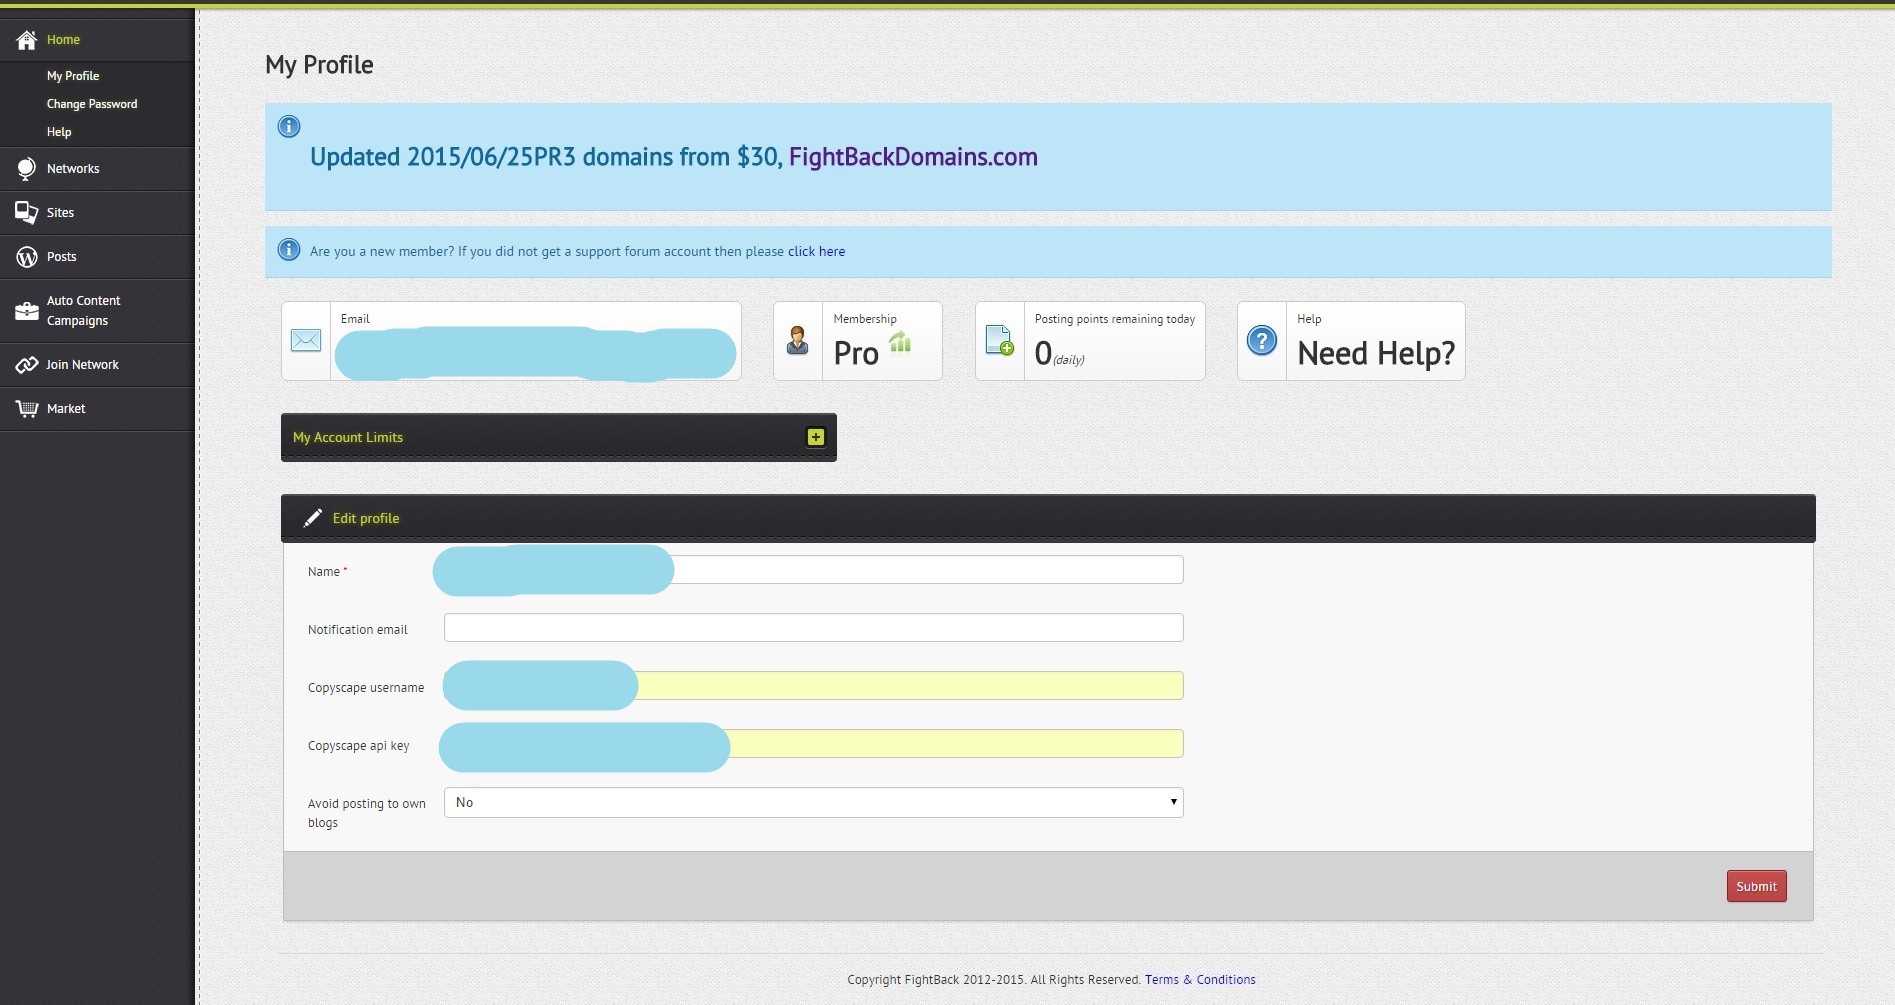
This page basically lists your account information – email, password, etc. Now I want you to look at the “Posting points remaining today” box. This is basically the number of links you can create for the day. Based on the plan you have purchased and on the number of feeders sites you have, you can get up to 6,000 posts per month.
The other thing which is important from this page is the “Avoid posting to own blogs” option at the bottom of the screen. I always set it to “Yes”, because I do not want to post links on my own feeder sites – I want to post links on other people’s PBN sites.
Now, the way we will structure this FBN tutorial is through the menu on the left hand side. Now, we have already looked at the first sub-menu of the “Home” menu i.e. “My Profile”. The “Change Password” menu is a no-brainer as to what it allows you to do, and the “Help” menu simply takes you to the forums of FightBack Networks.
The Networks Menu
Now, before we get to explaining this menu, I want to note the following: If you are just starting out with FightBack Networks, I would suggest joining a pre-created blog network. There are a lot of awesome ones that are public and have good sites joined in.
Okay, back to our FBN tutorial. The “Networks” menu has two sub-menus – “My Networks” and “Create Network”. The first one simply lists (in a table style) all of the blog networks you have created. The table shows number of members in the network, confirmed sites, and sites waiting for your approval. And then we have the “Create Network” page which basically allows you to create your very own blog network. Keep in mind that this functionality is available only to “Pro” members of FBN:
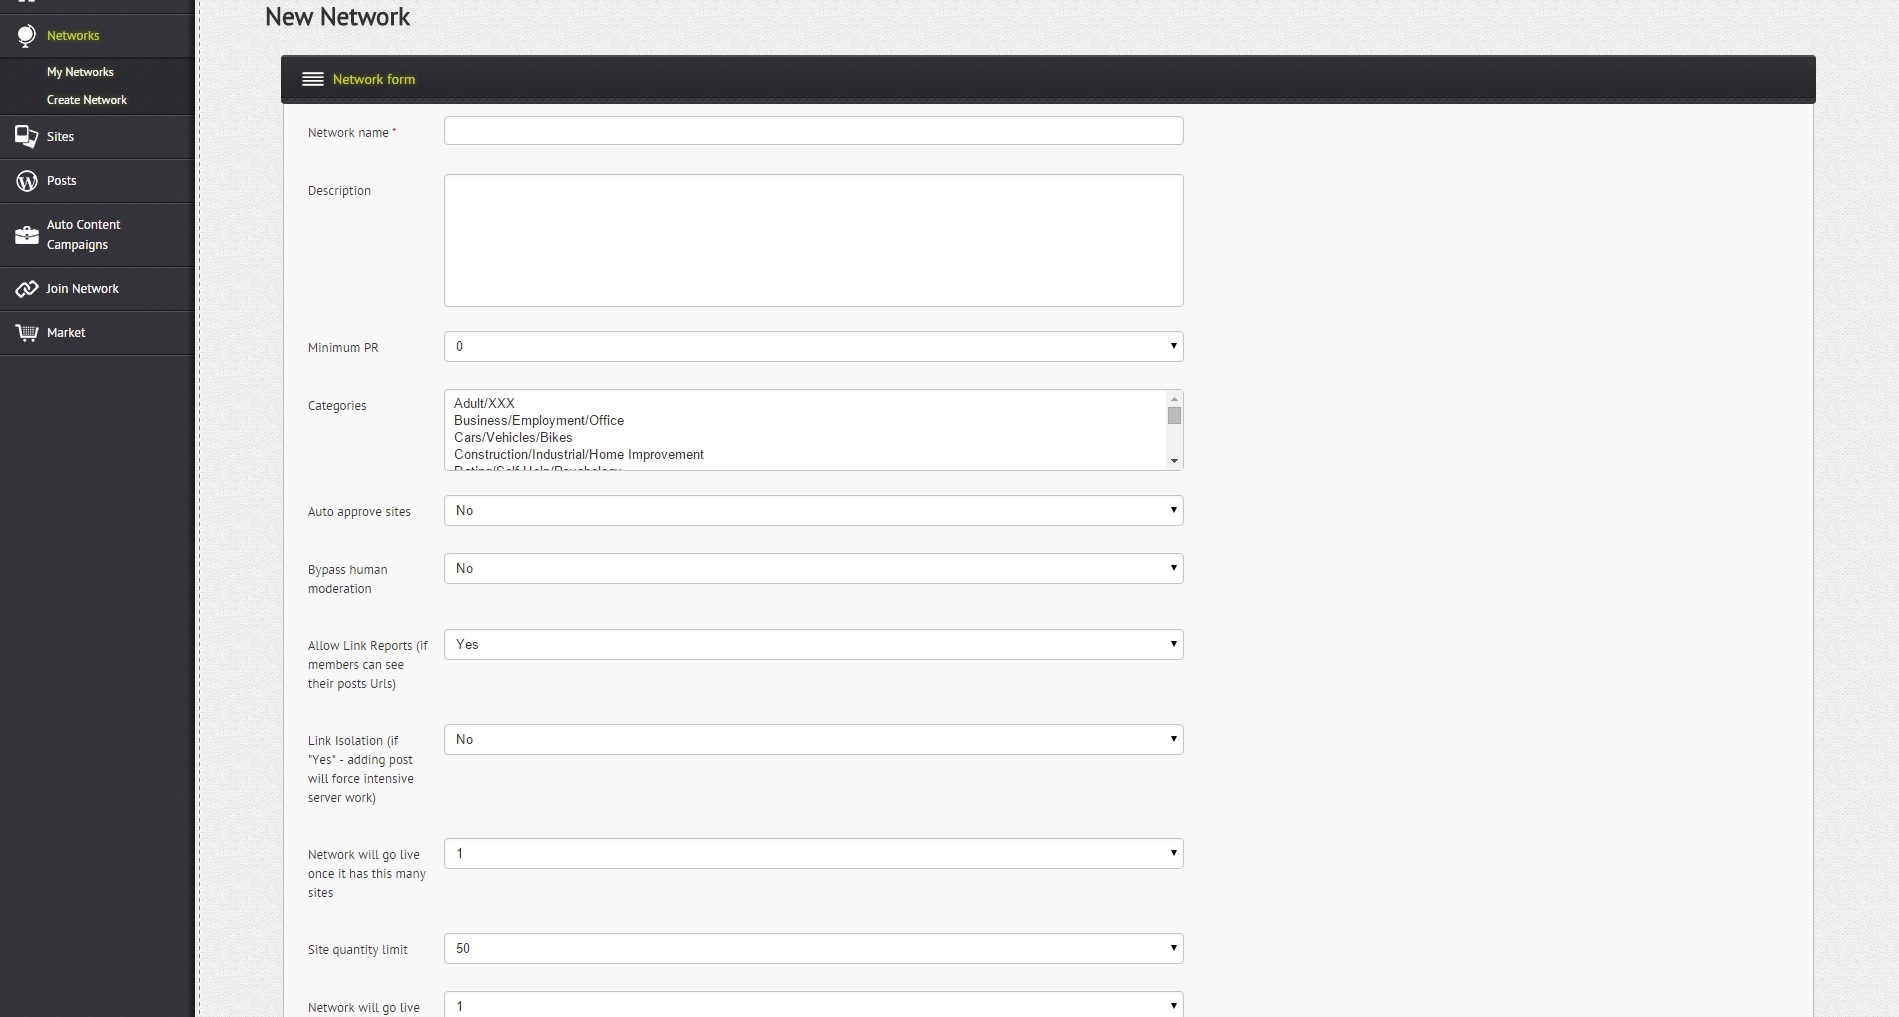
As you can see, there are a lot of options you can tweak and also, this is where you setup the requirements for your new blog network. Let’s look at each of these:
- Network name – the name of your ground breaking network.
- Description – what is your network about?
- Minimum PR – the minimum PR of the sites which will be allowed to join the network.
- Categories – this is basically the niche of the network. FBN comes with pre-defined categories which you can choose from:
- Adult/XXX
- Business/Employment/Office
- Cars/Vehicles/Bikes
- Construction/Industrial/Home Improvement
- Dating/Self Help/Psychology
- Ecommerce/Shopping/Coupons
- Electronics/Home Media
- Fitness/Weightloss
- Food/Cooking/Nutrition
- Gambling/Spread Betting
- General
- Internet Marketing/Forex
- Internet/Telecomms/Web Hosting
- Law/Professional Services/Real Estate
- Loans/Banking/Insurance
- Marijuana/Cannabis
- Medical/Beauty
- Mom/Baby/Family
- Movies/Music/Entertainment/Games
- Pets/Wildlife
- School/Training
- Software/Apps
- Sports Teams/Sports Equipment
- Travel/Outdoor Activities
- Auto approve sites – whether you want to review sites before allowing them to join the network or not.
- Bypass human moderation – whether you do not want to check each scheduled post before it gets posted to a site in the network.
- Allow Link Reports -do you want people who have joined the network to see where their links have been posted?
- Network will go live once it has this many sites – the number of member sites the network must have before it becomes operational i.e. starts allowing the posting of articles.
- Site quantity limit – the maximum number of sites allowed in the network.
- Network will go live once it has this many members – the network will allow the posting of links once it has at least the amount of members specified by this option. Keep in mind that one member can have many sites (depending on their FBN plan), so if they joined one network with many of their own sites, and there are no other members, they will be posting links only on their own feeder sites and we don’t want that.
- Limit network to this many members – the maximum number of members allowed to join the network. Again, a member is simply a person who uses FBN.
- Max number of sites each member can submit – the number of feeder sites every member can join the network with.
- Unique content only – whether you want to enforce posts with unique content. You must have a CopyScape API key in order to use this functionality.
- Minimum post content length – the minimum number of words that a post must have.
- Homepage blog roll – whether you want the feeder sites to be be styled like a homepage blog roll.
- Unique IP in – whether you want unique IPs for this network or for all networks.
- Daily posts per domain – the number of posts allowed per day for each site in the network.
- Is private network – whether you want the network to be private. A private network will not show up on the “Networks Grid” page. Members can only join such networks via an invitation mainly through the forums of FightBack Networks. Most of the top quality blog networks on FBN are private.
- Only members with these account types can join – the type of account you want the member to have in order to join your network.
The Sites Menu
First things first. You see, the way you connect your feeder site to FBN and make it eligible to join blog networks is via this WordPress plugin. You simply install that plugin on your site and you enter your site’s API key which is generated through FBN (you will see how in a second). That’s it. However, there are some requirements that your blog must meet:
- Subdomains and IPs are not allowed – the blog must have its own domain name.
- Standard WordPress themes are not allowed – the theme of your blog must be custom.
- Standard posts such as “Hello World!” and standard pages such as “Sample Page” must be deleted on your blog.
- Google Analytics and AdSense must not be present on your blog – this is very important because you don’t want Google knowing what’s happening here.
- The blog must not be banned or blacklisted by Google in any way.
Via the plugin you can also specify which post categories you want FBN articles to use and what authors should be used for the posting. Okay. So far so good. We now know how to add the plugin to our website. All we need is the API key generated by FBN for this site. Let’s go back to the “Sites” menu and you will see where that is. The “Sites” menu has 3 sub-menus. Let’s look at each of them.
The Add Site Sub-Menu
This is the page where you add your feeder sites to FBN:
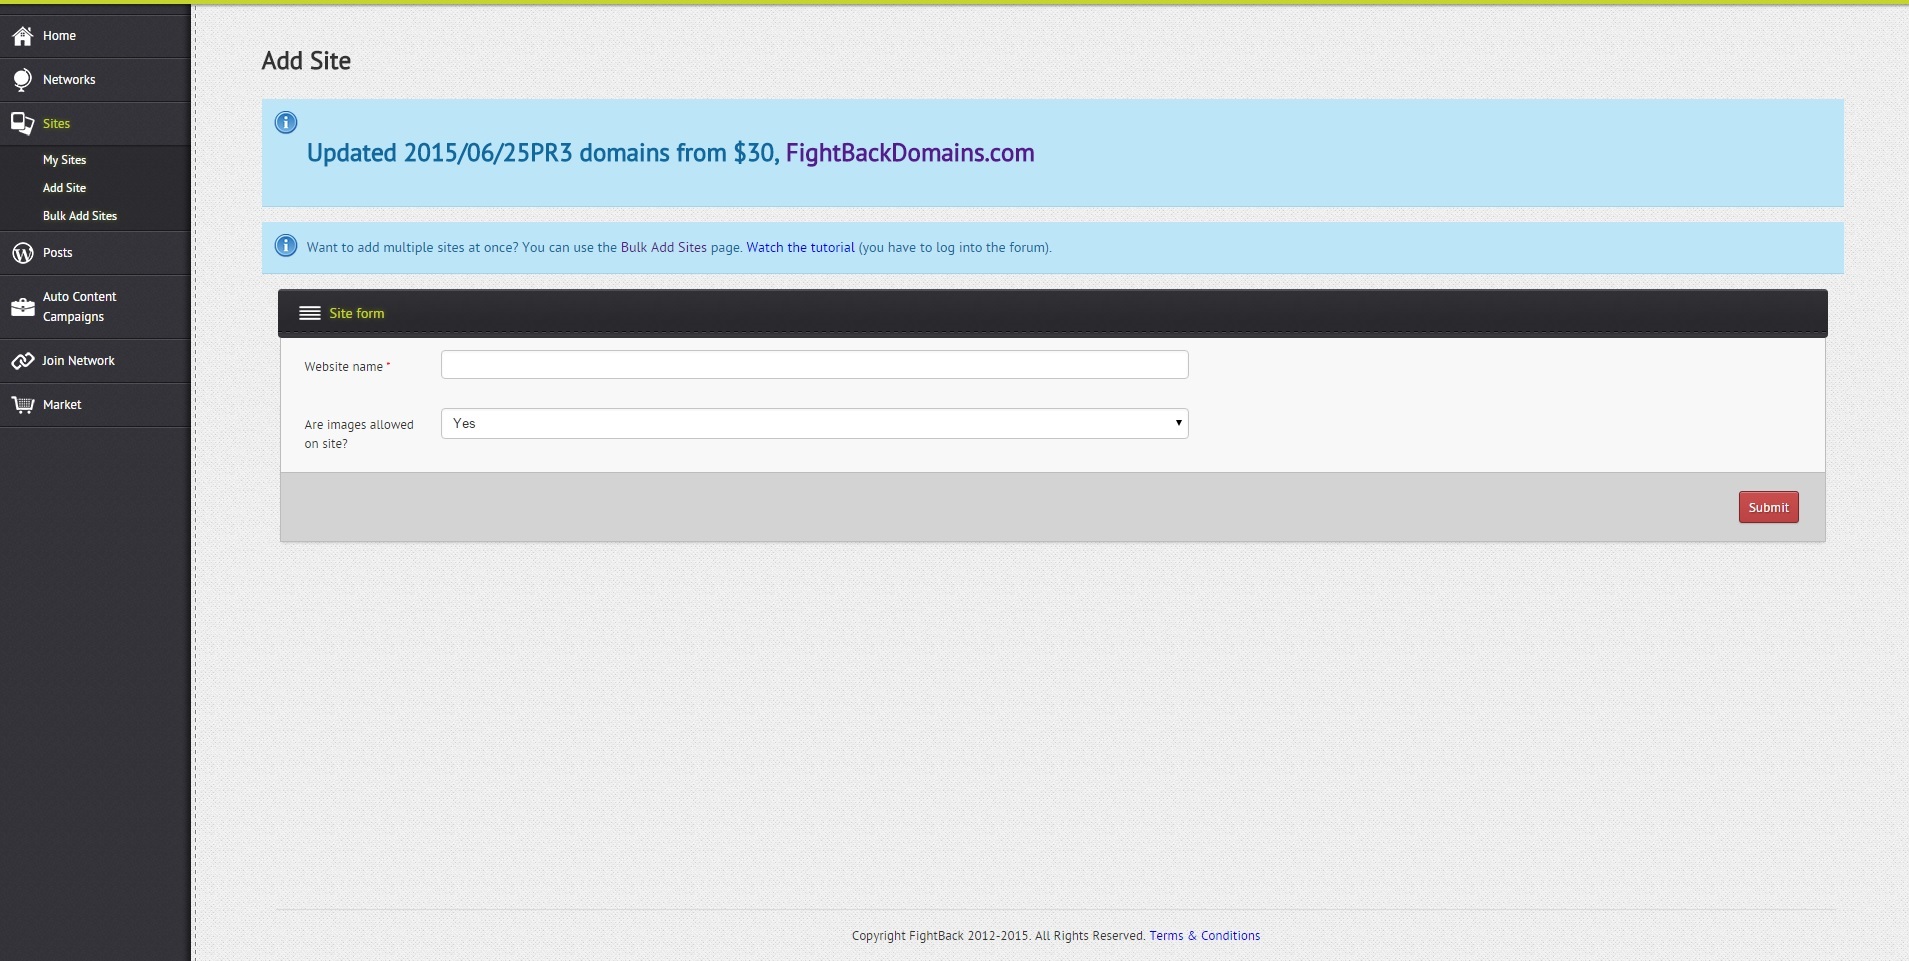
Now, the “Website name” property is just a label, so it doesn’t have to be the domain name itself. For instance, if your domain name is www.maginafinishedfarming.com, you can simply use Magina Finished Farming as the website’s name in FightBack Networks. And then you choose whether images are allowed on the site or not. Remember that other people will be posting to this site, so you want to be as specific about it as possible. When you are done with the options, you simply click the “Submit” button, and your site is almost ready to join an FBN blog network.
The My Sites Sub-Menu
This is where all of your feeder sites are listed:
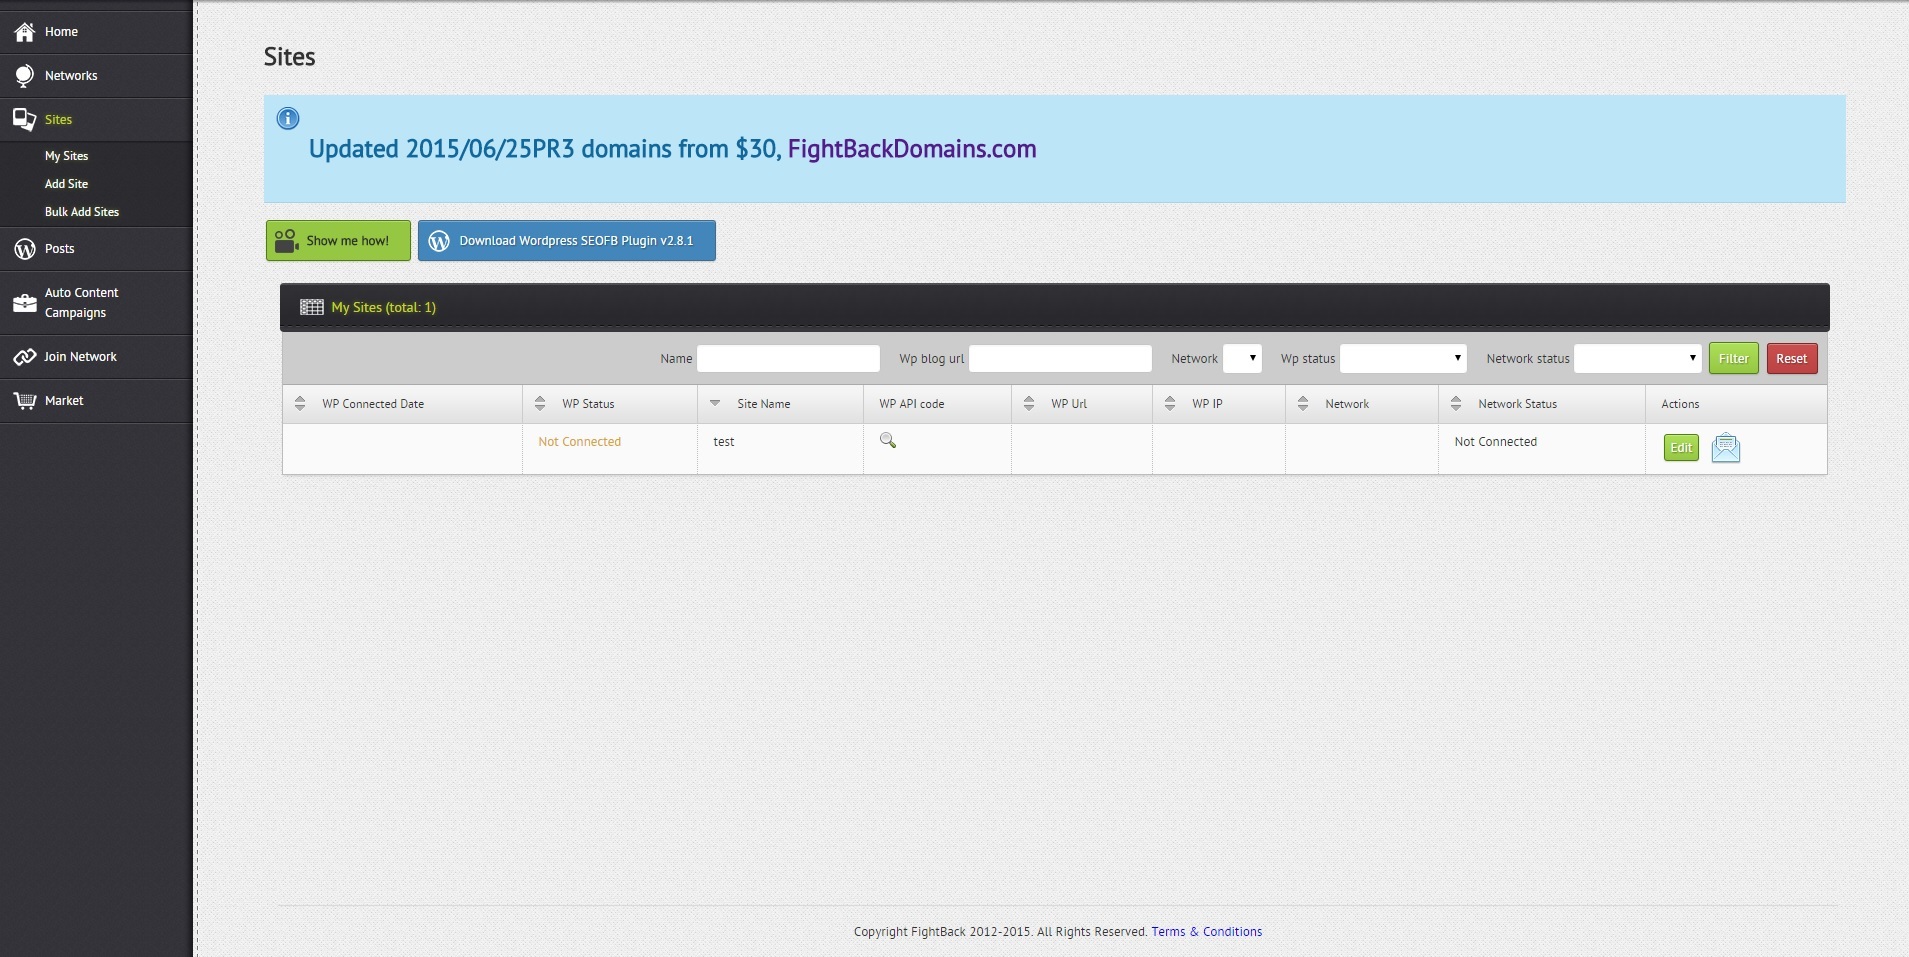
As you can see, I added one site for testing. Now, the table shows important information about your sites, but the thing we are looking for is the “WP API code”. This is the string you will paste in the WordPress plugin you installed earlier in this section in order to connect the site to FBN. Pasting the WP API code and clicking “Connect” will tie the knot of said website with FightBack Networks. Also, when you do that, you will see the rest of the columns fill up with data.
The “WP Status” will change to “Connected” and you will see the IP of your site, its domain, and when it was initially connected. You can also edit your site via the actions column at the end, or you can check out messages regarding this site – whether it was approved or disapproved to join a certain blog network for example.
The Bulk Add Sites Sub-Menu
The final sub-menu of the “Sites” menu allows you to add sites on a bulk instead of creating them one by one:
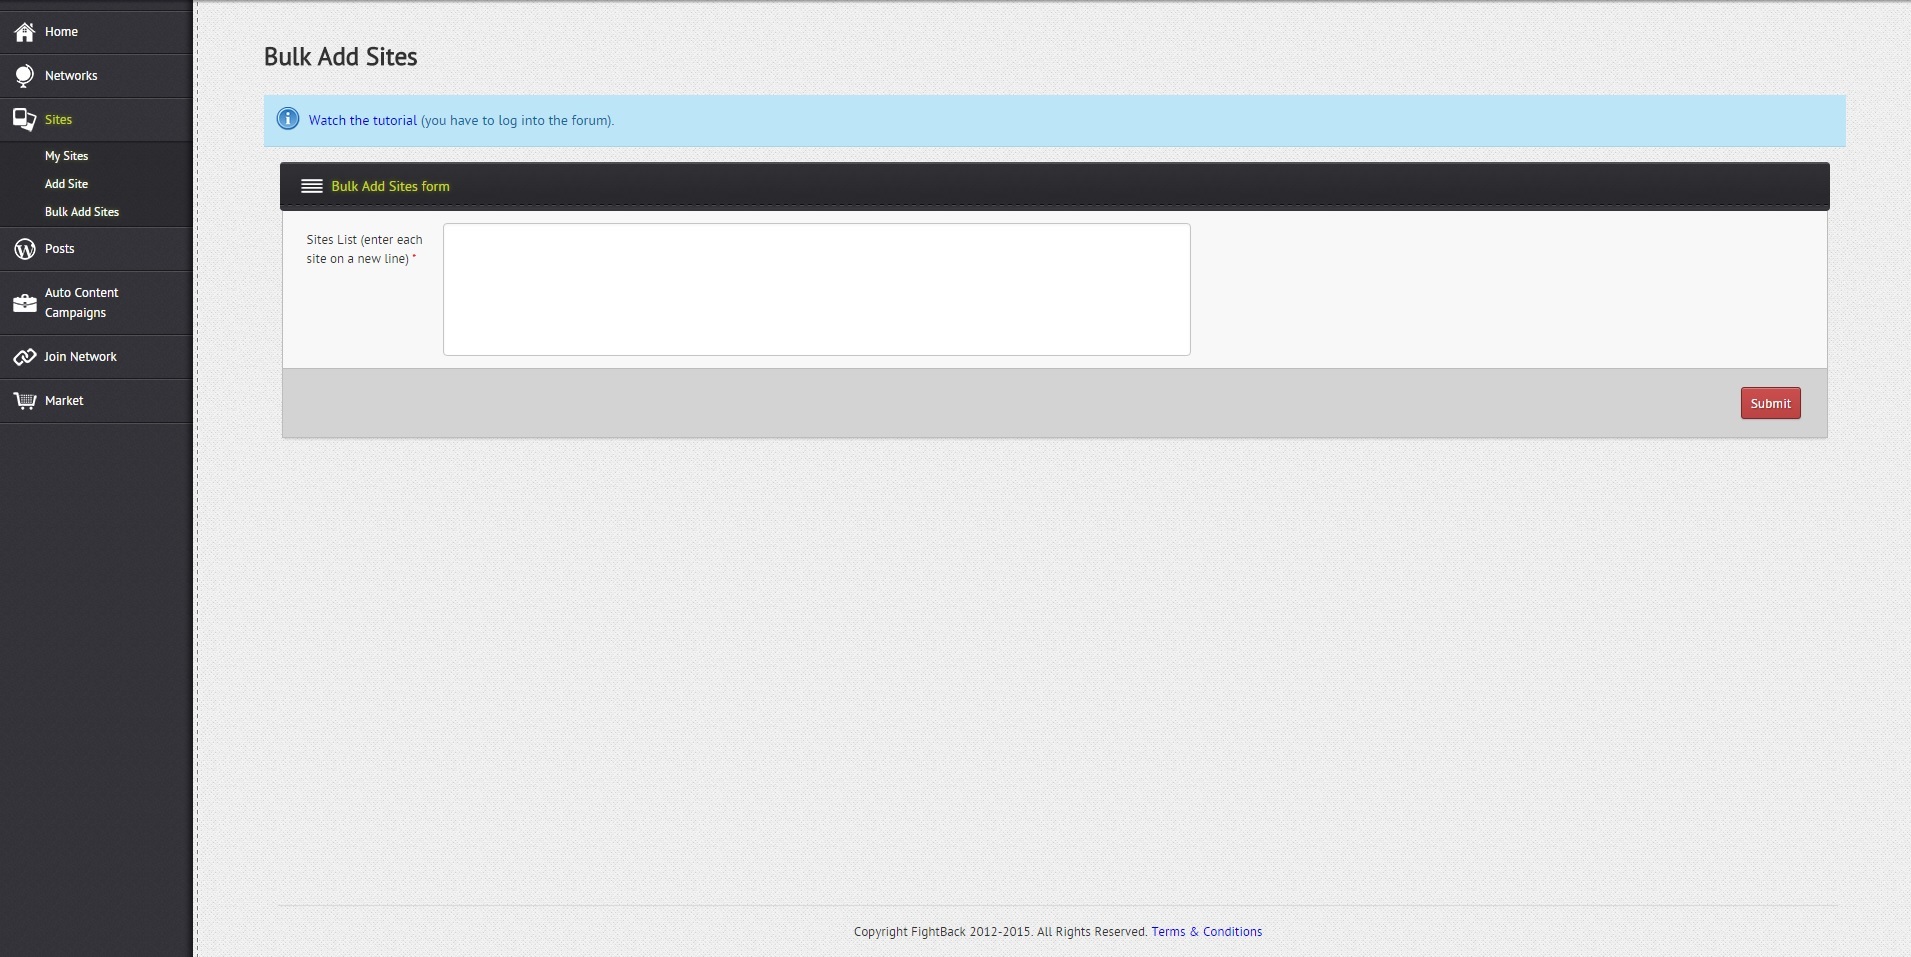
You simply enter one website label on each line and it will add them all to your feeder sites list. Because you cannot select whether images are allowed through this type of site creation, the default value is yes. So all sites you create from the “Bulk Add Sites” page will allow images by default.
The Posts Menu
The “Posts” menu is where all of the posts will reside – both yours and posts on your feeder sites. This menu has 5 sub-menus – “My Posts”, “Posts On My Sites”, “Create Post”, “Posts Campaign”, and “My Campaigns”.
The My Posts Sub-Menu
This is where all of your posts will be listed:
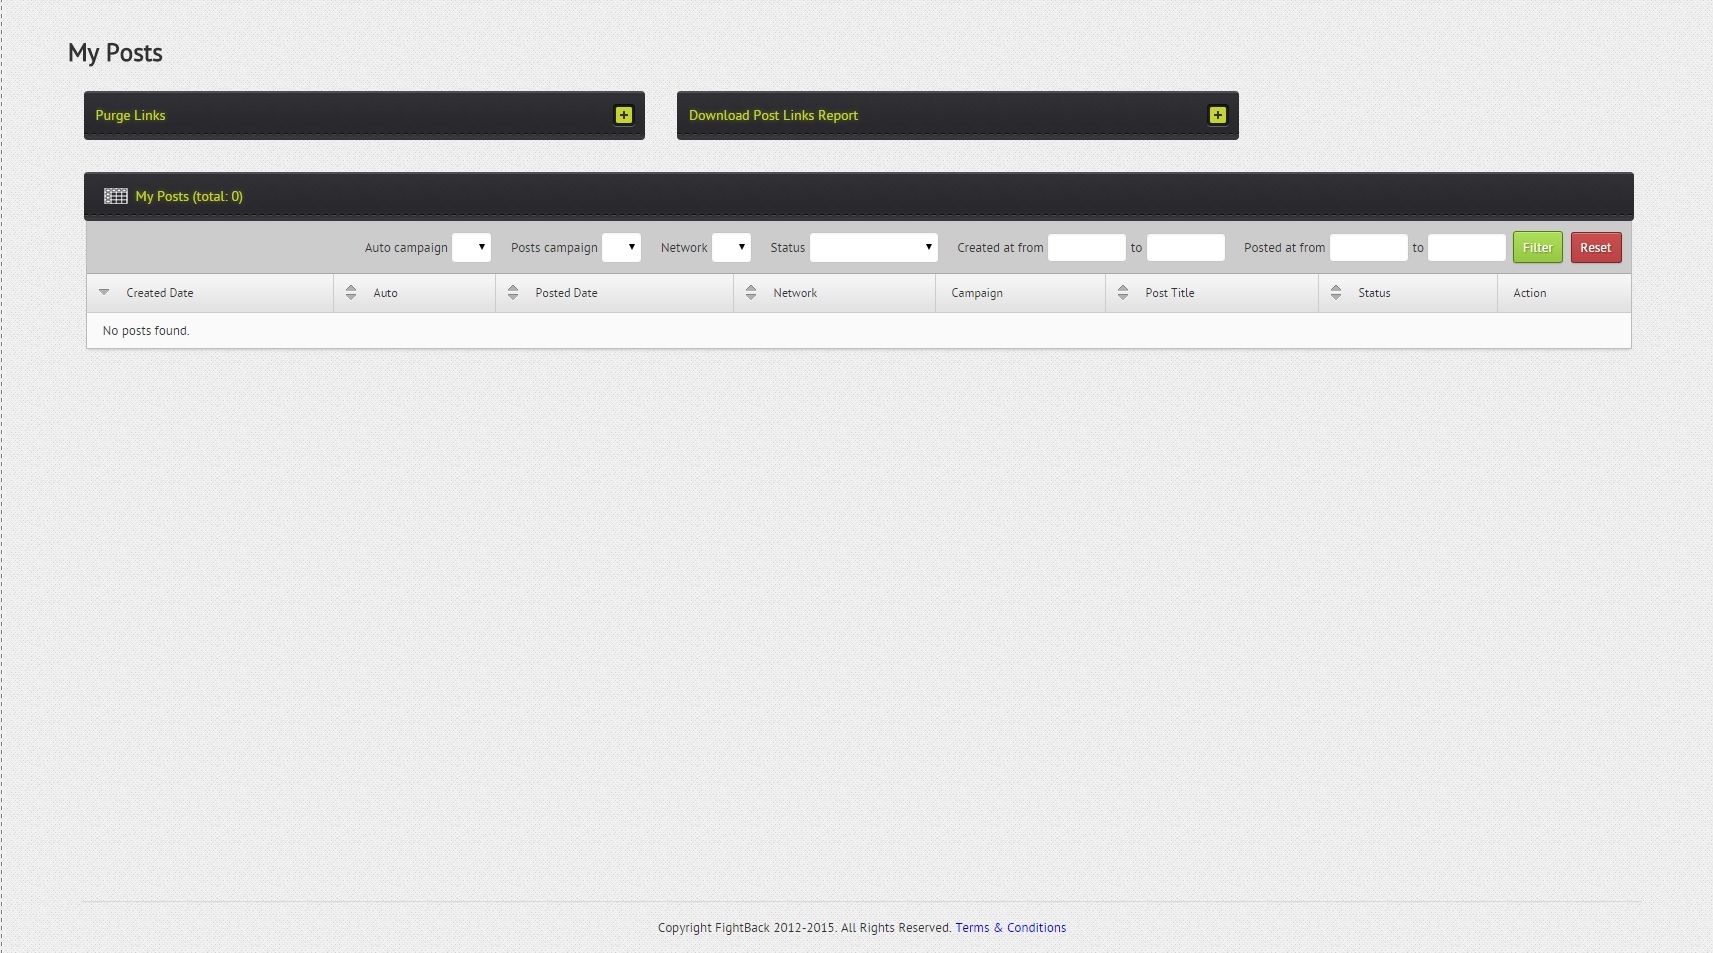
First of all, I want you to notice the 2 options above the posts table – “Purge Links” and “Download Post Links Report”. The first one allows you to choose a network you have joined, purge all links you have created on it and leave it. For instance, if you have made a mistake of some sort and posted articles and/or links you do not actually want, you can delete them through this functionality. I really don’t know any other blog networks that have such possibilities. Keep in mind that this action is non-reversible so once it’s done, it’s done.
The second one simply allows you to download links report for all of the posts that are in the table below. The search filter also applies meaning that if you have filtered only certain posts, you will get a links report only for them. FBN offers two types of reports:
- Plain text files
- CSV files
Okay. We covered “Purge Links” and “Download Post Links Report”. Now let’s look at the table below them. First of all, you have your usual search options. You can filter posts by:
- Auto campaign – shows only posts which are scheduled in the auto campaign you choose.
- Posts campaign – shows only posts which belong to the posts campaign you have chosen.
- Network – shows posts that belong to a certain network.
- Status – filters posts by status. There are 5 post statuses in FBN:
- Waiting for Moderation – a post which is awaiting moderation.
- Scheduled – a post that is scheduled and awaits its submission.
- Correction – a post that requires edition.
- Posted – a successful post.
- Pending Review – a post that is waiting to be reviewed.
- Created at from and Posted at from – filters posts by date.
That’s basically it for the search options. Now let’s look at the columns of the “Posts” table:
- Created Date – the date when the post was created. Keep in mind that this is the creation date, not the submission date.
- Auto – whether the post is generated via FBN’s auto content generation functionality.
- Posted Date – the day the post was submitted to a website in a network.
- Network – the network to which this post belongs.
- Campaign – the campaign to which this post belongs.
- Post Title
- Status
- Action – you can edit or delete posts.
The Posts On My Sites Sub-Menu
This page quite simply shows all the posts that your FightBack Networks feeder sites have received:
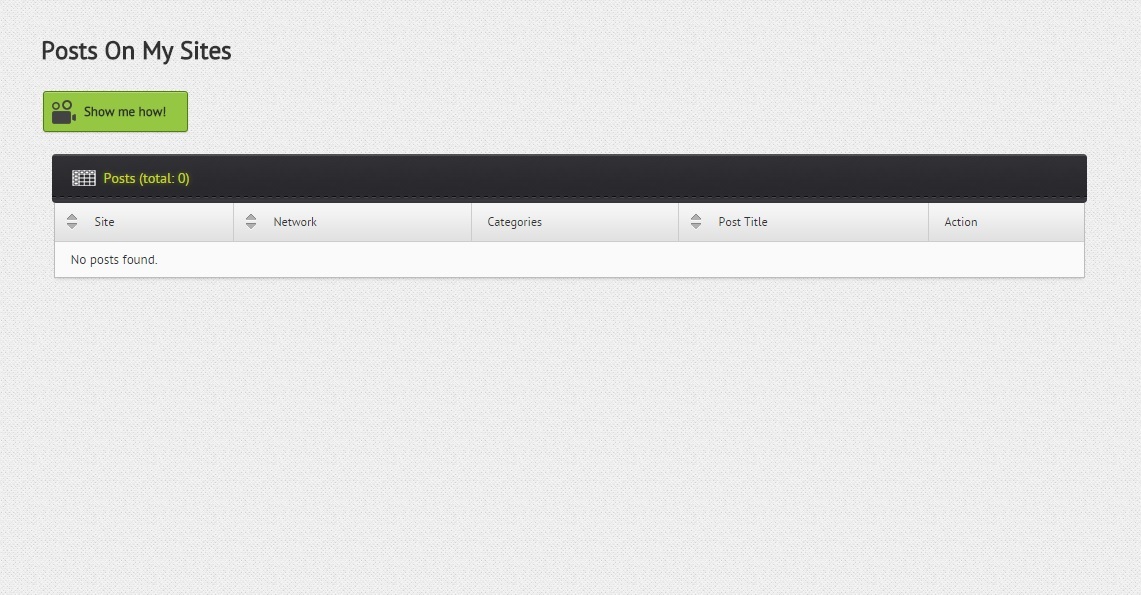
Here’s a breakdown of each of the columns:
- Site – the site on which the post resides.
- Network – the network which the post belongs to.
- Categories – the categories of the post.
- Post Title
- Action – you can file for a review of the post if you think that it is not appropriate in whatever way.
The Create Post Sub-Menu
This is where you create individual FBN posts:
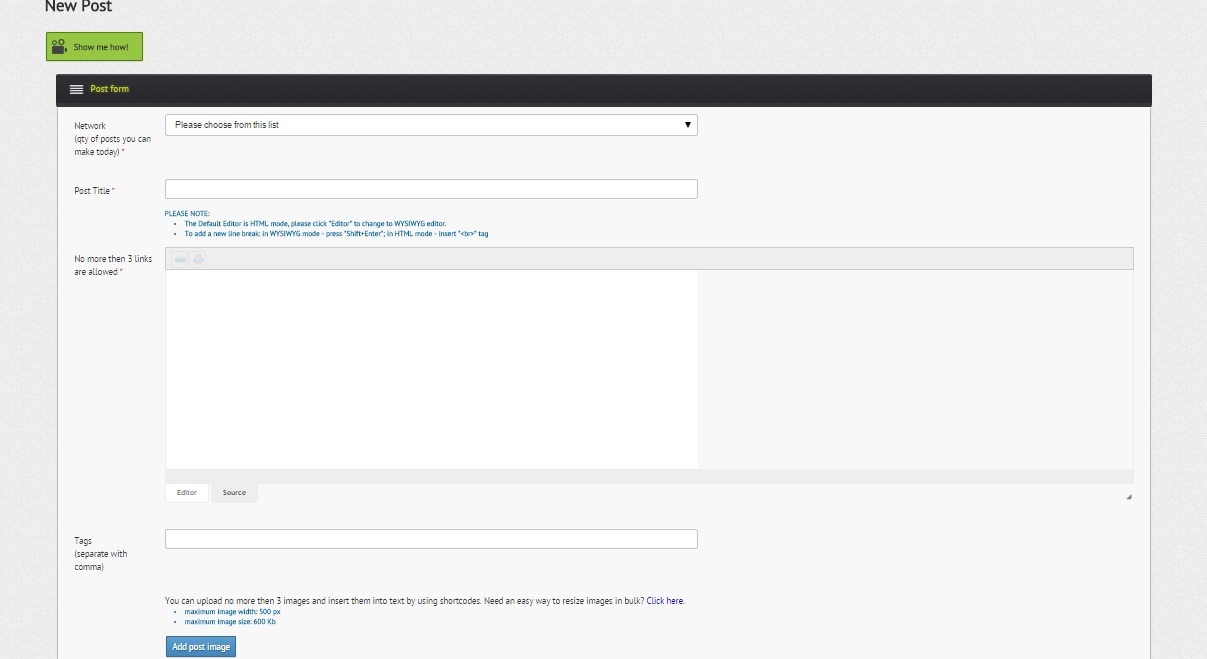
Let’s break down each of the options:
- Network – this is the network that the post will be submitted on. You will also see from the drop-down menu how many more posts you can make on that network today.
- Post Title
- Content – the big text area is where you will enter the content of your post. FBN allows no more than 3 links to be contained in a single post including authority links. The default editor is in HTML mode, so you can use any HTML tags you like.
- Tags
- Add post image – FBN allows you to upload up to 3 images and insert them into the post’s content using shortcodes generated right after the upload finishes.
- Add post video – you don’t see this one from the screenshot above, but it’s there at the bottom. FBN also allows you to add up to 2 YouTube videos and insert them into the post’s content via shortcodes. You can also use plain HTML if you don’t like the shortcodes – same goes for the post images.
And that’s basically it. Then you simply click the “Submit” button and your post goes out to the target network.
The Posts Campaign Sub-Menu
The “Posts Campaign” page allows you to schedule multiple posts at a time instead of creating each one separately through the “Create Post” page:
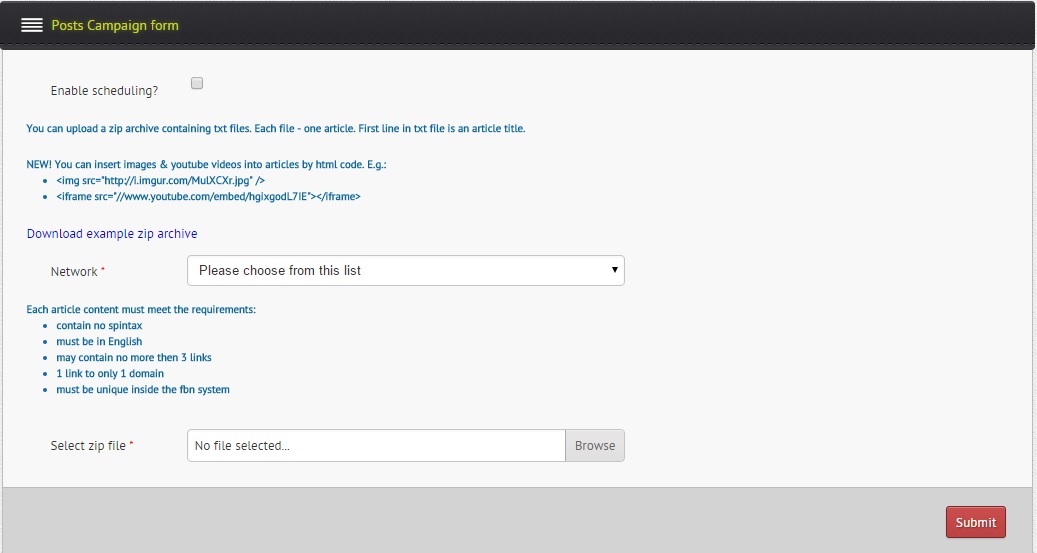
As you can see from the image above, you simply write the posts each in a text file with the first line being the post title. The same syntax applies as the one in the “Create Post” page – HTML tags are allowed and you can include up to 3 images and embed up to 2 YouTube videos in each post.
You can choose to enable scheduling for the posts campaign which will then ask you for a number of posts that will be submitted each day and will also ask you to name your posts campaign. After that you will select the target network where the posts will be submitted.
FBN also has attached a sample ZIP archive to make things even clearer. There are rules that apply to each of the posts as you see from the image above and you must comply with those. At the very bottom is a file upload input where you will attach your ZIP archive containing all of your posts and then you will simply click the “Submit” button. It may take some time for FBN to process your request depending on how many articles you have inside the archive, so be patient.
The My Campaigns Sub-Menu
This is where you will manage all of your FBN posts campaigns:
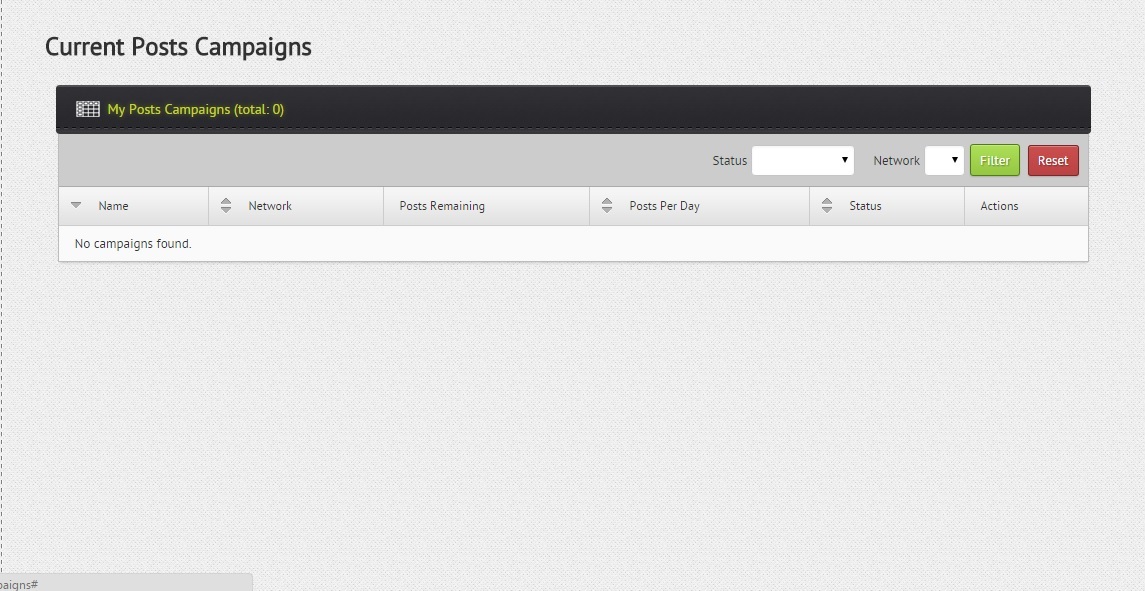
As you can see, it’s nothing more than a simple table which lists all of your posts campaigns. You have a search bar which allows you to filter by status and network and then you have the table columns:
- Name – name of the posts campaign.
- Network – the network to which the posts campaign is submitting.
- Posts remaining – the number of posts that have not been submitted yet.
- Posts Per Day
- Status
- Actions – you can stop, edit, or delete a certain post campaign.
That wraps up the “Posts” menu. Moving on with the ultimate FightBack Networks tutorial and review.
The Auto Content Campaigns Menu
The “Auto Content Campaigns” menu allows you to use FBN’s auto content generation functionality in order to create posts. Of course writing the articles yourself is the ultimate solution, but if you don’t have the time, this can work as well. This has two sub-menus – “My Campaigns” and “Create Campaign”. The first one is identical to the “My Campaigns” page of the “Posts” menu. It simply lists all of your auto content campaigns in a table.
The Create Campaign Sub-Menu
This page allows you to create your auto content campaigns:
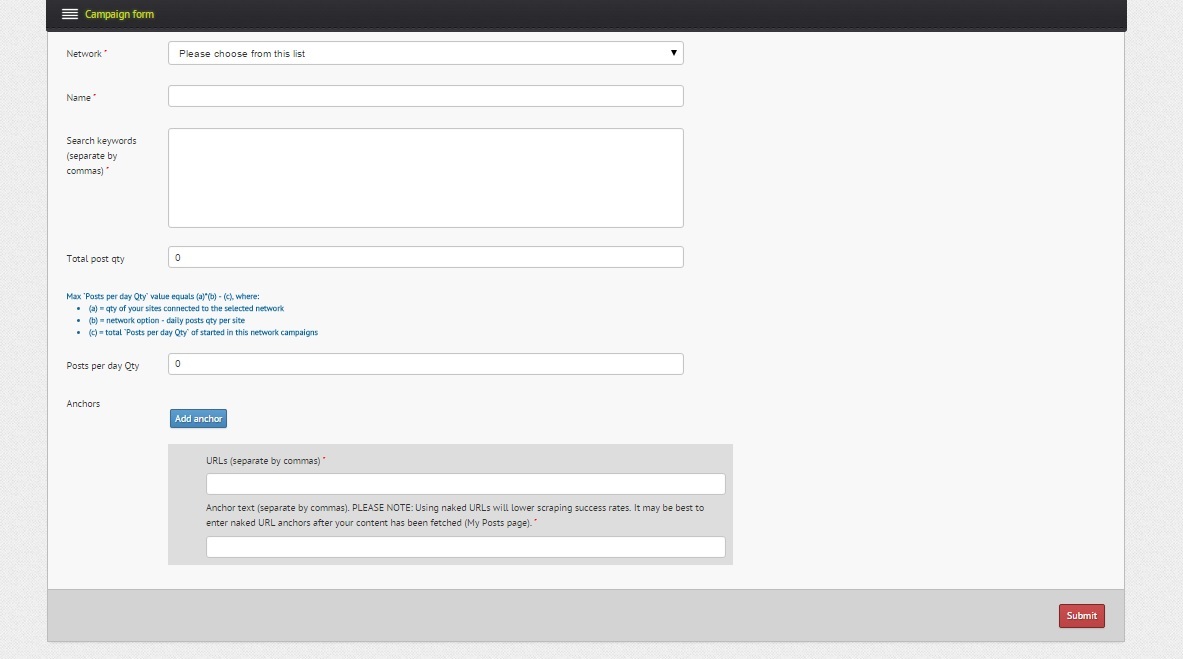
Let’s break down the fields:
- Network – the network to which the posts will be submitted.
- Name – the name of the auto content campaign.
- Search keywords – the keywords that will be used by the auto content generation system of FBN to generate your posts.
- Total post qty – the number of posts you want to be generated.
- Posts per day Qty
- Anchors – this is where you will add up to 3 target URLs and their anchors that will be inserted into the posts. You can enter more than one URL in each of the boxes by separating them with commas. Same goes for anchor texts.
This wraps up the “Auto Content Campaigns” menu. I just want to note again, that I would not recommend this, because it doesn’t generate that good of a content. Writing the posts yourself is how it’s done. But if you had to go the automatic way, I’d suggest you using Kontent Machine (our tutorial and honest review) and some great spinner like WordAI or SpinRewriter (check out our case study of the top 5 content spinners).
The Join Network Menu
This is where you will be joining FBN blog networks with your feeder sites. The “Join Network” menu has 2 sub-menus – “Networks Grid” and “Networks Joined”.
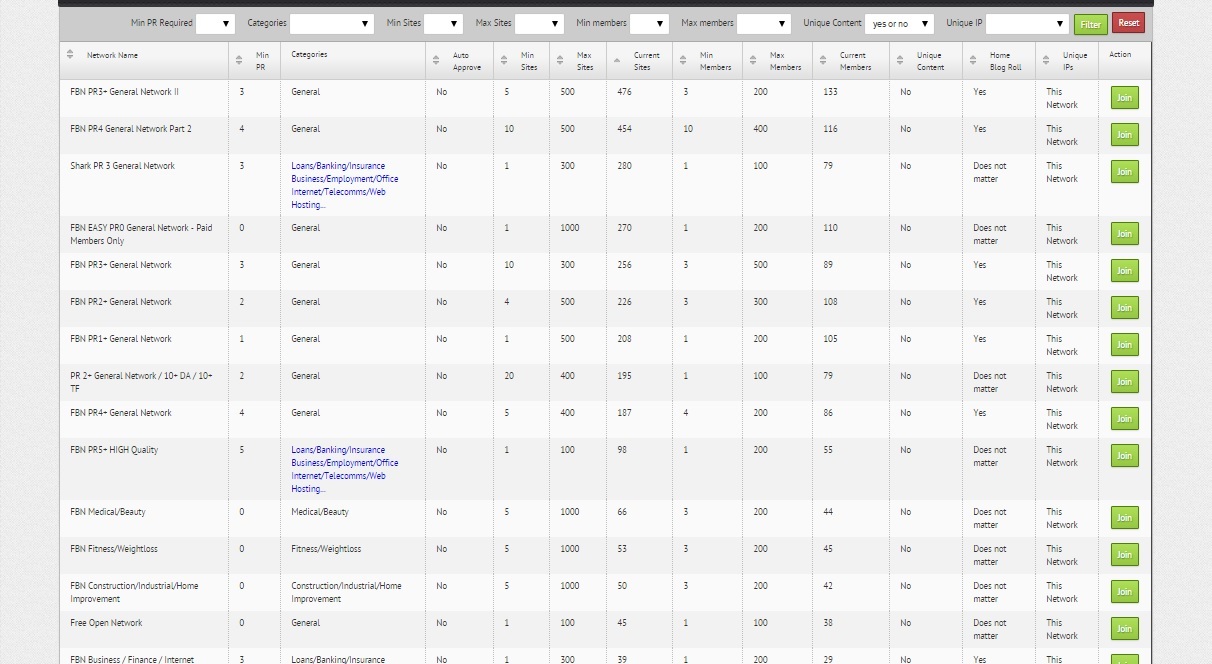
The Networks Grid Sub-Menu
This page shows you all of the blog networks on FBN which are public and ready for your feeder sites to join:
Let’s start with the search bar:
- Min PR Required – filter networks by their minimum PR requirement.
- Categories – filter networks by categories a.k.a. niches.
- Min Sites – filter networks by the minimum number of sites required before the network goes live.
- Max Sites – filter networks by the maximum number of sites allowed to join.
- Min Members – filter networks by the minimum number of members required before the network starts operating.
- Max Members – filter networks by the maximum number of members allowed to join.
- Unique Content – filter networks by their unique content requirements. Basically there’s 3 options for this:
- Yes or no
- Yes
- No
- Unique IP – filter network based on their unique IP requirement.
The search makes it really easy for you to find the networks that will fit your feeder sites. And then there’s the “Networks” table with the following columns:
- Network Name
- Min PR
- Categories – a.k.a. niche.
- Auto Approve – indicates whether sites joining the network get auto approved or must go through a review process.
- Min Sites – the minimum number of sites required before the network becomes operational.
- Max Sites – the maximum number of sites allowed to join the network.
- Current Sites – the number of sites currently in the network.
- Min Members – the minimum number of members required before the network becomes operational.
- Max Members – the maximum number of members allowed to join the network.
- Current Members – the number of members currently in the network.
- Unique Content – the policy of the network regarding unique content.
- Home Blog Roll – the policy of the network regarding its member sites and home blog roll.
- Unique IPs – the policy of the network regarding unique IPs.
- Action – you can join or exit a network.
That’s basically it. The good people at FightBack Networks have created numerous default public networks of all niches and requirements that are free to be used by any of their members. This makes it extremely easy for beginner FBN users who are looking to quickly start getting some nice PBN links.
And that puts an end to the FBN tutorial. Now, let’s review FightBack Networks, but first, it’s best practices time.
FightBack Networks Best Practices
FightBack Networks provides so much functionality, but you have to know how to use it wisely. That’s where experience comes in. But until you gain it, here are the FightBack Networks best practices which you should be employing:
- Name your feeder sites accordingly – you will be surprised how much easier you can manage a well-named network of sites. I am referring to the labels you give your feeder sites once you add them inside FBN. I am not referring to their domain names.
- Enable the “Avoid posting to own blogs” option on the “My Profile” page.
- Look through the forums of FightBack Networks – you will find a lot of quality private networks which you can apply for. You will also find numerous FBN strategies that other members are employing.
- Make sure you use only unique quality content for you posts.
- Do not add more than one link to the same domain name from a single post.
- Add authority links in your posts from time to time.
- Add both images and videos to your posts in a random style – sometimes 1 image and 0 videos, sometimes 3 images and 1 video, well you get the point.
- Try and always join high PR blog networks.
- Join niche relevant blog networks – you really want backlinks from relevant sites.
- Join networks that have a higher amount of member sites – that way, you will be getting PBN links from a lot of different domains.
- Keep an eye on the number of members currently in the blog network – you might see that there are a lot of sites in a certain network, but you also want to see a lot of current members.
- Try and find networks which enforce unique content – these are the more quality FBN networks.
- Make sure your feeder sites comply with FBN rules.
- Do not use any patterns on your feeder sites – I know that setting up 100 sites can be a pain in the ass, and after a while, you just want to do the same thing over and over again, but that’s not good. Always use different themes, different menus, different categories, etc. Do not create any patterns.
FightBack Networks Honest Review and Final Verdict
As you saw, FBN is an awesome online marketing service which basically allows you to get more out of your PBN sites. When you find the right network, you will most certainly get a jump in rankings. If done right, PBN links can be one of the most powerful backlinks out there.
Another great thing about FightBack Networks is that it comes with 30 days no-risk money back guarantee for both of its plans, so now you know you are covered. I bet you are now wondering how expensive these plans are right? I’d say they are pretty affordable. See for yourself:
- FightBack Networks Beginner
- $19
- ★ Add up to 10 sites
★ Link to anywhere you want
★ Up to 600 links per month
★ Perfect for beginners
- FightBack Networks Hero
- $47
- ★ Add up to 100 sites
★ Link to anywhere you want
★ Up to 6,000 links per month
★ Create your own networks
★ Perfect for more advanced PBN enthusiasts
Not too shabby at all. Getting a PBN link for less than 1 cent is not something you come by everyday. Less than 1 cent? Well, simply divide $47 by 6,000 and you’ll see what I’m talking about. And the best part is that the price doesn’t scale depending on the network you are in. So if you have 100 sites that are PR5+, and you join only high PR networks with them, you will still be getting 6,000 PBN links per month at the same price – less than 1 cent. Now that’s just awesome.
Bottom line is FightBack Networks is an extremely cost-effective and valuable online marketing service and community which can certainly make the difference when it comes to taking your website to top positions. Take a look at some customer reviews at the FBN site and you will see that it’s real. Plus, the forums are also extremely nice and filled with valuable online marketing information. Let the PBN games begin.