
We’ve all seen it, but not all experienced it – a PBN being identified and destroyed by Google. Now, there are a lot of different footprints that might have tipped the big G off and we will talk about that in a minute, however, when it comes to PBN safety, there is one ultimate best method/strategy you can follow – create a real website.
Yep, if you are creating a PBN site and you are thinking to yourself – it’s just a PBN site, so let’s make this quick – you will become, sooner rather than later, one of those people who open the infamous “my private blog network got pwned” threads on the marketing forums. Now let’s talk safety.
What You’ll Learn
- A quick intro – the mind-frame of a PBN creator and how you should and should not think when you are in the process of creating your private blog network – this is probably the most important part of the tutorial.
- The most popular PBN footprints – what are the most common signs that tip off Google and allow it to identify and shut down a private blog network? Does your PBN currently have any of these?
- The ultimate guide to PBN safety – step-by-step instructions for you to follow and enjoy a long-lasting private blog network.
- Summary – a quick recap of everything said and done.
Quick Intro
I know how a person who hasn’t well researched the world of PBN goes about setting up a private blog network – after all, I was one of these people as well. It basically goes something like this. Our hero:
- Becomes aware of private blog networks.
- Looks into a few examples of how someone ranked something with PBN backlinks.
- Gets excited.
- Believes they can do it too.
- Finds and reads several posts about PBNs – what they are, how to set them up safely, etc.
- Begins considering volume and costs of their PBN to be – number of sites that it will contain, domain purchases, monthly hosting payments, etc.
- Comes up with a budget – many times, people won’t have a big enough budget, but they’d still want to encompass as many niches as possible to use these PBN links for as many sites as possible thus making the mistake of creating broad niche multi-themed websites.
- Reads on a few more posts to make sure they know “everything” on the subject.
- Sets out to create the PBN – this is where it gets real tricky.
- Site after site, the new PBN owner builds their network.
- Gets bored and starts, unconsciously, creating patterns and maybe even makes a few major mistakes with hosting, because of wrong information they have previously read.
- PBN is now live – sets out to create backlinks to rank their money site(s) and/or sell PBN backlinks to clients.
- Decides to cut costs a bit more by using scraped and spun content for the articles with backlinks.
- Starts getting some results (maybe) depending on their individual SEO knowledge.
- Things go well for an undefined period of time depending on the footprints left.
- Eventually, everything goes to hell one day after the PBN gets detected (for one reason or another) by Google.
And that is pretty much the general scenario we have with private blog networks. Of course, not all PBN owners have it like this, with the ones that know what they are doing never getting detected, but I just wanted to illustrate a general example in my mind.
So the first and foremost mistake that you can make when setting out to creating your own PBN is thinking of it differently than you think about your money site. Basically, each of your PBN sites is a money site – there is no difference. It will still make you money if you do it right – so do it right.
If you think of your PBN sites like some entities that do not require your nurturing and support, you will have prematurely destroyed your private blog network, because there’s a good chance you will make a mistake somewhere in the process of creation – and trust me, there are a lot of places where you can go wrong.
So bottom line, each of your PBN sites is a real site that will make you money and should not be treated and regarded as a second hand entity. This is a very important mind-frame that you must create, because the future success of your PBN will strongly depend on it.
The Most Popular PBN Footprints
Now, before I start listing out common mistakes PBN creators make, I want to emphasize on an extremely important note:
Most people are giving Google way too little credit and most people are giving Google way too much credit. There are only a handful that give Google just the right amount of credit while at the same time still thinking about future possibilities – you want to be one of those guys.
The first group of people i.e. the ones that give Google way too little credit are first on the line of PBN de-indexation. Their networks leave way too many footprints and alert way too many of Google’s filters which is why they get pwned the fastest.
Then we have the guys that give Google way too much credit which is a blade with two sharp edges. They will usually spend way too much time thinking about stuff that is currently remotely possible (not impossible) and might make mistakes in the real simple stuff, which we will get to in a minute.
And then we have the “balanced” thinkers that are well aware of the current PBN stage and Google condition, but are not excluding any factors that they deem could/will be implemented by Google somewhere in the future.
To conclude this intro, you cannot possibly be 100% sure that your PBN will be safe for all eternity since you don’t know (for sure) how Google will change in the future. But what you can do is make sure that your PBN is safe for today and near future situations.
Now, that we have laid out the dynamic reality of a private blog network, let’s talk a bit about the most common footprints people leave nowadays. We won’t talk about the “distant” past when you could do pretty much whatever you wanted to do and still get away with it. Without a further a due:
- No mixing of hosts – forget about those PBN “specifically-designed” hosting providers – it just doesn’t work anymore. Nowadays, you gotta mix it up – cloud hosting, shared hosting, etc.
- Irrelevance – creating an all-in-one PBN is currently not an option. I mean, you can’t have a PBN that you initially set up to rank websites in the insurance niche and then one day decide that you will also start posting articles about weight loss, because you have new clients in that niche and you don’t want to invest some extra bucks in creating and managing a new PBN focused specifically on the weight loss niche. Just forget about this scenario.
- Low quality content – using spun content in your PBN sites ain’t gonna cut it this time. I mean, this is not your average GSA SER link building campaign. You have to think quality here and that means getting real content written for you.
- Thin content – using 10 client backlinks from one post of 500 words is a big no-no. The big black and white bear will karate your PBN before you can spell “what the hell just happened”.
- Identical length for all posts – using 500 words for all of your articles is a huge giveaway – think about it, it’s just not natural for a website to have like 20 – 50 posts with all of them being in the 500 – 510 words range.
- Any patterns – using the same theme, same layout, same plugins, etc, is the battle cry of a PBN to be de-indexed.
Those 6 are the most common “groups” of footprints that allow Google to detect and tear apart a private blog network. Of course, there are a lot of other footprints that you can get busted for, but chances are, you will get caught for one of the footprints listed above.
No worries though, in a few minutes time you will know exactly how you can create a PBN site from scratch that is completely safe (as of now), so you won’t be having any sleepless nights fearing Google’s paid animal assassins. For show.
The Ultimate Step-By-Step Guide To PBN Safety
Okay, now that we’ve laid out the ground work for this article, let’s get into the essence of it – the guide to PBN safety. From this point on, this tutorial assumes that you have already gathered a list of (expired) domain names that you will be using for your PBN – you either found them by employing the strategy from this tutorial, or you simply found them on ExpiredDomains.net or another domains trading site.
Keep in mind that you shouldn’t purchase those domains you found and I recommend that when you find a domain you want to include in your PBN, you stop searching for more domains, but you go to setting up the PBN site on that domain asap. So, in a nutshell, you find a domain you like and then you set up a PBN site on it – repeat until your private blog network reaches the target number of sites.
We will also assume that you have prepared a bunch of phone verified email accounts from Yahoo, Outlook, etc, but not Gmail for obvious reasons and when you find a domain name you want to add to your PBN, you choose one of these accounts to tie to the entire process of site creation. Now let’s get started.
Step #1: Creating a Fake Persona
The first thing you want to do is go to Fake Name Generator and create a fake persona that will be the digital manager of your new PBN site. That is, you will register everything using the information for this persona – domain name, hosting, WordPress author, social media, etc.
Now, before you create this digital person, you want to first choose their digital location. If you are going to be using this PBN for a certain website and you know the exact location you will be targeting, logically, choose that same location for your fake person.
But, if you will be using the PBN for yourself, clients, etc, you can pretty much choose anything. I’d still go with U.S. mostly, but you want to add a few other countries in the mixture as well. For this guide, since I will show you the set up of only 1 PBN site, I will choose U.S. as his location – don’t forget to change the name set as well:
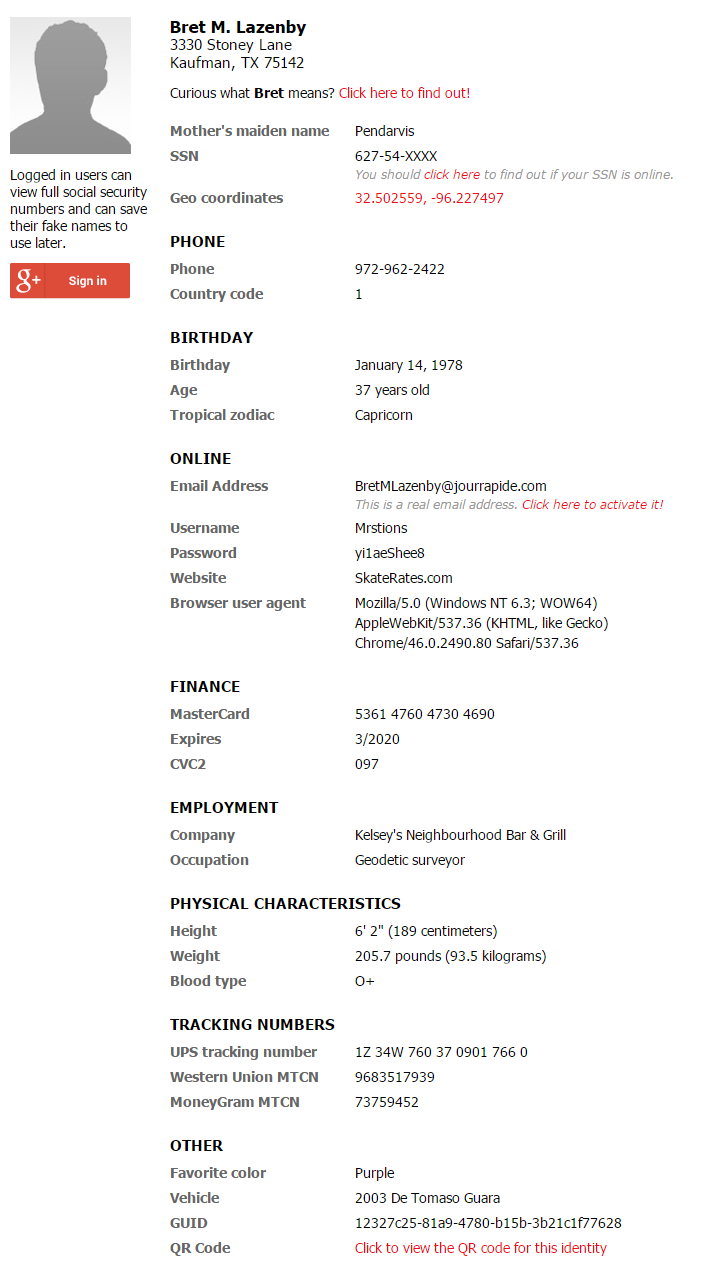
There you have it. I now have the digital person who will create and own this PBN site and all accounts related to it. Now, a very important thing here – I will use all the information above except for the name and email. We already have those from the email account.
Important: You might want to also edit the street name and number if they do not seem realistic as this might leave a footprint for Google to pick up on.
Now, take all that information from above, copy it and paste it into a text file for safe keeping – you never know when your browser might crash. Once copied, replace the name and email with the ones from your email account. For the purposes of this guide, I will be using a Yahoo account with the following details:
- Name – Almire Dobson. If possible, you want the name of the fake persona to be “in tone” with the country you used from the Fake Name Generator, however, it’s not mandatory.
- Email – almiredobson@yahoo.com.
Now, once in you login to the email account, you want to open the default message that most email services send – This is extremely important for the credibility of the account. Once you have copied the info from Fake Name Generator and replaced the name and email with the ones from your account, it’s time to register the domain.
Step #2: Registering The Domain Name
Now before you actually register the domain name, I want to note on a few extremely important things about it that part of the PBN site creation process:
- Always mix up the TLDs – don’t just use .com for all the PBN sites. Mix it up with .org, .net, etc, as well as national TLDs such as .co.uk, .us, .fr, etc, of which you can actually find a lot more high quality expired domains compared to the usual .com and .net mixes. If you find a good .biz or .info maybe, don’t be afraid to throw it in the mix as well.
- Domain name topic – you have to make sure that the domain names included in your PBN actually embody the topic that your network will target. Take notice, I said topic, not niche and there’s a difference. Now, at this point you are probably already aware that a private blog network (done right) is not the cheapest of things – there are a lot of ongoing costs aside from the initial set up. So, you want to utilize it to its absolute maximum and that means covering as many similar niches as possible. For instance, you can target the topic of “business and finance” which includes a lot of niches – very profitable at that.
- Use different registrars – don’t purchase all your domains from GoDaddy, but include any of the following as well (of course, your choice will depend on whether you are registering a “lost-in-the-records” expired domain, or purchasing one from an auction, etc):
- NameCheap
- HostGator
- NameJet
- NetworkSolutions
- Register.com
- SnapNames
- Tool.Domains
- ExpiredDomains.net
- Moonsy
- RegisterCompass
- And a billion others that you can find by simply performing a search for the keywords “domain registrar”, “domain auctions”, “expired domains”, etc.
- Don’t use WHOIS as much – you’d think that the logical thing to do here is hide your information on all domains, but it’s not – remember, we are creating a real site here and real sites don’t have anything to hide (in most cases). Of course, include a WHOIS privacy here and there. NameCheap is just perfect for that since a new domain registration comes with a free WHOIS privacy – so take advantage whenever you are thinking of adding WHOIS privacy to a certain domain name.
Okay, we covered the most important points of this step, now let’s actually execute it. I’m gonna use GoDaddy for this example since I can easily pay via PayPal. That will save me some time and will also illustrate one of the countless options you have when combining a domain registrar and hosting provider (I will use HostGator for this).
Okay, so I fire up GoDaddy and I search for the domain name I want to register. One note here again – I will illustrate this example with a brand new domain, but in most cases, you will probably be registering/purchasing an expired domain that you found one way or another – after all, a PBN is at its strongest when it contains good quality high PR websites.
Anyway, I found a dummy domain to register for this guide, but who knows, I might find some purpose for it later on:
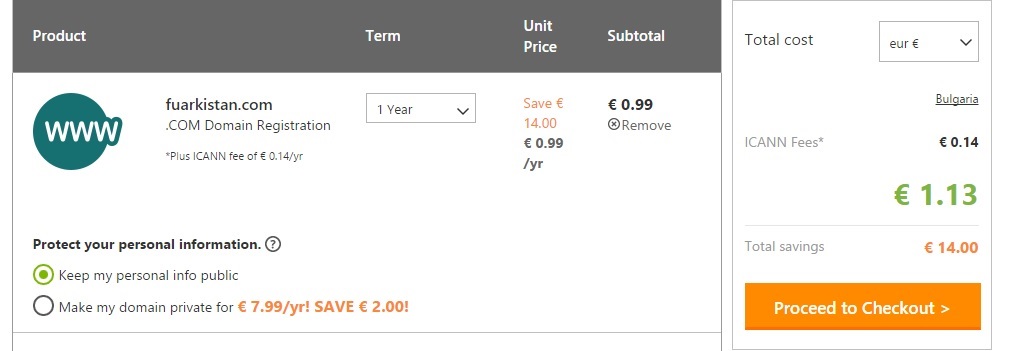
Then I click “Proceed to Checkout” and I select “New Customer”. I then get redirected to the “Billing Information” page where I will fill in the details of, you guessed it, Almire Dobson – the digital fake persona I created earlier:
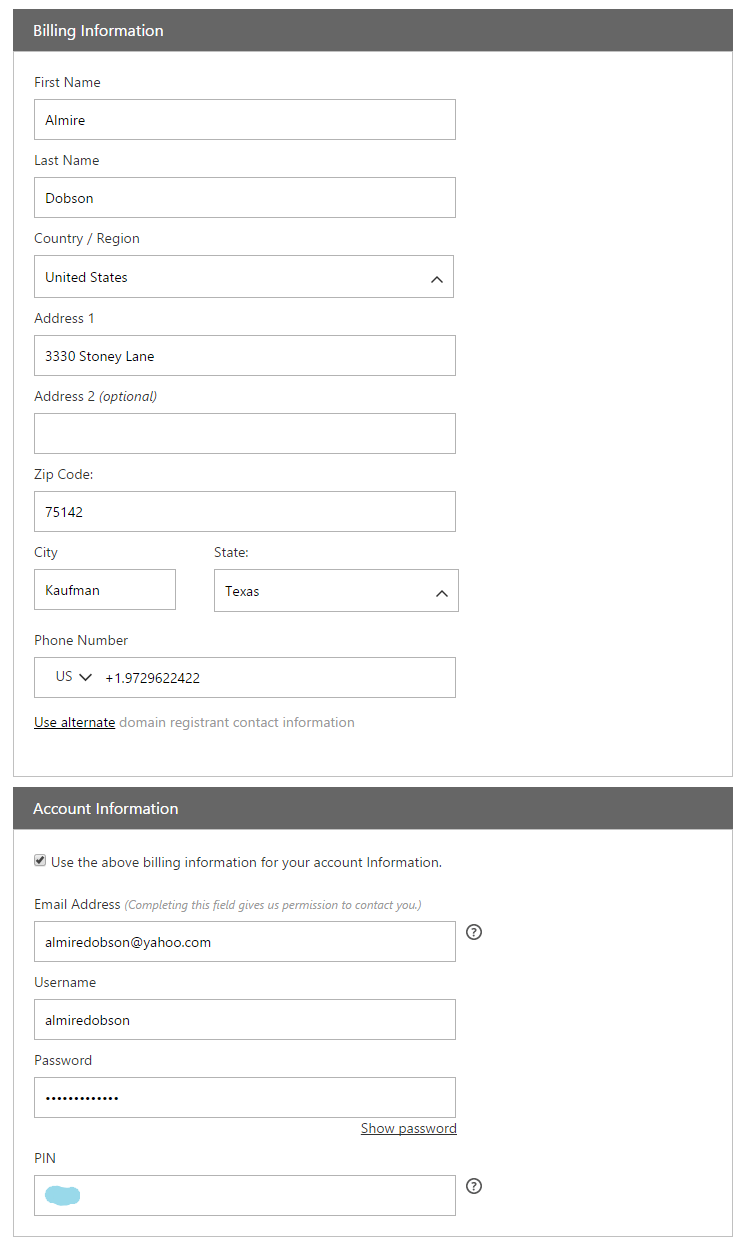
As you can see, all the needed info from the file we saved earlier has been employed. Now, an important thing I want to note here is the fact that you will need to add the PIN number to the text file with all of your fake persona’s data. Who knows when you’re going to need it right?
The next thing I do is select PayPal as a payment option and then I click the “Place Order” button. Before you know it, Almire Dobson is the proud owner of a brand new domain. And don’t worry, you can purchase all your PBN domains from the same PayPal account.
Now, a very important sub-step of this bigger step of the guide – you need to go back and login to your email account. Once inside, you will have messages from the registrar you just used to purchase your domain name. You absolutely need to open them and make sure they get marked as read – one of them will probably be about you confirming your email address and it is very important that you do so.
And that’s it. Now we have a domain registered with our fake persona. Next step – selecting a hosting provider.
Step #3: Choosing The Hosting Provider
Just like with the domain registrars, you want to mix it up here as well. Important notes about your selection of hosting provider for each PBN site include:
- Do not use SEO Hosting – this is most likely a footprint nowadays and you want to avoid it at all costs. Those unique class class “X” IP addresses ain’t fooling anybody no more. Hosting like this was initially created to cut costs and centralize the digital location of your PBN sites, but it is just too easily recognizable by Google, because of those identical numbers in the IP addresses. I’m going to spare you the details on this, because a lot can be said, but for your own benefit, I urge you to never use any form of SEO Hosting for your PBN sites. Period.
- Use different hosting providers – Do not host all your PBN sites on HostGator (use coupon “inetsolutions” for a $9.94 discount) or GoDaddy, but spread out your locations and types of hosting:
- InMotion Hosting
- Bluehost
- iPage
- SiteGround
- DreamHost
- DigitalOcean – only for those who know their way around Linux.
- Maybe use a local hosting provider to your fake persona – so in our example here, Almire Dobson is from Texas, so it is quite logical that he might have looked for a hosting provider located in his city or his state in general – in this case, Rackspace is a viable option.
- And any other host you deem fit to add a randomization pattern to your private blog network.
- Use different combinations of domain registrars and hosting providers – don’t always use, for example, NameCheap hosting when you register a domain name using NameCheap. Play around with the combos.
Now those are the basic rules you need to follow in regards to your PBN hosting. As I already mentioned a little bit above, I will use HostGator for this example. So, I go to their site, and I order their smallest hosting plan (the “Hatchling” Plan):
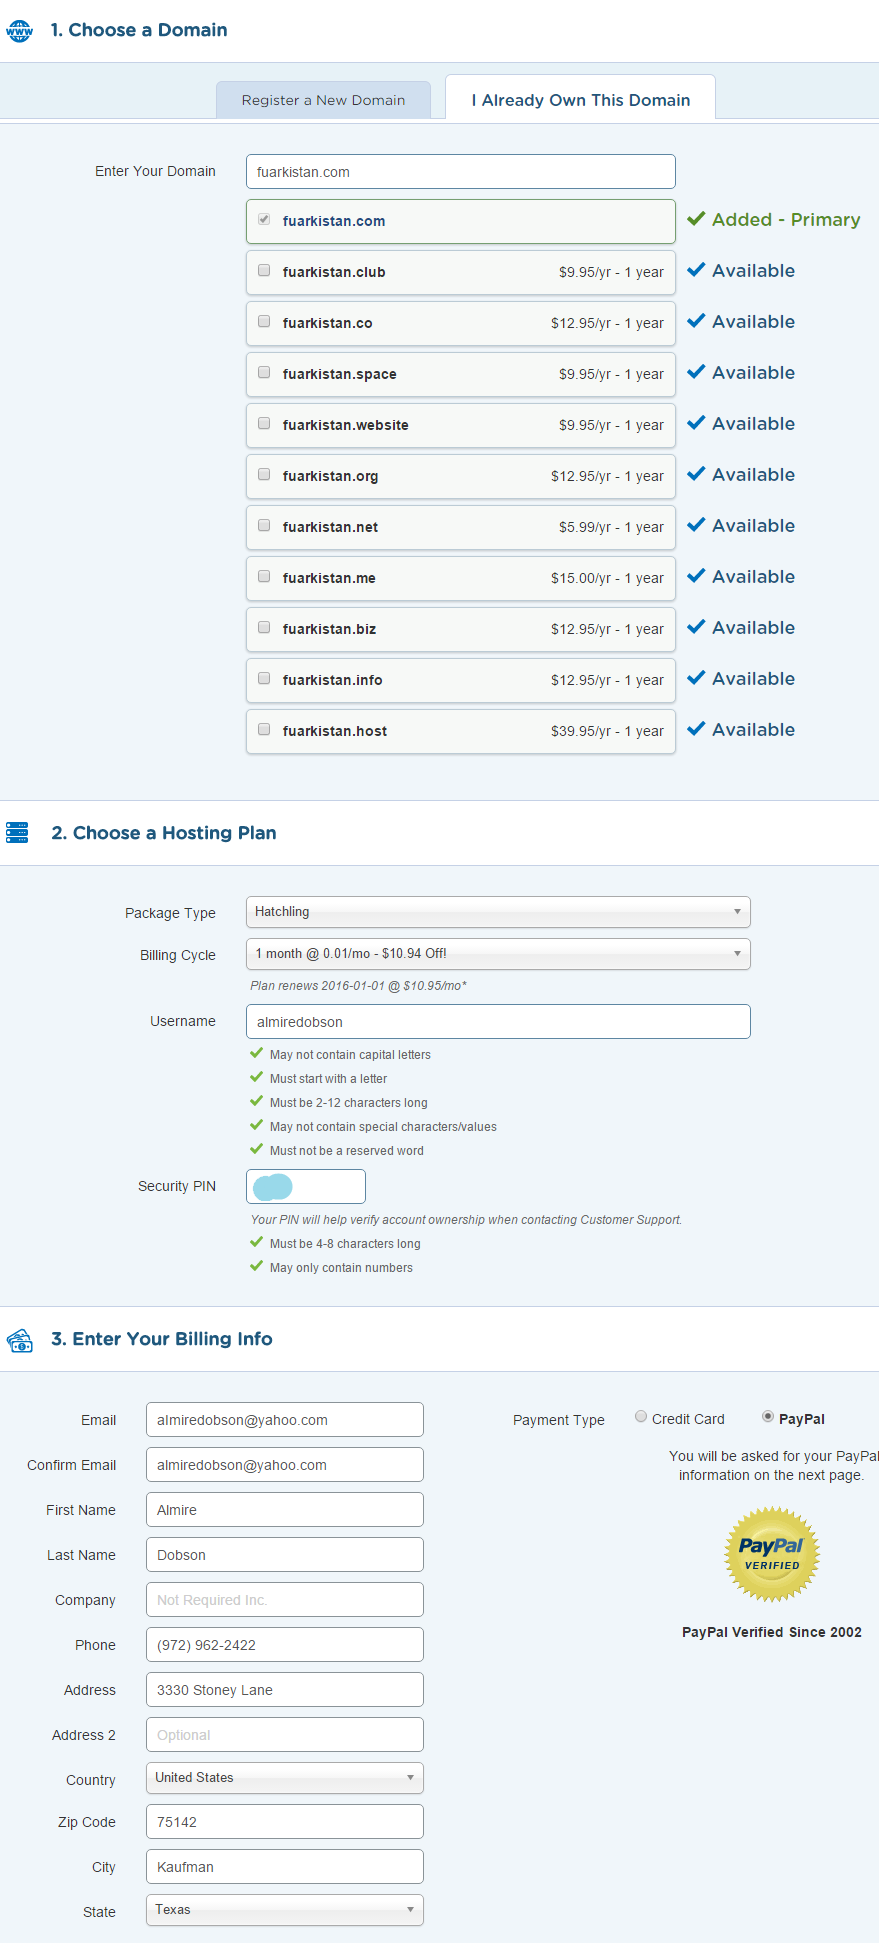
Again, I simply enter the details from my fake persona and I select PayPal as a payment option. Also, notice that the username is connected to the fake persona as well – first name and last name included. And that’s basically it. Now I simply click the “Checkout Now” button at the bottom of the page, I pay for the hosting account, and I wait for HostGator to set up my account – usually takes a few seconds.
When your hosting account is ready, you will receive an email with the login details that you obviously need to open and read in order to get to the next step – setting up the PBN site on said hosting account.
Step #4: Setting Up The PBN Site
Now that we have a domain name registered and a hosting account ready, it’s time to connect the first to the latter i.e. change the nameservers to the ones HostGator provided. These are usually included in the email with the login details of your hosting account, and all you have to do is sign-in to your GoDaddy account, and change the default nameservers that it sets for each new domain you purchase through it.
It takes a few seconds for the update to take action, but when it’s done, you will clearly see the page that shows up on your domain switch from the default one by GoDaddy, to the default one by HostGator. At this point, we are ready to set up our PBN site on the domain.
Now, you have a lot of options here – you can write a site from scratch, you can use a framework, or you can simply take advantage of the many CMS platforms available nowadays. For this example, I will go with one of the more popular choices – WordPress.
Step #4.1: Installing WordPress
I’ve read, on several occasions, that WordPress might be a footprint for PBN sites, but I think that’s completely not true. I mean, with more than 25% of the websites using WordPress, I think it will be quite hard for Google to make a difference between a PBN site and a real site – provided of course the PBN site is and looks like a real site, which is what I’ll show you how you can achieve.
Most of the hosting providers I mentioned above provide a one-click WordPress install option and that includes HostGator. Now, another important thing here – when you are installing WP, it will request that you enter the following default information in order to create the blog:
- Admin username – instead of always using the name of your fake persona, you should mix this up sometimes with “admin”, “root”, etc.
- Email – that’s self-explanatory.
- Blog title – remember the topic you chose for your PBN? Well, employ it now.
- First and last names – too obvious.
Once you fill in these fields, you can click “Install”, and your WordPress website will be set up in a few seconds time and you will also receive the login credentials in your email. Then simply login to your brand new WP installation and prepare for all the fun that’s coming. Before that, a few important notes about your WP installation:
- Use different versions here and there – do not always install the latest one – check out why here.
- Disable the auto-update function in WordPress – for obvious reasons.
- Removing the “readme.html” footprint – when you install or update WordPress, a file called “readme.html” will be added to it. You have two ways of dealing with this file – either delete it or you simply change the WP version inside of it. Again, mix it up with each of your PBN sites.
Now, since this example will include a WordPress PBN site set up, I will go over the different footprints that you must avoid, but I want you to know that pretty much the same ones apply for any type of website you set up.
Now, let’s look at every single thing that you need to do in order to set up a WordPress PBN site the right way – starting with the removal of the default data.
Step #4.2: Removing The Default WP Data
When you install WordPress, it will add some example information for beginners to play with and understand the platform. This includes a dummy post, a dummy comment, a dummy page, and a few pre-installed plugins.
Obviously you want to remove the dummy post and with it, the dummy comment and no, having this removed on all your PBN sites is not a footprint – it’s just good sense.
There’s also a default “Hello Dolly” plugin that you can remove, but should not remove on all websites. In my opinion, it is more logical that some website owners, especially the ones that are new to WordPress, forget to remove it – I know I have on a few occasions in the past.
Step #4.3: Choosing a WordPress Theme
Once your WP installation is completely blank i.e. it doesn’t have any default data on it, it’s time to select a theme – you can check out this awesome post, which includes the top 50 free WP themes for 2015. This is where you can go wild, but remember, the theme you choose must be in tone with the topic of your PBN site.
You don’t want to install a theme specifically designed for lawyer sites when you are in the topic of “Health & Fitness” for example. Keep it relevant with the theme. Other important notes concerning the theme of your PBN sites:
- Mix it up – I don’t know how many times I’ve said that so far, but it basically applies to every aspect of your private blog network. You gotta mix it up. So, for instance, if you have 10 sites in your PBN, you may have 2 using one theme, 1 using another, 3 using a third one (different palettes of course), etc. Do not create any patterns whatsoever.
- Do not use free themes only – if you can, include a premium theme here and there.
Step #4.4: Creating The Layout Of Your PBN Site
After you select a theme for the website, it’s time to create its skeleton – just like you would do for a real website. This includes logo, blog categories, pages, menu(s), sidebar widgets, etc. Important notes:
- Creating a logo – you can use DesignMantic, Canva, Logomakr, and other similar free online logo designers to create the logos for your PBN sites. Again, mix it up here as well – use different fonts, different positions of the symbol of the logo in relevance to the text, sometimes use only an image without a text and vice versa, etc.
- Blog categories – you already know the topic of the PBN site, so now you need to create an open-to-variation number of categories. For instance, if your PBN topic is “Health & Fitness”, you can have blog categories such as “workout programs”, “diet routines”, “mind health”, “ectomorph”, “endomorph”, and even more specific niches such as “paleo diet”, “weight loss workouts”, “cardio”, etc – you get the idea.
- Pages – you will most definitely need to create a few mandatory pages here. This includes the homepage, the blog page, which in some cases can be the homepage, an about us page, a contact page. You can even go the extra mile and include terms of use and/or a privacy policy page. Now, do not always do the exact same thing and set up these exact same pages. Sometimes for instance, you can include the about us content in the sidebar as a widget, sometimes you can insert the contact us form in the footer, again as a widget, etc. But do not create any patterns that can relate one of your PBN sites to another.
- Menu(s) – I’m saying menu(s), because these vary from theme to theme. Some have a main menu and then a footer menu, some have a sub-header menu, etc. What you need to do is go with the flow of the WP theme you have installed on that particular PBN site. Your main menu i.e. the one in the header will most usually include the pages you have created, and might also include a few menus with sub-menus that represent your blog categories. So for instance, you can have a “Diet Routines” main menu that when hovered, displays sub-menus like “Paleo Diet”, “Weight Loss Diets”, “Weight Gain Diets”, etc. Yet again, no patterns should be created.
- Sidebar – most WordPress themes have their own little specifics when it comes to the sidebar. They usually come with a few widgets that you can put there. These include, but are not limited to most popular posts, recent posts, newsletter signup widget, Facebook like box, Twitter feed widget, etc. What you need to do is choose a few that would go well with the theme and insert them into the sidebar.
- Footer – include a few widgets in there as well, maybe a contact form and/or even a newsletter signup, latest posts, tags, archives, a copyright text with the current year, etc.
And there you have it. At this point, your PBN site should have a stable skeleton ready to receive content. However, there are a few more things we need to take care of in order to make it look even more like a real boy… sorry, site.
Step #4.5: Installing WordPress Plugins
We can’t go without those right? Now, there’s nothing mandatory here and basically, the sky’s the limit. Important notes:
- Mix it up – same old story again. Maybe use a caching plugin for one of your PBN sites, and then use another one for a different PBN site. Maybe use CloudFlare for one or two PBN sites and no CDN for the next 3. Or maybe, do not add any plugins to one of the sites. You get the idea. Plugins can leave a big footprint, so be careful with them. Also, by default, WordPress comes with Jetpack and Akismet. So, sometimes delete those, sometimes leave them and utilize them, and sometimes, delete just one of them. However, in most cases, you’d want to leave and actually activate Akismet otherwise, your PBN site will be blasted into oblivion by spam.
- Use plugins that you need and plugins that you don’t need – I can’t tell you how many times I have looked at WP sites that have non-utilized or even disabled plugins just laying around and slowing down the performance of the site – it seems natural. What I’m trying to say is, don’t make all of your PBN sites perfectly clean plugins-wise. Leave some dirt in there.
Step #4.6: Social Presence
This is one of the steps most PBN owners mess up. They really underestimate not only the trust provided by social media, but its power as well. There’s basically two steps here – establishing the social presence for your fake persona, and establishing the social presence of your PBN site.
Step #4.6.1: Establishing The Social Presence Of Your Fake Persona
There isn’t much to say here – basically create a profile for your digital PBN site owner on social networks such as Facebook, Twitter, LinkedIn, etc. Of course, again, you have to mix it up – do not create profiles on the same websites over and over again for each different fake persona.
Now, when you are creating the profiles, don’t just close the tab when you login to the created account – oh no. You have to make the profile look like a real account. And that means adding a profile photo, a cover photo, information about the persona which you can take from the data generated by Fake Name Generator at the beginning of this PBN guide. Also, do not forget to confirm your email after you create an account on all these social networks.
When you are done with all that, head over to Gravatar, create a WordPress account for your fake persona, and then sign-in. Once inside, add a profile image to your account. Why? Because this is yet another small trust bonus your PBN site will need. The image you add to your Gravatar account will show up in your PBN site’s admin account. So, whenever you add a new post, or you comment or whatever, that profile picture will be seen instead of the default “unknown person” image.
Once you are done with all the social profiles of your fake persona, head over to their profile page on your PBN site and add links to the social profiles there. Also, fill in first and last name, and the about me description.
Step #4.6.2: Establishing The Social Presence Of Your PBN Site
Once you are finished with the social profiles of your fake persona, you need to do the same for your PBN site. That means creating a Facebook page (using the fake persona’s FB account), creating a LinkedIn company page, etc.
Again, you want the social networks where you register your PBN sites to vary from one site to the other. So, include Pinterest here and there, Instagram here and there, StumbleUpon, Delicious, Diigo, etc. And again, just like with the social profiles of your fake persona, you want to add in all the information that can be added – description of the page, tags, keywords, goal, profile image, cover photo, etc.
Step #4.7: Social Signals
You want those PBN posts that you create to get indexed as soon as possible right? Well, employing as many social signals as possible is a proven way to achieving exactly that. Now, you won’t want to manually share every post you submit, so, automating this process is a must.
You can do that by utilizing either the Jetpack plugin’s “Socialize” tool, or by creating an IFTTT account for your PBN site. Again, mix it up – sometimes use IFTTT, sometimes use the Jetpack plugin. Personally, I prefer IFTTT because it’s just so simple, and it also allows me to automate the process on a lot more social networks compared to Jetpack.
So, create an account for your fake persona on IFTTT. Once inside, go to “My Recipes”, and then click the big blue “Create Recipe” button. The way this will work is, we will set IFTTT to watch the RSS feed of our PBN site, so that whenever a new post appears there, it will go out and trigger a number of processes all of which will do one thing – create social signals to that new post.
So for instance, I have created social presence for the example PBN site from this guide (you will see it in a minute) on Facebook, Twitter, and Pinterest and anytime I post a new article on the website, that same article will be automatically shared on those platforms thanks to IFTTT.
Now, you can set up a new post to be shared on a lot more social networks than FB, Twitter, and Pinterest. For example, when I publish a new post on Inet Solutions, IFTTT will share it on the following social networks:
- Yammer
- Readability
- Nimbus Note
- NewsBlur
- Medium
- Inforeader
- Evernote
- Instapaper
- Weebly
- Blogger
- Bit.ly
- Diigo
- Delicious
- WordPress
- Tumblr
That’s a total of 20 social networks. How else do you think my posts get indexed in just a few hours after I publish them? You can utilize any of these for your PBN sites, but again, you do not want to be creating any patterns whatsoever. Those social signals will not only help your PBN sites in terms of trust, but will also boost their effectiveness as well, so do not ever ignore them.
Step #4.8: Creating Content For Your PBN Site
This is the final part of this guide and probably the most important one at that. I mean, every single step so far is extremely vital for the safety of your private blog network, but the content is the thing that most people fail at and the thing that leaves the footprint that gets their PBNs destroyed by Google.
Just like with the social media presence, there are two parts to the content of a PBN site – content with backlinks meant to rank your or your clients’ websites, or plain content with or without random links which’s purpose is to bring a natural look to the website.
Step #4.8.1: Creating Content With Backlinks To Websites That You Want To Rank
This one’s actually really easy – get high quality extremely niche relevant content that is in tone with the topic of your private blog network, and insert backlinks in it (check out this step-by-step tutorial on how to do it properly). Important notes:
- Forget about any form of content other than human written – duplicate content, scraped content, mixed content, spun content are non-existent in the vocabulary of PBN owners who know what they are doing. It might have worked once, but not anymore. Just forget about it. Find yourself some great writers at a reasonable price and get your content from there. Good places to start are iWriter and Fiverr (if you know how to find good quality writing gigs).
- Insert the backlinks naturally and in different parts of the content – each backlink that you insert in your articles must flow naturally otherwise you might get flagged by one of Google’s content filters.
- Add other links as well – I know that the link juice will get diluted, but the post will seem much more natural that way. So don’t be afraid to link out to other blog posts (don’t just link to Wikipedia and other similar authority pages) that are relevant to your post. Again, insert those backlinks naturally throughout your content.
- Style the content – in my experience, this is not really mandatory, but is a good practice. What I mean by styling is including heading tags, bold and/or italic words or phrases, radio buttons, etc.
- Images and videos – media-rich content is far better than plain content and also seems more natural. So, whenever you feel like a part of your post needs an image/video clarification, insert one. But don’t always include them. You might have some posts without any images or videos – mix it up.
- Internal links – oh yea, a real site has a lot of internal links and we are creating a real site here. It can be somewhat hard to keep an articles map of each of your PBN sites in your mind so that you can interlink their posts, but you’ll get used to it after a while.
- Anchors diversification – I know most people still want those specific target keyword anchors which “will rank their pages”, and while that may have been true a few years ago, nowadays, that is no longer the case. I have said it before and I will say it again – the best “type” of anchor text you can get nowadays is a branding backlink. So always keep in mind anchors diversification when you are creating your PBN backlinks.
And that’s basically the gist of it. Follow the above recommendations to the letter and your private blog network will be safe from the content filters that Google’s algorithm includes.
Step #4.8.2: Creating Filler Content
Now, aside from the posts that are meant to actually rank something, you want to add posts that are simply meant to provide plain information without any agenda. Important notes about that type of content:
- Quality – just like with the content meant for rankings, the filler content should also preferably be high quality. Now, this means extra costs for the maintenance of your private blog network since you will have to constantly feed your PBN sites such content, but at least it will be safe. Currently, some people might still get away with scraped and spun content for their filler content, but in the long run, it will screw them over. And I have a feeling you want to keep your PBN for the long run right?
- Links – even though those are filler content posts, you’d still want to include a random authority link here and there.
- Images and videos – same as with the content meant for rankings.
Now, obviously, you’d preferably want to manually publish content meant for rankings, but when it comes to the filler content, you can automate it and forget about it for a certain period of time. The way you can achieve that is for example to have a number of articles written for you and then schedule those articles for posting to your PBN sites via Kontent Machine – provided your websites are all using WordPress.
In a best case scenario, you’d want to have more filler content than content with backlinks intended to rank something, but that will of course depend on your budget. Something like 1 or 2 filler content blog posts per PBN site per week is a good starter.
So for example, if you will be publishing 1 post per week per PBN site and you have 10 websites in your private blog network, you would have to purchase 40 blog posts and then schedule 4 for each PBN site via Kontent Machine (you can check out how the scheduler works in this tutorial). That will cover your PBN’s filler content needs for 1 month.
And that’s basically it. If you follow all of the above recommendations and notes, your PBN should be completely safe (as of now) from the Internet private blog network police. Now, I have employed everything mentioned in this PBN safety guide to the domain I purchased and hosted a little bit above, so you can see for yourself what a sample PBN site might look like – basically, a real site.
Summary
We covered a lot of important notes that you should keep in mind when you are setting up your private blog network, but I want to summarize the most important ones:
- Create real sites – do not think of your PBN sites as something secondary, but rather, as real sites that will make you a lot of money.
- Mix it up – creating patterns between your individual PBN sites is one of the biggest footprints you can leave. Randomize on everything right from the start of the creation process up until the very end.
- Avoid shortcuts – finding some cheeky way to save a few bucks or some time, for example, using multi-site management software, will usually result in you leaving some huge footprint that will eventually come back and bite you on the ass.
- Do not fall into pattern mode – When you are setting up site after site, it’s quite possible to enter machine mode and make a few patterns without you even realizing it. That is why I recommend taking some time off (a few days for example) after you add a new website to your PBN.
- Invest – I know that the natural instinct of humans is to spend as little as possible and still get decent results and it’s good, but when it comes to private blog networks, you don’t want to save up on anything. If done right, you will be making a substantial amount of money from it with some people even reaching for the 6 digit numbers – no, I’m no joking at all.
Bottom line is a private blog network is not easy or cheap to create nor is it easy or cheap to maintain. It takes a lot of time, capital, and work to do it right. But if you actually do it right, you will not only enjoy a safe and secure PBN, but also an extremely effective one that will bring in a lot of revenue for your online marketing business. Good luck!