
High Quality Link Building With GSA SER – Step By Step Tutorial
GSA Search Engine Ranker is not meant only for quantity as you might think – you can also build high quality backlinks with it and today I will show you how. There’s a stereotype going on around that GSA SER (our tutorial and honest review) can only be used for Tier 2 and/or Tier 3, but never for Tier 1 projects and it couldn’t be more wrong. Sure the links we build today aren’t going to be of the PBN level, but they will still look great. Here we go.
What You’ll Learn
- How you can find high quality target URLs for your project – we will combine footprints from GSA SER and a bunch of niche keywords to scrape some target URLs. And then, we will filter out the low quality ones.
- How to get high quality content – any link building campaign will not be as effective if the articles, social bookmarks, etc, are low quality.
- How to setup a high quality Tier 1 GSA SER project – we will use the target URLs we found in combination with the quality content we got on our hands to create a powerful Tier 1 campaign.
- How you will create your very own high quality GSA Search Engine Ranker verified link lists – we will save the links that were verified after our Tier 1 project runs out of target URLs and start building high quality verified link lists.
- Wrapping it up – in a nutshell…
High Quality Link Building With GSA Search Engine Ranker – Step By Step Tutorial
Here’s how it’s going to go down. I will walk you through each and every step it takes to create this high quality GSA SER link building campaign I speak of. We will start by picking out a niche (the success niche for this example) and then we will get footprints from GSA SER only for quality engines worthy of Tier 1 backlinks.
Step 1. Selecting Niche Keywords
As we said, for this example we will use the success niche. So simply head over the Google’s Keyword Planner and get some keywords relevant to this niche. Do not select too many because we are going to have a ton of footprints and we will combine them with our keywords, so the end number of keywords will be quite big. I selected a total of 64 keywords and here they are:
Step 2. Getting the Footprints from GSA SER
The next thing you want to do is gather all footprints for all of the GSA SER engines we will use in this Tier 1 project. Those engine groups are:
- Article
- Directory
- Social Bookmark
- Social Network
- Wiki
Usually you can leave out Wiki links, but for this example, I will build some of them because they are a nice addition to a healthy off-page portfolio.
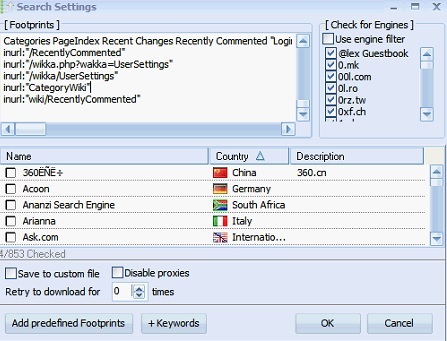
Now go to your GSA Search Engine Ranker instance and click on the “Options” menu. Then select the “Advanced” tab, click on the “Tools” button and then click on the “Search Online for URLs” menu. A window will show up which is basically the one that allows you to search for target URLs using GSA SER. You could do that, but I have found that Scrapebox works better in those terms.
Now click the “Add predefined Footprints” button at the bottom left of the window and add all footprints for the aforementioned engine groups, just like this:
Now right click over the footprints and select all – Ctrl + “a” doesn’t work. Then copy and paste them into a file.
Step 3. Scraping for Target URLs
Now comes the fun part. Fire up your Scrapebox or GScraper – I will use Scrapebox for this tutorial. After it has started, copy and paste your niche keywords into the keywords field and then click the small “M” button. Select the footprints file and wait for Scrapebox to merge all of your keywords with all of the footprints – I ended up with a total of 50,432 keywords. After that, go to Text Mechanic and copy and paste all of the 50,432 keywords in there and then randomize the lines. It might take a while but when it’s done, cut all the randomized lines from there and paste them back in Scrapebox.
Then setup your proxies if you already haven’t done so. As you know, on many occasions we use fresh proxies from GSA Proxy Scraper, but this time, we have a lot of footprints using advanced search operators such as “inurl”. This really puts a lot of pressure on the proxies so I would recommend using some private proxies from BuyProxies so that this method could work better, faster and more efficiently.
Set the connections to 5 and select only Google as a search engine. Then let it rip. Mine scraped for about 16 hours and was only at the 5th thousand keyword, but I got more than enough target URLs to show you how this works. Ultimately, you’d want to let it scrape till the end. You will get quite a lot of errors because of the footprints, but don’t worry, that is supposed to happen. URLs per second will be quite low as well which is why it takes so much time, but that’s the Nature of quality.
When I stopped the harvesting process, I was looking at ~200k harvested URLs. If you let the harvesting process run till the end as you should, you will be looking at a million or more. Now export them to a text file called “harvested URLs” and clear the URLs from Scrapebox, but don’t close the software yet. We will need it again soon.
Step 4. Checking the Harvested URLs
Now that we have a bunch of harvested URLs, we want to first check them to see which ones actually get recognized by a GSA SER engine. Open up your Search Engine Ranker and here’s what you do.
First of all, we are going to need the “Identified” lists folder to be empty. So if you are using it and you have some lists there, archive them and empty the folder for now. For those unaware, you can open your “Identified” lists folder by going to the “Options” menu, clicking on the “Advanced” tab, and then clicking the “Open Folder” link next to the “Identified” lists location. Even if you have it disabled, make sure there’s nothing there.
Okay, now that the “Identified” lists folder is empty, click on the “Tools” button and then select “Import URLs (identify platform and sort in)” and then select the “harvested URLs” file. A process will start which will test each and every URL from that file for GSA SER engine matches. If it does match an engine with a URL, it will put the latter into its respective file in the “Identified” lists folder. This process might take a while, so let it be.
Once it’s done, you will see a number of identified URLs i.e. URLs which matched some of GSA SER’s engines, and a bunch of unknown URLs which did not match any platform engine. Now click the “Open Folder” link next to the “Identified” lists location again. This time, the folder will be filled with files each of which representing the engines which matched our harvested URLs:
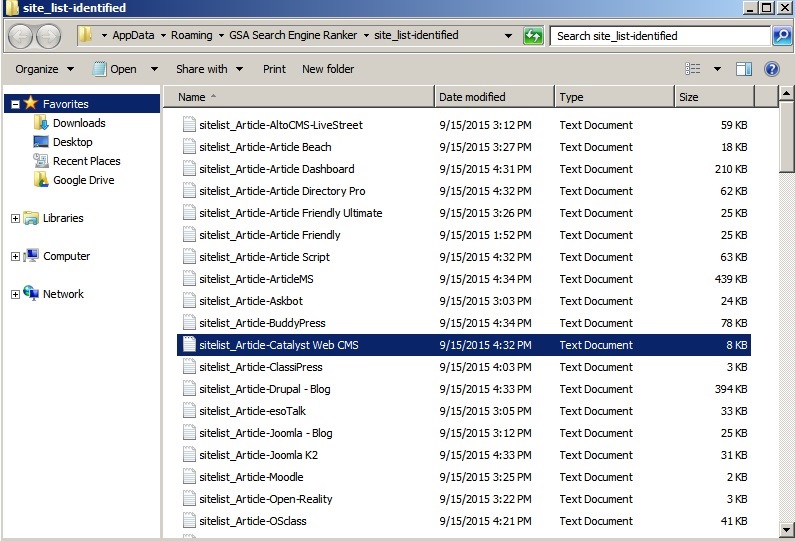
Now, even though we used footprints only for certain engines, there will be identified URLs for engines which’s footprints we did not use. This means that we will need only the files for the engine groups which we chose in the beginning. So you need to select all files which start with the following:
- sitelist_Article
- sitelist_Directory
- sitelist_Social Bookmark
- sitelist_Social Network
- sitelist_Wiki
Once you have them marked, copy and paste them into another folder outside of GSA SER and name the folder “identified site lists”. Now switch back to Scrapebox and open the “DupRemove” addon. Look at the “Merge Lists” section at the top. Click on the “Select source files to merge” and select all of the files in the “identified site lists” folder you just created. Then select a location for the target file, name it “identified URLs” and click “Merge files”.
This will basically combine all of the URLs from each of the engine files into a single file – “identified URLs”. To follow this example, I am looking at 89,192 URLs which matched an engine belonging to one of the 5 GSA SER engine groups we selected at the start – Article, Directory, Social Network, Social Bookmark, and Wiki. Now, it’s time to filter these identified URLs and leave only the quality ones, as this is high quality link building with GSA SER we are doing over here.
Step 5. Filtering the Identified URLs
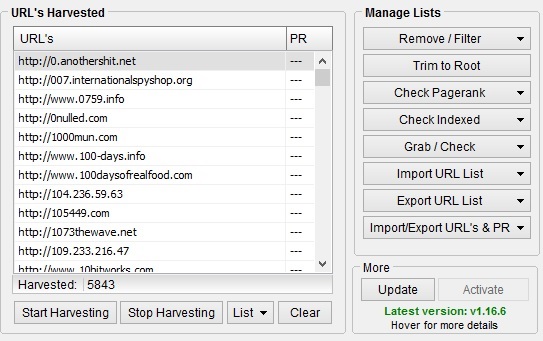
First of all, import the “identified URLs” file into Scrapebox – “Import URL List” -> “Import and replace current list”. Then “Remove Duplicate Domains”, and “Trim to Root”. I am left with 5,843 unique domains:
Then you need to export those domains – “Export URL List” -> “Export as Txt (.txt)” and name the file “root domains”.
Now start up Scrapebox’s Page Authority addon and set it up. You will need at least one API key from Moz (get one for free here), but you can use more than one, because Moz’s free API access allows you to make 1 request every 10 seconds and there’s 5,843 domains waiting to be checked. You do the math. Once you have your Moz API key(s), paste it/them into the “Account setup” of the “Page Authority” addon. Then load up the “root domains” file and click the “Start” button. Depending on the number of domains and on the number of accounts you setup, you can wait quite a while.
Once the Page Authority addon finishes checking all of the domains, click the “Export results as” button and name the file “domains Moz metrics”. Then open that file and sort the columns by DA which is the third column. Next thing you want to do is remove all domains which have lower DA than 30. You can play with this number of course – the higher it is, the more quality the link building campaign will be, but generally 30 is a good place to start.
Once you have only DA 30+ domains remaining, sort them by PA, which is the second column. Scroll to the bottom and remove any domain which has 1 PA. These will most likely be some Web 2.0 accounts which are relatively new and don’t have any power in them yet. We won’t make any links on them anyway so remove them. In the end, I am left with 1,961 domains all of which have more than 30 Domain Authority:
Now, these 1,961 domains are the ones we will try and post to, but we won’t use the root domains as target URLs for our GSA SER project. Copy all of the domains from the “domains Moz metrics” file and save them to a text file called “quality domains”. Switch back to Scrapebox, clear the 5,843 domains you have there, and then import the “identified URLs” file again.
Then click “Remove/Filter” and select “Remove URLs not containing entries from…”, and select the “quality domains” file. This will basically remove all identified URLs which are not on the quality domains we just filtered:

We end up with a total of 26,660 quality target URLs. Now, it’s time to setup the high quality GSA SER Tier 1 project.
Step 6. Setting up the GSA Search Engine Ranker Project
First of all content. You can forget about generating it with Kontent Machine (our tutorial and honest review) or some other content generation software. You will either write it yourself, or you will get some writer on the job. Either way, you will want quality human readable niche relevant content for this project. This will increase both the efficiency of the link building campaign and the chance of GSA SER to successfully verify the links after submission.
Now, click the “New” button in GSA SER and prepare for some writing and configuring. You already know which engine groups to select – Article, Directory, Social Bookmark, Social Network, and Wiki. You can also select both the SEREngines engine groups if you have an active subscription with them – and you should. SEREngines are an awesome addition of engines to GSA Search Engine Ranker.
Now, let’s setup the project tab by tab.
The Data Tab
First thing you want to do is add your URL(s) – the URL(s) to which you will be building quality backlinks to. Then fill in one keyword in the “Keywords” field (we won’t be using search engines to get target URLs so we don’t need these, but there has to be at least one there), and again, add one keyword in the “Anchor Text (based on Main Keyword)” field.
Now move down to the anchor text distribution section. Make sure you create a really healthy and natural distribution – don’t give 20% to partial match anchors, but rather, focus on branding. At this point, here’s how the “Data” tab of my quality GSA SER Tier 1 project looks like:
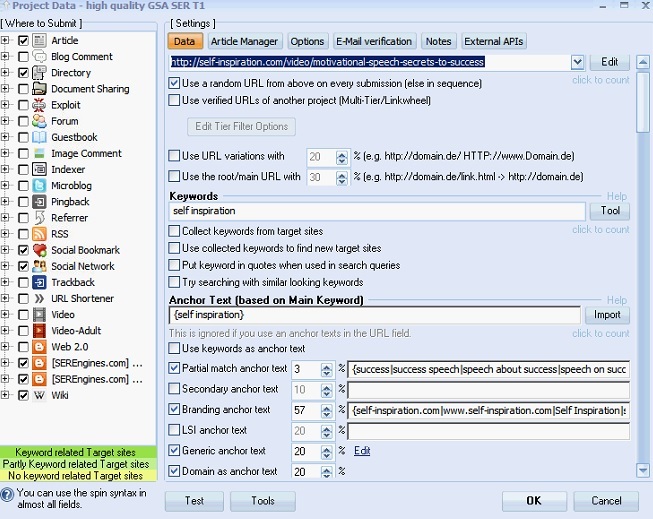
As you can see, I have left only 3% for my keywords with most of the anchor texts being distributed to the branding of the target site. To make the anchor texts portfolio completely healthy and natural, I have also added 20% in generic anchors and 20% in naked URLs. When you are done with the anchor text distribution section, it’s time to write the content. You will need to fill out the following fields:
- Website Title
- Category
- Description 250
- About Yourself
- Forum Comment
- Description 450
- Forum Subject
- Blog Name
- Blog Tagline
- Blog Subdomain Name
- Blog About
Here’s how I did that. I went to the web interface of WordAI and a wrote content for each and every one of these fields. Then I spun it with the setting for readability set to “Very Readable”, so I’d get the most readable content possible. After that, it was time for a manual touch. I looked at each of the texts for each of these fields and either removed words which appeared to not look good in the text or added words which would improve the uniqueness and number of versions of the text.
Now, I will be using only US and UK sites for this project, so I simply copied the Description 250 content to the German and Polish Description 250 fields – same goes for the Description 450 field. If you don’t know what to write for any of these fields, just hover over the “Help” text to the right of the field label and you will see what it will be used for.
The Article Manager Tab
Next thing we will do is write a comprehensive article, spin it, and add it into GSA SER. We want the article to be strongly relevant to our target niche, and we also want it to be longer than the standard 500 words everyone else is talking about. A thousand or even two thousand words is something else and will empower this quality GSA SER Tier 1 project.
So I wrote one article of a little less than 2,000 words and I spun it again using WordAI's Turing spinner. Keep in mind that you can also use other great content spinner which are more affordable such as Spin Rewriter (our tutorial and review) and The Best Spinner.
Once the spinning finished, I checked it for bad grammar, spyntax, meaning, and flow of text. Once I assured myself that everything looks good, I added the article to my GSA SER Tier 1 project. You can do that by clicking the “Add” button and then selecting “Enter Manually”. You will be prompted to enter the title and body of the article and then you can simply click “OK” and the article will be added to the project.
The next thing we want to do is to configure the various options below. Here’s what I’m looking at:

As you can see, the backlink will be inserted at a random location throughout the content of the article and I have also allowed up to 1 authority link per article. There can also be either 1 image or 1 video in the content of the article which improves its natural look a lot.
The Options Tab
There are 4 separate sections in the “Options” and you need to configure them just right. Here’s how you do that.
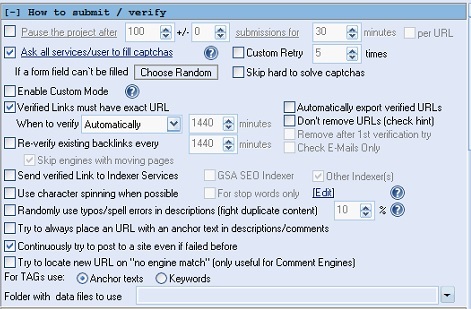
The How to Submit/Verify Section
Now, first of all, you will want to limit the verified links of the project to about 10 or 20 per day depending on the website you are targeting – the older the website and the more backlinks it already has, the more backlinks you can create to it on a daily basis. I won’t set a limit because I want to show you how much links we can build and how fast, and also, the website I am targeting is quite old and already has a ton of backlinks behind its back.
Here are the rest of the settings for that section:
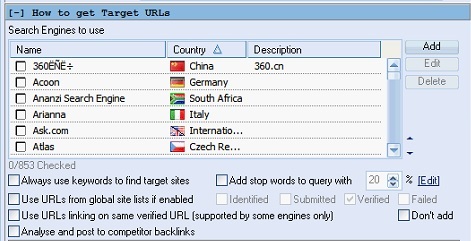
The How to Get Target URLs Section
Next thing we want to configure is the way our GSA SER Tier 1 project will get target URLs. Because we already have found and filtered our target URLs, this section will remain completely unchecked – deselect all search engines, and deselect the “Use URLs from global site lists if enabled” option. We will use only the URLs from the “target URLs” file:
The Scheduled Posting Section
I want the project to post to unique domains only, so this section will be completely deactivated.
The Filter URLs Section
In the final section of the “Options” tab, we want to add some filtering to our target URLs. For instance, I want to post to sites which are US or UK only and are written in English – those have a higher chance to be more quality looking and authoritative. Here’s how my “Filter URLs” section looks like:
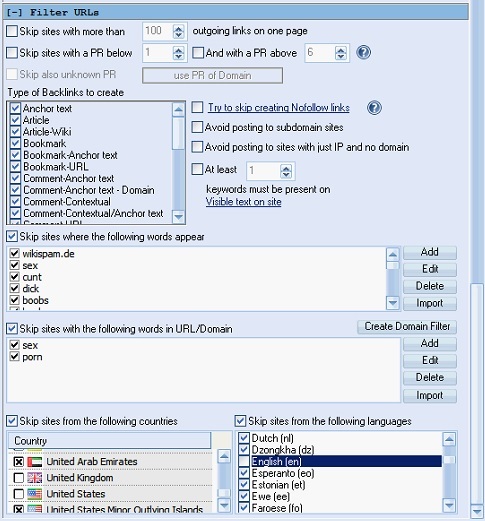
Now, as you can see, I haven’t selected any PR filter, because we already filtered our target URLs by the more reliable, in a sense, Moz metrics. But, setting a PR filter of 3 or higher can even further increase the quality of this GSA SER Tier 1 project. I want to build more links for this example, so I will leave it without a PR filter.
Then all you need to do is select all of the backlinks types, activate the words filters, and configure the project to skip all countries except for US and UK and skip all languages except English. That concludes the “Options” tab of our project. Moving on.
The E-Mail Verification Tab
You want to add at least 3 – 5 emails to the project to give it a higher chance of submitting and verifying backlinks. I recommend using accounts from Yahoo which tend to work best for GSA Search Engine Ranker at this time. Don’t forget to check the “Time to wait between two logins x seconds” option and set it to 900 seconds. Then test all the email accounts and if they are all successful, return back to the “Data” tab of the project.
We don’t have anything to setup in the “Notes” or “External APIs” tabs, but we need to make a review and re-check of everything. Look at the target sites, anchor texts distribution, target keywords, article, options, and make sure everything is as it should be. Then click the “OK” button which will create and save the project. You will see a warning saying that you haven’t chosen any search engines, but don’t worry about that – just click “Yes” and move on.
This warning appears because we have disabled both search engines scraping and the use of the site lists of GSA SER. We will add our target URLs in another way – and the next step will teach you exactly how you will do that.
Step 7. Building Some High Quality GSA SER Backlinks
It’s time. All the preparation we have done so far has been building up to this moment. And now our GSA Search Engine Ranker Tier 1 project is ready for some action. Right click it, then “Import Target URLs”, and then select “From File”. Choose the “target URLs” file containing all the URLs we filtered with DA 30 or more and click “Open” – when asked, randomize the list.
Now before you fire up the project, you want to do this one thing. If you plan on keeping the verified URLs from this project exclusive, you need to tell GSA SER to stop saving verified URLs to the lists. You can do that by going to “Options” -> “Advanced” and then unchecking the “Verified” site lists option, so that the software no longer saves your projects’ verified URLs. When the quality GSA SER Tier 1 project finishes submitting and verifying, you can re-enable this option to continue building your verified lists.
Also, you want to forward all captchas which were not solved by GSA Captcha Breaker (our tutorial and honest review) to your third party captcha solving service which can be ReverseProxies OCR or Death by Captcha for example. In either case, you will need a secondary captcha solving service, which is proven to take care of harder to solve captchas. Do not forget to uncheck the “Send only marked types” option which will force GSA Captcha Breaker to send all captchas it fails to solve to your third party captcha solving software.
Now, let’s see what will happen. Activate the project and enjoy the show. After about an hour, the target URLs were already depleted and I was looking at 53 verified URLs. Yes, just 53. I checked the logs of the project and the filter we set for US and UK only countries really made a lot of difference. If I hadn’t set that, there would be probably 10+ times more links. But, this tutorial is all about quality so quantity isn’t something we are really looking for. It’s the links we look at.
To squeeze some more verified URLs from your target URLs, you can simply re-import them again into the project. In order to do that, you will first need to do the following: right click on the project -> “Modify Project” -> “Delete Target URL History”. When asked if you are sure the first time, click “Yes”, but when asked if you want to delete the created accounts data, click “No”. This will basically allow the project to try and post to all the same target URLs again. Then import the “target URLs” file again into the project and activate it.
Now I will not show you all the links created because I like to keep my GSA SER verified link lists private, but I will show you one for each of the engine groups we selected:
Not too bad at all I would say. Again, these are no match for PBN links (here’s how you can use other people’s PBN sites), but they look much better compared to a regular GSA Search Engine Ranker campaign. Once the high quality Tier 1 project finishes verifying all submitted links, stop it and take a look at the verified links. You can perform a second verification just to make sure the verified links are still there and then you can export them and add them to your own high quality GSA SER verified link lists.
You do this again and again and again, and little by little, these lists will grow. Don’t expect nor demand huge numbers – just a nice decent amount of quality domains you can build backlinks on.
Summary
As you can now see, GSA Search Engine Ranker can be used for quality Tier 1 projects as well – it just requires a lot more effort on your part. The main factors of this method that you want to play with are the DA limit and whether you want to further filter the target URLs by PR. Basically, the results you get will strongly depend on:
- Your niche
- Your target keywords
- Your proxies – both the ones used for harvesting URLs and the ones used in GSA SER for submitting the backlinks.
- The DA limit
- The content you create for the campaign
- Other GSA SER filters – PR, countries, languages, bad words, OBL, etc.
- Captcha solving – GSA CB alone will not give you great results, so you will most surely need a secondary captcha solving service.
When you are done with the quality Tier 1 backlinks, you can create a nice Tier 2 and Tier 3 campaigns to throw some more link juice down their way. You can use the same strategy for the Tier 2 and Tier 3 campaigns as well, but you can lower the DA limit for example to 20 and 10 respectively. If there was anything throughout this tutorial that you didn’t understand, you will most likely find answers in our ultimate GSA SER tutorial. And if anyone thinks of something I might have missed, do share it in the comments below and I will update the tutorial asap. Let’s keep it quality.


![Optimal GSA SER Configuration Tutorial [Updated Regularly]](https://www.inetsolutions.org/wp-content/uploads/2016/07/Optimal-GSA-SER-Configuration-Tutorial-Updated-Regularly-180x180.png "Optimal GSA SER Configuration Tutorial [Updated Regularly]")