
I’ve been asked a lot lately about Web 2.0 networks and how to build and manage them, so I decided to write about it to answer all those queries – after all, who am I to not give the people what they want? So, in this tutorial, I will create a high authority Web 2.0 blog network and then show you how you can manage it on autopilot using a few internet marketing tools. Here we go.
What You’ll Learn
- How to find high authority expired Web 2.0 profiles – we already covered that topic in this tutorial, but now we will use it for more than one Web 2.0 site and we will also search for niche specific accounts.
- Registering the authority expired Web 2.0 accounts – once found, we need to recreate these once existing profiles, so we can get them under our control.
- Managing your newly created high authority Web 2.0 network – we will take advantage of a few online marketing tools to manage our blog network.
- Preventing the Web 2.0 properties from being suspended – you do not want the expired accounts you re-registered to die again and this section will give you some tips and tricks on avoiding exactly that.
- Summary – in a nutshell…
Finding Niche Relevant High Authority Expired Web 2.0 Profiles
Now, as I mentioned, we already showed how you can quickly and easily find high authority expired Web 2.0 profiles in this tutorial, however, we only focused on one Web 2.0 site – Tumblr. While you can make a blog network just from Tumblr accounts, it is not optimal and we should take advantage of other authority Web 2.0 sites.
The ones we choose will be a select few of the set of supported Web 2.0 sites by Scrapebox’s Vanity Name Checker addon which are:
Why not choose all? Because these are the ones that are blogs and could be managed by FCS Networker – the software we will use to post, on autopilot, articles with and without backlinks to the accounts we recreate. Then why not select LiveJournal as well? Because using expired profiles there is not free, and I don’t really want to spend money on registering a Web 2.0 account even if it has some authority behind its back. Now, instead of just following the aforementioned tutorial to find high authority expired Web 2.0 accounts on each of these platforms separately, we will do it all at once and here’s how.
Of course, first of all we will need our niche keywords. Since I will actually be using this Web 2.0 blog network to boost the rankings of a certain site, I cannot show you exactly the niche and keywords or the site itself, but you will see more than enough to learn how you can do this and the depths of its effectiveness.
I usually use just Google’s Keyword Planner tool to get my target keywords, but other, more advanced keywords research tools such as Long Tail Pro, SEMrush, and/or Market Samurai can also do the trick, but those are more geared towards main site keywords research.
After you gather a list of niche keywords (mine are 760 for reference) and you paste them into Scrapebox, you need to create a file which you will merge with said keywords. The content of the file is the following:
Basically this will force Scrapebox to find URLs only on the specified Web 2.0 sites in that file – the same ones we want to find authority expired accounts on. Now, click the “M” button in Scrapebox and choose the “Web 2.0 Target Sites” file.
What this will do is basically mix each of your keywords with each of the lines in that file. That way, Scrapebox will search for profiles on those target sites that rank high for our target keywords – hence the niche relevance.
Now, if you are using Scrapebox V2, which you should, you won’t need any proxies for the harvesting process. Scrapebox V2 comes with user proxies which you can take advantage of and which actually work really good. I set the harvester connections to the maximum, which is 500, and I let it rip.
It will take some time for Scrapebox to finish, depending on the number of total keywords you have, but once it’s done, you should be looking at something like this:
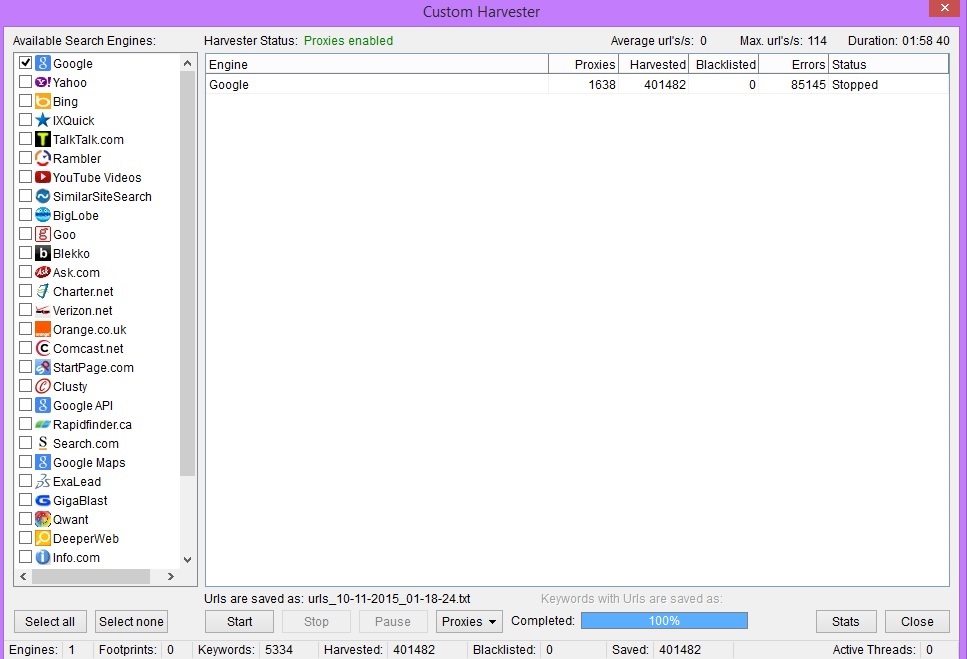
As you can see, I let it run till the end and got a little over 400k URLs scraped. Now let’s filter them – trim to root and remove duplicate URLs. That leaves me with 58,888 URLs most of which are profile URLs such as inetsolutionsofficial.wordpress.com. Let’s check their availability.
Fire up Scrapebox’s Vanity Name Checker addon (I prefer using the old one) and load all these URLs from Scrapebox’s harvester. Then, click on “Settings” and tick only the Web 2.0 sites that we listed a little bit earlier. Also don’t forget to tick the “urls” checkbox and that you will need to enter login details for Weebly accounts checking. Now, this time you will need some proxies of your own to do the work – I will use a bunch from BuyProxies (our review), but if you have GSA Proxy Scraper (our tutorial and honest review) installed, you can scrape for some fresh proxies and use them instead.
Anyway, tweak the number of connections and start the process. It took the addon about an hour to check all the 58,888 URLs I loaded, but it was well worth it – I am now looking at more than enough expired Web 2.0 accounts. Of course everyone should calculate how many profiles they need depending on what they will be using the blog network for.
The final step of this part of the tutorial is to filter the available accounts by Moz stats, and mainly, focus on Page Authority. I will use the Page Authority addon of Scrapebox, but if you have a lot of URLs to check and you are using a free Moz account, you will have to wait a while – there’s a 10 second delay between each API request. However, if you do have GSA Proxy Scraper in your arsenal, you can simply use its URL Metrics Scanner tool to check the Moz metrics of these expired Web 2.0 accounts without any delay.
I also want to note that there are two alternatives to getting authority Web 2.0 properties:
- Domain Hunter Gatherer – you can use DHG to find authority expired Web 2.0 profiles by simply entering your niche keywords and clicking a button – this tutorial shows you how.
- Building accounts from scratch – this method will take a lot more time since you will have to create the accounts using FCS Networker's Account Creator and then boost their PA with GSA SER backlinks for example. However, it does take time for it to rise, so this method is a last resort. The good side of it is the fact that you would be able to create accounts on more than 5 sites, which gives you the power of a higher number of unique domains.
Anyway, whatever method you choose, you will end up with a bunch of high authority expired Web 2.0 profiles – let’s revive them.
Re-Registering The Expired Authority Web 2.0 Accounts
This one’s pretty easy actually – you just simply go to the Web 2.0 site which the profile existed on once and create a new account with the same username. This of course can become quite annoying if you are planning on building a huge authority blog network – manually registering, say, a hundred accounts is not what I’d call fun, but it’s something that has to be done.
However, there are things that need to be further configured once the account is re-registered such as customizing the blog title, about section, theme, etc. These are highly recommended and will significantly increase the power of the Web 2.0 properties. Include hand written niche relevant content for all of these sections and use a different theme every time. You can even go the extra mile and add unique images to each blog – blog logo, background image, cover image, etc.
Now, I want to note something very important. You don’t have to create a new account for every expired Web 2.0 profile – you only need one on each of the sites. So for example, if you have found 11 expired Tumblr profiles, you need to create only one account on Tumblr and then simply create 11 blogs on that account using the expired profiles’ usernames. Same goes for the other 4 Web 2.0 sites we selected at the start of this tutorial.
So, to summarize, you need to create 1 account on Google which will be used for the login on Blogger, 1 account on Tumblr (you might want more since Tumblr allows no more than 10 blogs to be added to an account per day), 1 account on Weebly, 1 account on Wikidot (you might need more since Wikidot allows no more than 5 blogs to be set up on one account), and 1 account on WordPress. Then you login to each of these accounts and create blogs using all of the high authority expired Web 2.0 usernames you found. After each creation, you edit the blog’s title, about content, etc, to make it look legit and pretty much like a real blog would look like.
Managing The High Authority Web 2.0 Network
Now that I have the expired profiles under my control, I want to easily manage them and not have to go manually to every one of them and post articles. The way I do that is by using FCS Networker (our tutorial and honest review). It allows me to import my accounts and then setup projects that create posts on said accounts. Let’s start with the importing.
Importing Your Accounts Into FCS Networker
The first thing you want to do is to create a new blog network for these accounts. Name it something accordingly – for example, “High Authority Insurance Niche” or something like that. If you are going to be using that network for a specific site like me, you can name it “%Website Name% High Authority Blog Network”. You get the idea.
Once the blog network is created, you simply click on it and FCSN will take you to the page where all of the accounts will be shown. At first of course, there will be nothing there, but there will be a pretty blue button titled “Import To Network”. Click it:
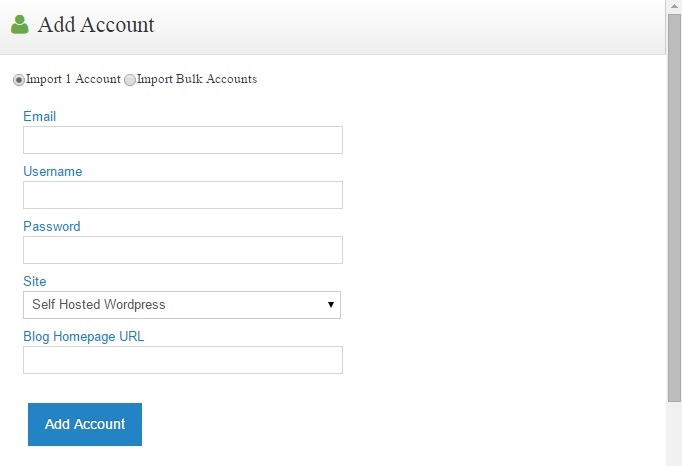
First off, you need to select the “Site” on which the account you will be adding exists. Then:
- Email – this is the email you used to register the account that holds all the blogs, just like we explained with the Tumblr example.
- Username – this is the username of the blog from its URL i.e. username.wordpress.com.
- Password – the password of the account on the site which was used at its registration.
- Blog Homepage URL – the full URL of the blog you want to add i.e. inetsolutionsofficial.wordpress.com.
Then you simply click “Add Account” and it will be added to the network. You need to do that for each of the expired Web 2.0 profiles you re-registered or you can just click the “Import Bulk Accounts” and add all of them at once – it really depends on the number of accounts you will be adding.
Once you are done with importing all of your accounts into FCSN, it is time to utilize them.
Creating Filler Content Projects
Now, before you start creating backlinks to your sites, you first need to ensure that these blogs won’t get suspended again. And filler content is one of the things you want to do in order to prevent this from happening. If you don’t know what filler content is, it’s basically content that doesn’t have any backlinks or has only authority backlinks for example. Its only purpose is to fill the blog with niche relevant content that doesn’t have a purpose of ranking anything – it’s just there to provide information.
So, how do you add filler content to your blog network and how much do you need to add? First of all, I usually wait a couple of days before posting anything on these accounts. After that, it’s first time to setup some filler content projects on the blog network. I generally go for 1 article per week per account in the network, so if you have, say, 20 accounts, that would be a total of 80 submissions per month. Just keep that in mind since, as you know, FCSN has a limit on monthly submissions depending on your plan. Now let’s setup a filler content project.
Go to “Create Projects” and click “Create Blog Projects”. First, let’s start with the “Set Settings, Articles & Accounts For Posting” section.
The Project Details Tab
The first thing you want to do is setup the “Project Details” tab:

Enter the project name – for filler content projects, I usually enter the blog network name and I add “Filler Content” at the end. So, for example, the project name could be something like “High Authority Insurance Niche Filler Content”. Then, you want to change the “Submission Style” to “Post Amount Per Account Per Week” and set the “Submissions per week for each account” to 1. The latter will appear once you change the submission style.
The Schedule Tab
We don’t even need a screenshot here. You basically specify how many weeks you want the project to run and when to start.
The Accounts Tab
This is where you will select the accounts from the high authority blog network you created a little earlier:

So you simply click “Add Accounts”, you switch to “Network Selection” and then you select the blog network containing all the re-registered authority Web 2.0 accounts. I don’t usually activate the guaranteed posting because I do not want a failed post to be posted to another account of the blog network. I want them to have 1 filler post per week and that’s it.
The Articles/Content Tab
For content you will first need a few things – content generator software and content spinner. My choices are Kontent Machine (out tutorial and honest review), and WordAI. If WordAI is too expensive for you, you can go with a cheaper spinner such as Spin Rewriter (our tutorial and honest review) or The Best Spinner which also produce amazing results and are much more affordable than WordAI – check out this case study we did on these content spinning software to see for yourself the results they produce.
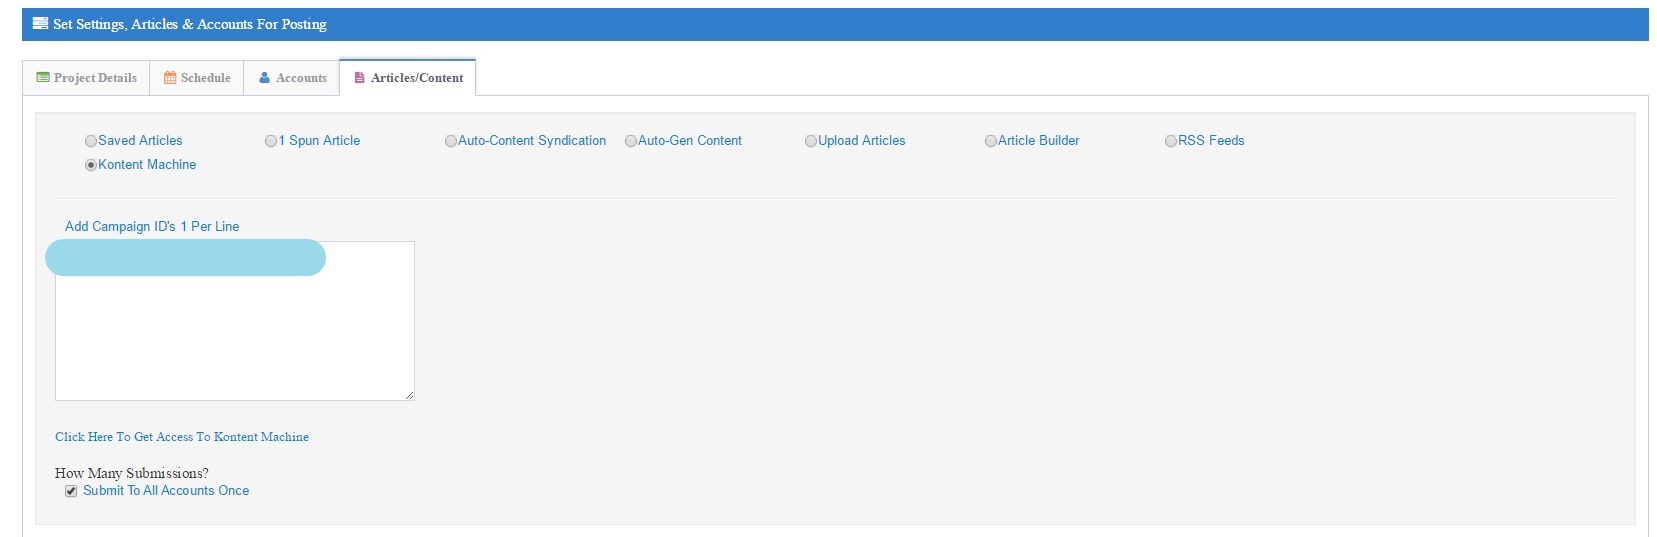
Now, FCS Networker also has the functionality to auto-generate content, but it will not be as good as the one produced from the aforementioned combination of software. It’s all up to you, but the great thing about Kontent Machine is the fact that you can upload the campaign generated by it to the cloud and then simply copy and paste the campaign ID into FCSN like this:
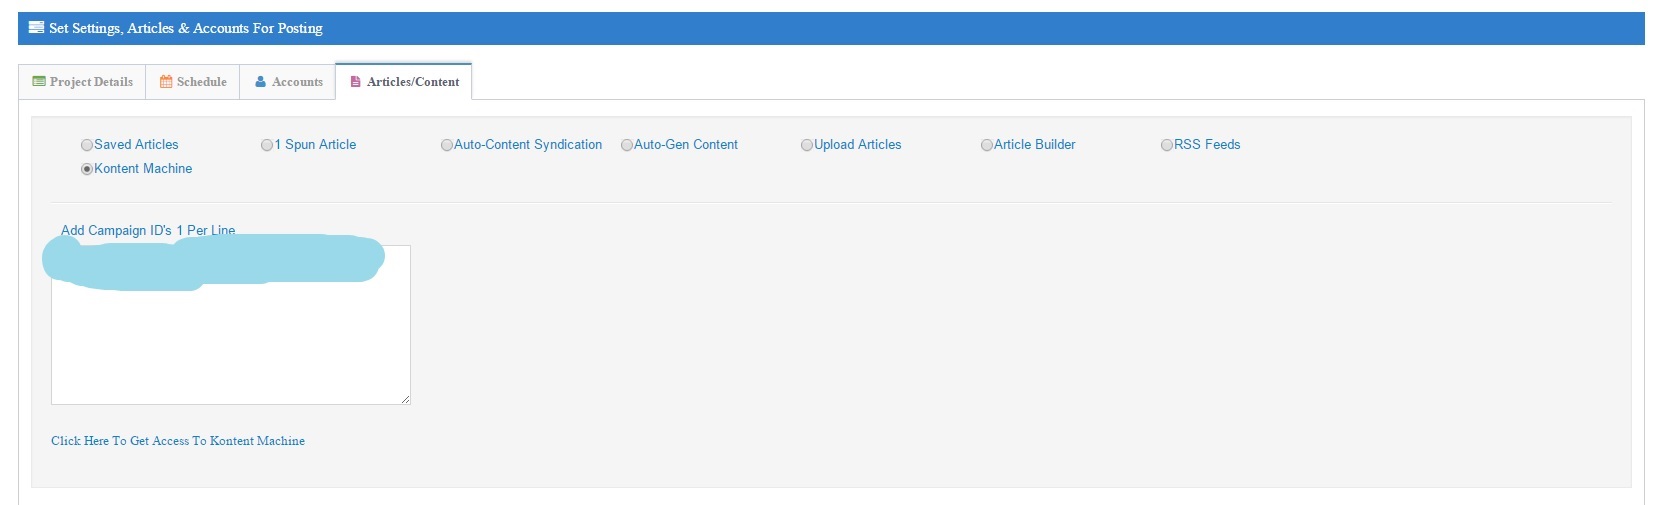
If done like that, the project will use content directly from the cloud of KM – you don’ have to import any articles into FCSN, which save some time.
Select Extra Options Section
Once you are done with the content, it’s time to look lower to the “Select Extra Options” section:
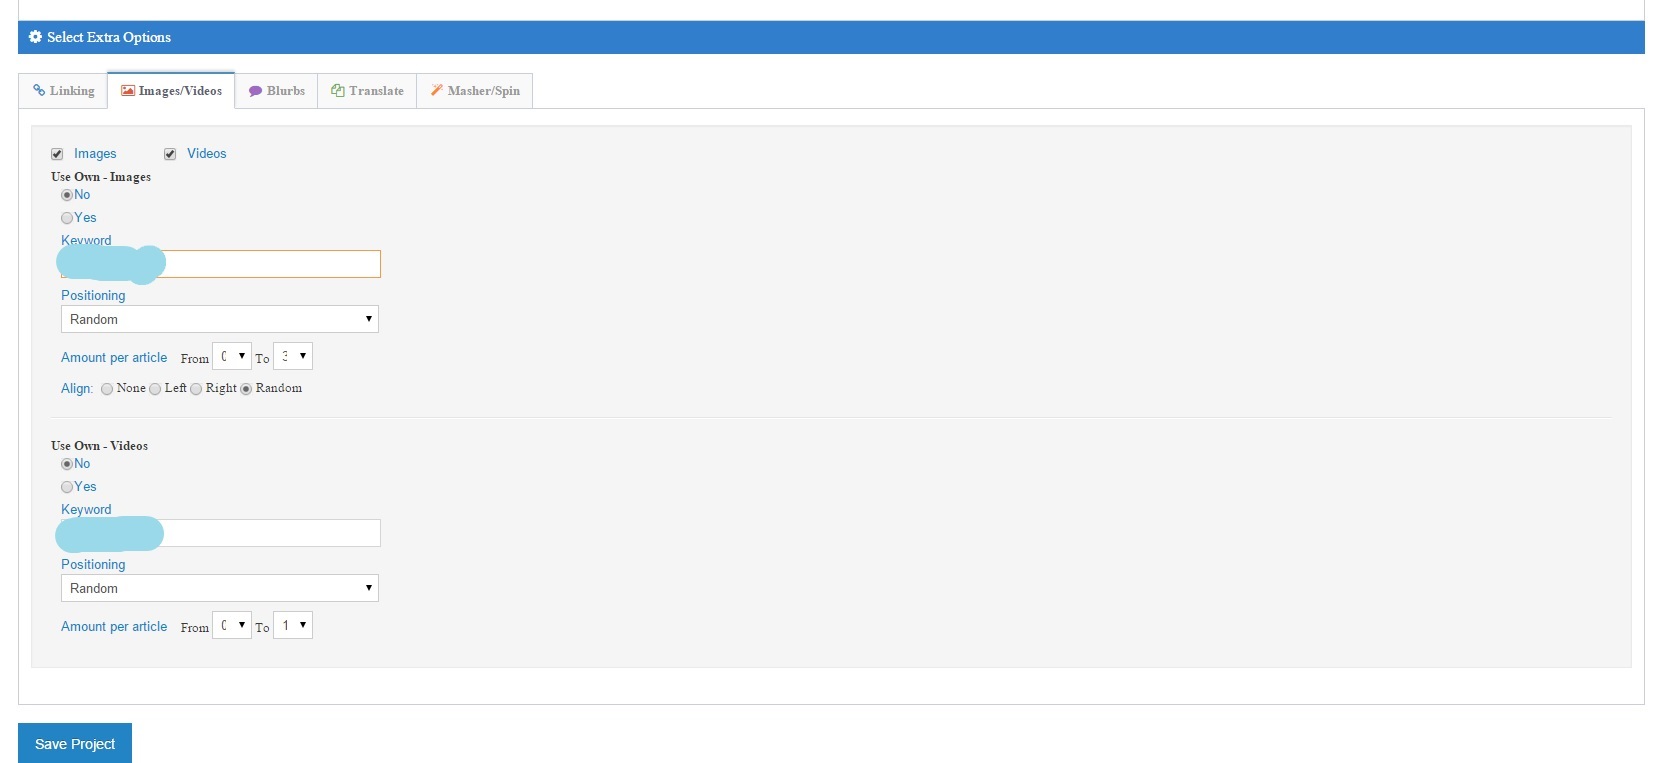
The above settings are the ones I use for my filler content projects. As you can see, the focus is on randomization – which is the natural order of things. And basically, that’s it for your filler content projects. You leave the “Linking” tab as it is – set to “None”, because as we already said, we do not want any links in these posts. Clicking “Save Project” is all that’s left to do, which will create and start the filler content submission. I never stop posting filler content to authority blog networks and I usually set the weeks to 4 for each project. When the project finishes said 4 weeks, I create a new one with freshly scraped and spun content and set it for another 4 weeks – and so on.
The filler content projects are a vital part of the health of your authority Web 2.0 network. A little later, we will look at some more tips and tricks you can do to prevent the blog accounts from getting suspended again.
Building Authority Backlinks
Once the first week of filler content passes and all the accounts have at least 1 plain article each, it is time for the blog network we created to fulfill its purpose – backlinks. You can even wait another week so the accounts have 2 posts each, but that’s totally up to you. If you feel like that would be better, go for it.
Creating The High Authority Link Building Project
Now, setting up an FCS Networker project that will create posts with backlinks on our high authority blog network is pretty much the same as setting up the filler content projects. Again, you name the project accordingly, you select the accounts i.e. the high authority blog network, and you generate content in whatever way you prefer. Now, the different part here is that we do not use the submission style “Post Amount Per Account Per Week” like with the filler content projects. Instead, we use the default “Post Amount Per Project”, which basically allows us to specify a number of posts you want to create on the chosen accounts.
Drip Feed
I usually drip feed these projects for 30 days – sometimes more if the blog network is very big. Now when you add content on the “Articles/Content” tab, you will see a checkbox at the bottom of the “Set Settings, Articles & Accounts For Posting” section – “Submit To All Accounts Once”. By default it is ticked and you want to leave it like that. We want to post a single article with a backlink to our site on each of the accounts in our high authority Web 2.0 network. So, if you will be using Kontent Machine to generate content for your posts with backlinks (even better to write the article yourself and spin it manually), you will be looking at something like this on the “Articles/Content” tab:
So far so good. Now we move onto the “Select Extra Options” section below. The “Images/Videos” tab will look exactly the same as with the filler content project – focused on randomization. However, with this project, we will have backlinks. So, your “Linking” tab will not be empty, but rather:
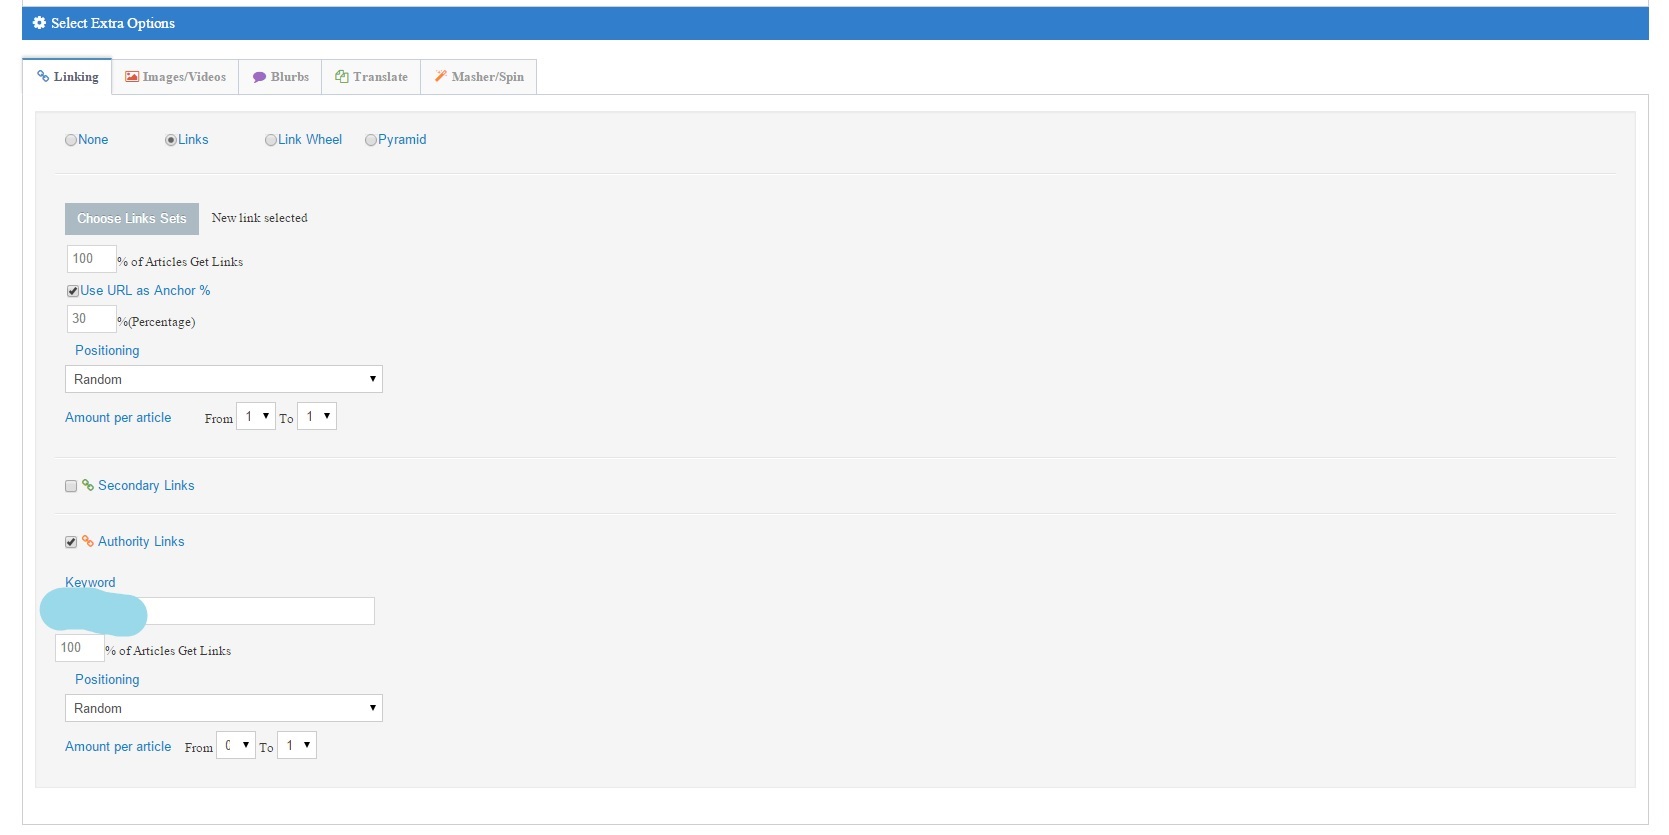
As you can see, we will have both our links (selected via the “Choose Links Sets” button), and authority links that will be automatically added by FCSN according to the keyword we specified. Now I don’t want each article to have authority links, because I want to get as much link juice from the post as possible and not dilute it to some authority backlinks. However, inserting them here and there won’t hurt and would actually make the articles seem more natural.
Adding Target Site(s)
When it comes to your links, when you click the “Choose Links Sets” button, you will see a window show up where you can enter all your keywords and select the anchor text distribution. I do not focus on exact keywords or keywords in general for my anchors, but mostly, on branding. So for instance, if I have a site in the insurance niche, and I am going to run such a project for it, I would get some niche keywords and give them no more than 5 – 10 percent share of the anchors. The remaining will be split among branding anchors and naked URLs (as you see here, I have checked 30% “Use URL as Anchor”). If you are not sure how you should distribute your anchor text (each project is different and needs customization), check out this tutorial – it will get you on the right track.
Once we are done with the “Linking” tab, we can start the project. However, it is no time to rest. The target website should be updated frequently and on-page optimized as much as possible if the high authority blog backlinks are to be efficient.
Boosting The Authority Of Your Blog Network And Backlinks
Let’s summarize what we’ve done so far:
- We found a bunch of high authority expired Web 2.0 profiles.
- We re-registered them manually on their respective sites.
- We customized their blog titles, about sections, images, etc.
- We imported them into FCS Networker.
- We created a filler content project that posts one article per week per account and scheduled it to run for 4 weeks.
- We waited another week, and then we created another FCS Networker project (the high authority link building project), however, this one included backlinks to our target site(s).
Now, as I already mentioned earlier, I drip feed the high authority link building projects for 30 days or more depending on the number of accounts I have in the blog network. In that period of time, our authority Web 2.0 accounts will receive both filler content and 1 post with backlink to our site. However, even though they have some authority to begin with, we want to even further increase it. For instance, most of the Tumblr accounts I found had PA of around 30, but there was one that has a PA of 51. Now that’s something else and the link juice will be much stronger from that PA51 Tumblr profile. Why don’t we increase the authority of all of our Web 2.0 blog accounts? We should and here’s how.
You basically have three options:
- Use FCS Networker – you can create a huge network of Web 2.0 blogs and social accounts (like 2k or more), and then you can create two projects – the first one will drip feed backlinks (for 30 days or so) to the homepage URLs of the high authority accounts i.e. inetsolutionsofficial.wordpress.com, and the second one will drip feed backlinks (for 30 days or more) to the posts from the high authority link building project. Of course, the latter will be created once the high authority link building project finishes its drip feed time, because you want to point the Tier 2 links towards live links only – some accounts might have died for whatever reason although, if you have followed my instructions so far, they won’t.
- Use GSA Search Engine Ranker – you can do the exact same thing, but with GSA SER projects – one will build backlinks to the blogs’ homepage URLs, and the other – to the live links from the high authority link building project. If you will be using GSA SER, you will need powerful and fresh site lists, which you can build on your own (recommended), or you can purchase from a GSA SER site lists provider (this case study will help you decide which one to use).
- Combine both GSA SER and FCS Networker – this will build a great looking off-page portfolio for your high authority Web 2.0 accounts and make them even stronger than they were when you found them.
Now, you can even go the extra mile (I actually recommend that), and add a third tier below the FCS Networker Tier 2 projects, because a recently created Web 2.0 account with 1 post on it has a very low chance of getting indexed. However, a bunch of backlinks pointing at it might change the mind of Google’s crawler.
Now let’s talk a bit about anchor texts distribution on these lower tiers:
- Tier 2 projects:
- Exact match anchors – no more than 10%.
- Partial match and LSI anchors – 20%.
- Generic anchors – 40%.
- Naked URLs – 30%.
- Tier 3 projects:
- Exact match anchors – up to 30%.
- Partial match and LSI anchors – 40%.
- Generics anchors – 20%.
- Naked URLs – 10%.
Of course, this ratio will vary from project to project depending on the thing that you are trying to rank, but generally, the distribution you see above will work great in most cases. For those unaware, exact match anchor(s) is/are the main keyword(s) you want to rank for (if you have such defined) and you can learn what partial match and LSI anchors are and what the difference between the two is from this anchor texts guide.
As for other GSA SER projects’ settings, you can check out our ultimate tutorial which shows the best configurations for Tier 1, Tier 2, and Tier 3 GSA Search Engine Ranker projects.
All in all said here, this is what the full structure of the link building campaign we have been creating up to this point would look like:
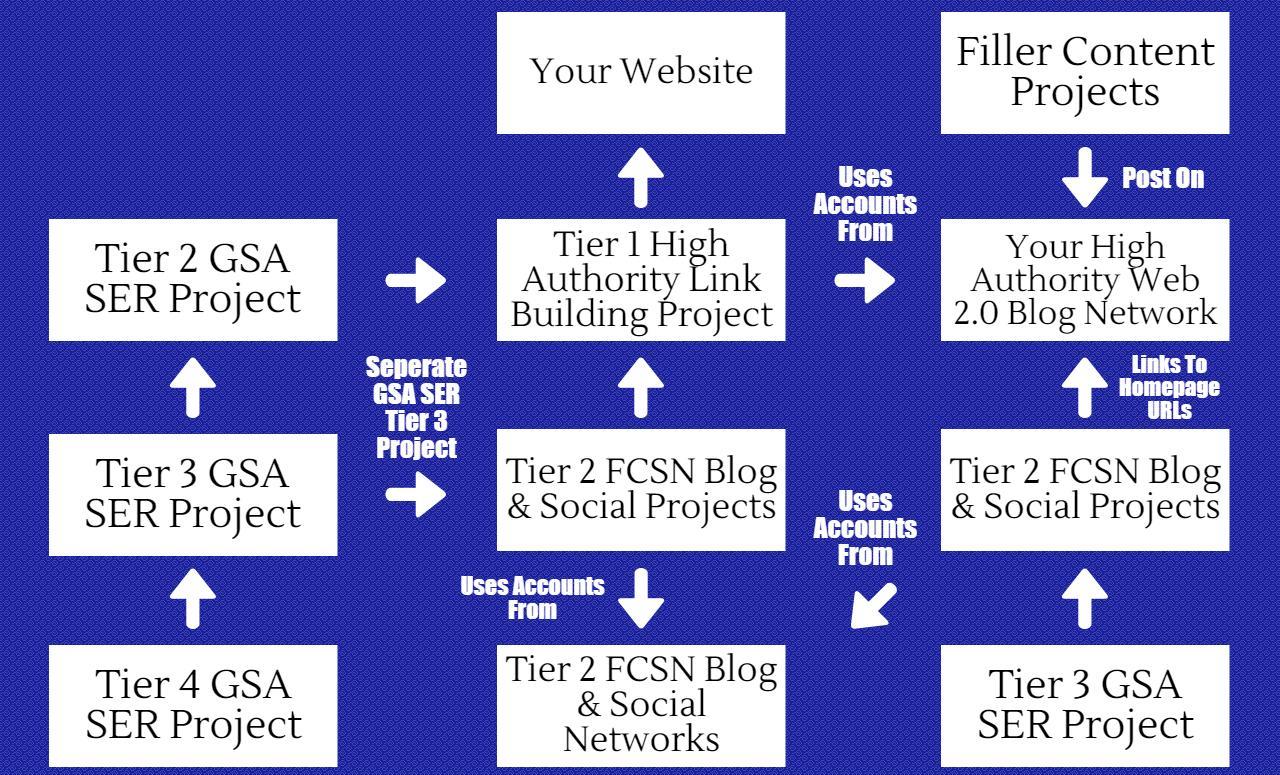
Hope this gives you a look at the full picture. And that basically concludes the management of your high authority blog network. I will actually execute this exact link building campaign and have already set up the filler content project for my high authority blog network, so I will update this post as soon as I get some movements in the SERPs. Currently, the site I am trying to rank is nowhere to be seen in the SERPs, but hopefully, that will change soon enough.
Preventing The Authority Web 2.0 Accounts From Getting Suspended Again
So you have gotten your hands on some really good authority expired Web 2.0 properties, and you don’t want to lose them like their previous owner did – especially the WordPress and Weebly accounts as I’m sure you are already aware just how hard it is to find expired authority accounts on these sites. So what do you do? Quite simply, you need to make sure all these blogs look like real sites. Here’s how you do that:
- Add niche relevant unique title to each blog.
- Add description to each blog containing niche relevant content – preferably written by you or someone else and not created by a content generation software.
- Use niche relevant tags on blogs which allow them.
- Use unique themes for each blog – wherever possible.
- Add unique images to each blog – logo, cover photo, etc.
- Weebly – some themes have default text in the sidebar like “Write something about yourself.” and you need to remove those and/or change them with your own content.
- Wikidot – the themes come with pre-defined content that basically tells you what each page is about, so you will need to manually edit each of them and write real content.
- Quality content – of course, the best possible scenario would be to write each article yourself (our hire someone to write them for you), but I don’t see that happening, especially for big blog networks. However, in order to still have relatively good content, although auto generated, make sure you use a strong combination of content generation and content spinning software.
- Don’t create too many posts that link to the same domain – you don’t want a single blog to have like 10 articles with backlinks to the same site (at least not consecutive ones) – it’s just too obvious. I do not post more than one article per blog that links to the same domain. Better to focus all that Tier 2 link juice on one quality post than on many not-so quality posts that might eventually get deleted anyway. If you need more backlinks to your site, simply find more authority expired Web 2.0 properties.
- Do not stop the filler content projects – always make sure your blogs are receiving fresh plain articles on a weekly basis.
- Randomize everything – number of images and videos in the articles, blog styles, titles, about descriptions, etc, nothing must create patterns.
I know that this seems like a lot of manual work and it really is. But, it’s just something you have to do if you want to keep your high authority Web 2.0 blog network for the long run.
Summary
So there you have it guys. Now you know how you can build your very own high authority Web 2.0 blog network by using one of the methods I showed you in the “Finding Niche Relevant High Authority Expired Web 2.0 Profiles” section. Then you learned how you can re-register said expired accounts on their respective sites and what you should look out for at the time of recreation. After that we moved on to management – filling the Web 2.0 properties with filler content and then running a high authority link building project using those same accounts. I also revealed the full structure of the link building campaign and how you can replicate it and use it for your own SEO purposes.
Bottom line is, if you do not have the capital or time to deal with private blog networks, you now have an alternative that will still give you great results – if done right. Before we put an end to this post, I want to strongly emphasize on the fact that what this link building campaign points to i.e. your website, is of the utmost importance – if you are trying to rank something that is not optimized and does not provide any value (or at least not that much), you should forget about link building and focus on creating the foundation first.