
GSA Search Engine Ranker is one of the top fully automated link building tools at this point in the online marketing history. We all know that link building is, and perhaps will always be a huge part of ranking websites, and GSA SER is here to help. Now, for a beginner, this state-of-the-art link building tool can be really hard to understand. I know it took me a while to fully grasp all of the settings and all of the tricks and tweaks that would put this GSA SEO tool on steroids.
Update: I have created a separate blog post that is updated regularly and always contains the optimal GSA SER configuration that we currently are using – Optimal GSA SER Configuration.
While there are many GSA Search Engine Ranker tutorials you can find, none of them look at absolutely every element and functionality of this GSA software. Trust me, I’ve probably looked at all of them. And that is why I have decided to gather everything I know about GSA SER in one place. Yes, everything. After you are done reading this, you will know the purpose of every pixel in GSA Search Engine Ranker. Go.
The Structure of this Ultimate GSA Search Engine Ranker Tutorial
Here is how the ultimate GSA SER tutorial is structured:
- GSA Search Engine Ranker features preview – just to tease your curiosity.
- Pixel-by-pixel GSA SER tutorial – this is the part where I will explain to you, every single element in GSA Search Engine Ranker and its purpose.
- GSA Search Engine Ranker Best Practices and Optimal Configuraiton – how we have configured our GSA SER software to squeeze maximum results from it.
- How to Create Huge GSA SER Verified Site Lists in a Few Days – you will learn how we built tens of thousands of verified links in a matter of days and how you can do it too.
- GSA Search Engine Ranker vs SEnuke XCr vs Ultimate Demon – a handicap match. Who is going to emerge victorious?
- How we use GSA Search Engine Ranker – an in-depth look at our strategies when it comes to employing this powerful link building tool.
- Genuine GSA Search Engine Ranker review – the final verdict.
- Exclusive GSA Search Engine Ranker discount – save some green stacks.
GSA Search Engine Ranker Features Preview
So what makes GSA Search Engine Ranker so good?
- Completely automated link building process
- Posts backlinks on more than 160 different platforms
- Automatically finds new relevant target websites and creates backlinks on them
- Automatic verification of your backlinks submissions – GSA SER will make sure your link is actually “live” before it moves it regards it as verified
- Advanced reporting – time/links graph, pie-charts for the diversification of anchor texts, successful sites, engines used, etc
- Extremely customizable options for your campaigns – use only high page rank, limit the number of outbound links on the target website, ignore sites where specified keywords are found, etc
- Integrated with all of the top captcha solving services including GSA Captcha Breaker – the mistress of captcha solving software and the king of automated link building go hand in hand
- Integrated with all of the best backlinks indexation services
- Integrated with all of the top tier content creation softwares
- Very easy and intuitive to use UI
- Can run hundreds of projects simultaneously
- Runs 24/7/365 without crashing – this beast will build links until you tell it to stop
- Very light on the CPU and memory of the machine you are running it on
- Frequent updates – the developers of GSA SER constantly roll out updates which improve existing engines, add new ones, or add new useful functionality throughout the software
- One-time payment – you pay once, and you have automatic link building for life
GSA Search Engine Ranker has so many other features, but they are way too much to be grouped in just one set of radio buttons. Before we get into the only GSA SER tutorial you’ll ever need, I want you to know that the software comes with a 5 day, completely free trial, so you can test it our yourself by clicking the following download GSA Search Engine Ranker link.
You can then install it and follow the tutorial on your brand new GSA SER instance. And later, when you see its true potential, you can buy GSA Search Engine Ranker using our godly GSA SER discount at the end of this extensive GSA SER review. Shall we? You bet.
The Ultimate GSA Search Engine Ranker Tutorial – Pixel by Pixel
Before we begin, I want to tell you that this tutorial will be extremely in-depth, so if you are here just for the exclusive GSA SER discount coupon, simply scroll down to the very end of the article or click here. See you on the other side.
Alright then. The screenshots you will see throughout this GSA Search Engine Ranker tutorial are taken from one of our VPS-s which takes care of clients’ projects mostly. Take strong notice of how we group our projects. I cannot show you the names, but I will talk about our naming convention as well. If you plan on using GSA SER for hundreds of projects, like we do, I suggest you learn how to group them so that you can easily navigate through them at a later point in time.
How GSA SER Works – A Brief Introduction
I think you will need this basic knowledge in order to more easily understand our GSA Search Engine Ranker tutorial. So this is how GSA SER basically works:
- You setup GSA SER’s global configuration options – captchas, proxies, site lists, etc
- You create a new link building project
- You add your website URL(s) – let’s put in https://inetsolutions.org for the purposes if this simple imaginary example
- You setup various settings for the project – content, minimum PR of target URLs, minimum number of OBL, words to avoid, etc
- You start the project
- Now GSA SER will take each new target URL it finds (this is a website on which the software will try and create a backlink pointing at https://inetsolutions.org) and try and post on it
- The way it tries and posts on target URLs is by matching them with engines – an engine in SER is nothing more than a script file which tells the software how to post on a certain platform. So, for instance, we have the engine “WordPress”, and some instructions inside i.e. how to fill-in the registration details, how to verify the account, etc, and when a target URL matches this engine, GSA SER will use this blueprint and try and register on the website, and then post a backlink pointing at your website – https://inetsolutions.org
- Once a links is posted, it is first marked as “submitted”
- After some time (a few minutes or hours depending on the engine), GSA SER will go back to this submitted link and check if it is actually live. If it is, only then will it be counted as a “verified” URL. And that’s what you want to see in your GSA Search Engine Ranker – a lot of verified URLs.
- And basically, that’s it.
I hope this gave you some perspective because it’s time we dug into this GSA SEO tool.
The “Dashboard” Screen
Once you click twice on the link building tool for beasts, you will have to wait a few seconds for the license verification process to pass and you will be greeted by the “Dashboard” screen of GSA SER:
We shall approach this from bottom to top, just like we did in the GSA Captcha Breaker review article.
The “Statistics” Bar
As you can see, the bottom of the “Dashboard” screen is filled with some helpful numbers – from left to right:
- Threads – the number of threads which GSA Search Engine Ranker has created
- Submitted backlinks (S:) – the number of backlinks which have been successfully submitted (not verified yet, meaning, that GSA SER has not yet checked if the link is actually live)
- Verified backlinks (V:) – the number of links that were actually verified by GSA Search Engine Ranker
- Active proxies (P:) – on the left side of the “|” you see the number of private proxies, and on the right side you see the number of public proxies
- Real-time links data – if you right-click on this field, you will have the power to choose from the following statistics:
- LpM – links submitted per minute
- VpM (recommended) – verified links per minute
- DpM – downloads per minute (a download is when GSA SER downloads the HTML of a target URL)
- With Download Failed – this is a checkbox input and when ticked, will show right next to one of the three options you chose above, the number of proxy failed downloads per minute (you want to keep this as low as possible, which you can do by purchasing some quality dedicated proxies like the ones from BuyProxies – just a tip)
- Captchas (C:) – to the left of the hyphen you see the number of captchas sent to the captcha solving services you specified in the “Captcha” tab from the “Options” menu and to the right you see the number of wrong captchas
- Memory used by GSA SER (Mem:)
- CPU percentage utilized by GSA Search Engine Ranker (CPU:)
If you left-click anywhere on the “Statistics” bar, you will be asked whether you want to reset the stats. GSA Search Engine Ranker automatically resets the stats at 00:00. Keep in mind that the captcha stats do not actually get reset until you restart GSA SER itself.
Moving on with our GSA Search Engine Ranker tutorial
The “Log” Table
Just above the “Statistics” tab, you can see the “Log” table. If you right-click on it, you will see the following context menu:
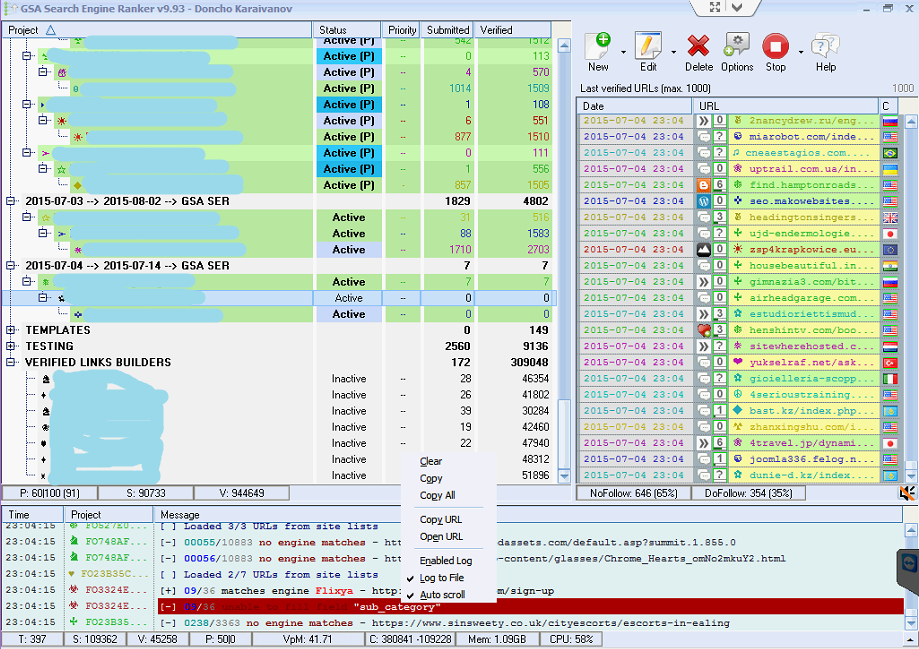
As you can see, I have activated the log just for a second to show you how it looks. We usually have it disabled unless we are debugging something, because with hundreds of projects, it can impact performance. Anyway, the context menu is more than self-explanatory, however, there are other things I’d like you to know about the log.
Common GSA Search Engine Ranker Log Messages and their Meaning
- “no engine matches” – this means that the target URL which GSA SER tried to parse and post a link on, was not recognized by any of the pre-defined GSA SER engines (these are simply files which tell the software how to post on a certain platform, for example Joomla or WordPress).
- “already parsed” – this one means that the target URL on which GSA SER is trying to post to, has already been parsed and posted to by the software.
- “download failed (Return: -, SockError: Connection refused)” – do not get scared by these (you will see them a lot). Yes, even private proxies cannot open all websites. GSA Search Engine Ranker posts to target URLs from all over the world, so expect some failures by your proxies and don’t be afraid – it’s supposed to happen (maybe the site is no longer live, maybe they banned your current proxy, etc)
- “no form at all” – this means that the target website which GSA SER is trying to post on has no inputs where it can fill in the registration details (however, it did match an engine, so quite possibly, this website has been modified by its respective owner)
- “registration successful” – congratulations, GSA SER has successfully managed to register on the target website. Now, all it has to do is post your backlink.
- “submission successful” – now we are talking. GSA Search Engine Ranker has successfully posted your backlink. Now, the only thing separating you from your brand new backlink is SER’s verification process.
- “verification successful” – a submitted link was successfully verified, which means that it is now live and ready to be indexed.
That’s it pretty much for the GSA Search Engine Ranker “Log”. Oh, you can also select only one project for debugging, but we will see how to do that later – by default, the log displays messages from all active projects. Next in the only GSA SER tutorial you’ll ever need is…
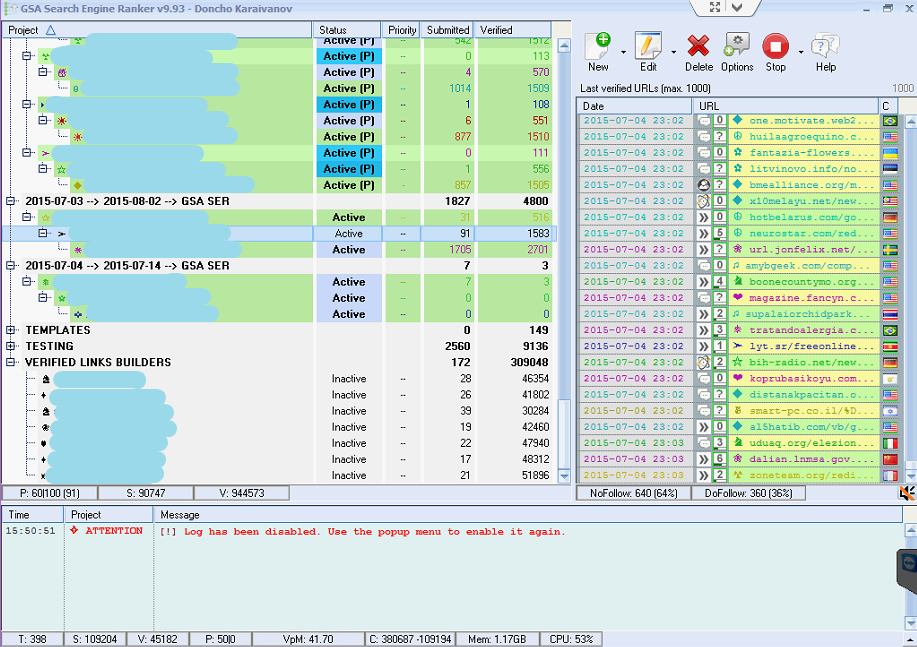
The “Live Links” Table
I will now divert your attention to the right-hand side. You see the table with all of the live links and the opened context menu right?
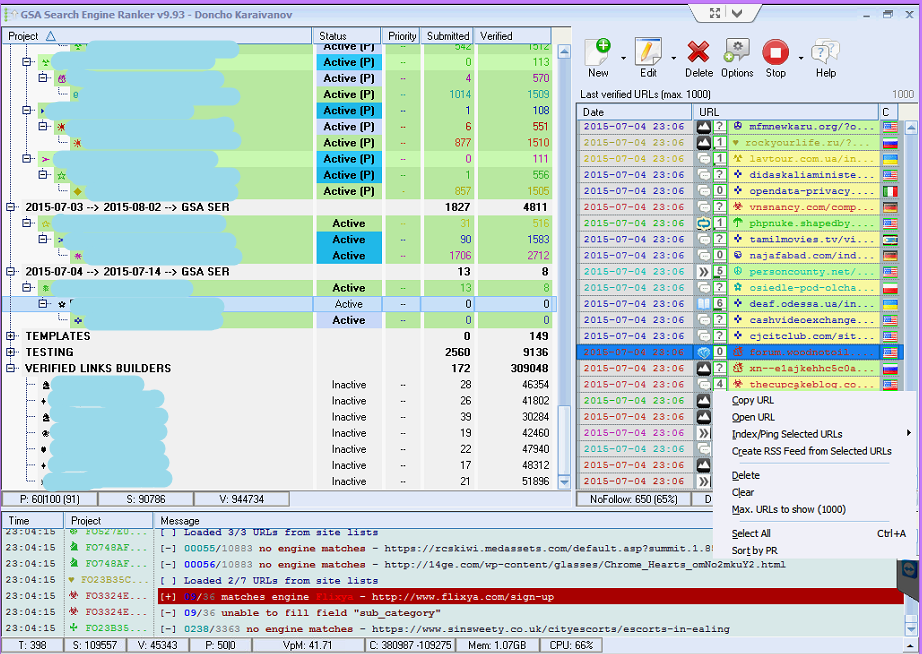
So this is where your verified links will appear. There is a default limit of 1000 links for the table, however, if you click on the text “Last verified URLs (max. 1000)” above the “Live Links” table, you will be prompted to enter a custom number that fits your needs. As you can see, there is nothing much to explain about the “Live Links” table columns – time of verification, icon of engine, PR, and the URL to the verified link itself. The context menu:
- Copy URL – this will copy the URL where the verified backlink resides
- Open URL – opens the selected URL in your browser where you can see with your own eyes, that the backlink is actually there
- Index/Ping Selected URLs – this will index or ping the selected URLs from the table by using one of the following sub-menu options:
- All Services – this will use all active services you have setup from the “Options” menu in the “Indexing” tab
- Ping URLs – this will simply ping the selected URLs using GSA SER’s in-built ping function
- The rest are third-party services which we will list a little bit later
- Create RSS Feed from Selected URLs – this will simply export the selected URLs into an RSS formatted file.
- Delete – deletes the selected verified URLs from the table
- Clear – clears the “Live Links” table
- Max. URLs to show – allows you to set a custom number of live links to show in the table
- Select All
- Sort by PR – sorts all of the URLs in the table by PR (ascending)
Below the “Live Links” table, you can also see the distribution between the NoFollow links and DoFollow links. So that’s it pretty much for this section of GSA Search Engine Ranker. I would suggest you not allowing way too much live links to be stored in the table so as to not hurt performance and resources.
The “Main Menu”
Above the “Live Links” table, you can see the “Main Menu” of GSA Search Engine Ranker. Let’s look at each of the menus from left to right.
The “New” Menu
If you click on the button itself, it will simply open the “New Project” window, which we will look at later, however if you click the small arrow which is a little to the right of the button, you will see the following sub-menu drop down:
- New – does the same thing as clicking the button itself
- New (Enter Name) – again opens the “New Project” window, however, once you are done setting up its settings, it will ask you to enter the name of the project, whereas with the above option, the name of the project will be the first website URL you have entered.
The “Edit” Menu
Clicking the button will open the “Edit Project” window for the selected project from the “Projects” table (the big area to the left of the “Live Links” table with all your GSA SER projects. Clicking the small arrow next to the “Edit” menu icon will show the “Projects Context Menu” which we will look at later.
The “Delete” Menu
This will simply delete the selected project(s). Don’t worry, it will first ask you if you are sure. This GSA link building tool will not allow you to delete projects by mistake. You can sleep relaxed now.
The “Options” Menu
This is where it gets interesting. You will see 5 tabs (on the left-hand side) once you open the “Options” menu – “Submission”, “Captcha”, “Indexing”, “Filter”, and “Advanced”.
The “Submission” Tab
The “Submission” tab is where you will setup your proxies and other relevant settings:
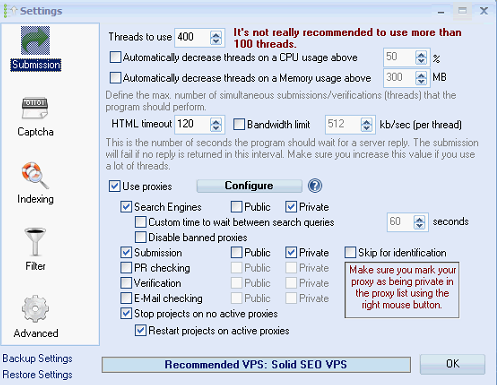
Let’s look at each of these from top to bottom. So, threads to use? There is a lot of debate about the number of threads you should use with GSA Search Engine Ranker. As you can see, there is a warning to the right which says we should not be using more than 100 threads. That is actually true, but only in the case when you are actually using GSA SER to scrape target URLs from Google (or other search engines), and then post to them. Our case is not of that nature – we have already built humongous lists with verified URLs, so there is no need for our projects to scrape target URLs from search engines. In such a case, you can go as high as 10 threads per proxy. If you noticed in the “Statistics” bar, we have setup 50 private proxies for the GSA Search Engine Ranker on this VPS, and we are running it at 400 threads, so 8 threads per proxy. I have personally found that 7 – 8 threads per private proxy is the sweet spot, again, if you are not scraping target URLs from search engines.
The checkboxes “Automatically decrease threads on a CPU usage above” and “Automatically decrease threads on a Memory usage above” are self-explanatory. I don’t set these ones up, because I have tested out GSA SER a lot and I know what resources it needs at the configuration we are running it at.
The “HTML timeout” option is extremely important. If my memory does not lie to me, I think the default value, right after you get GSA Search Engine Ranker is 30 (number is in seconds). However, there are websites out there for which GSA SER will need much more than 30 seconds to complete the account creation process. Through various forums and testing, I have found that 120 seconds is perfect.
The “Bandwidth limit” is useful for people who have, well, limited bandwidth on their VPS or personal computer. However, I don’t know how far you can get with a limited bandwidth using GSA Search Engine Ranker. This link building beast will eat it up in a day.
Now we are at the proxies section. Apparently, you want to use proxies otherwise this software will do almost nothing for you. Tick the “Use proxies” checkbox. We shall get back to the “Configure” button in a second. Now, I recommend using private proxies, especially if you will be scraping target URLs from Google. If you use public proxies, you will be wasting the talent of the king of automatic link building software which is illegal. Beware the GSA SER police.
So anyway, tick the “Private” checkbox to the right of the “Search Engines” checkbox. I have it ticked as well, although we do not scrape target URLs from Google, however, in rare cases, we do, so there’s no harm in the configuration of our GSA SER to be ready for this scenario.
The “Custom time to wait between search queries” checkbox is useful if you do not want your proxies to burn out very quickly, and especially if you are not using private proxies. 60 – 120 seconds depending on the number of proxies you have will do just fine, however, this will slow GSA SER’s work a lot. Just FYI.
The “Disable banned proxies” checkbox allows GSA Search Engine Ranker to automatically disable banned proxies, and you will most definitely need this if, again, you are not using private proxies. If you are, do not check it, because they do die from time to time, but they quickly get reincarnated from the proxies graveyard.
The “Submission” checkbox should always be ticked. This means that GSA SER will use the proxies you setup to post backlinks on target websites. Again, you’d want private proxies to post to websites, however, if you are not scraping target URLs from Google, semi-dedicated ones will give you good results as well. We rarely scrape target URLs with GSA SER, however we always use private proxies as they are far more efficient and you can go higher threads per proxy with them. After all, you are the only one using them. God knows what the semi-dedicated ones are being used for.
I have found that there is no need to use proxies for the “PR checking”, “Verification”, or “E-Mail checking”. And finally, we have the “Stop projects on no active proxies” and “Restart projects on active proxies” ticked just in case something goes wrong with the proxies and they die. We wouldn’t want the projects to continue trying to create backlinks, because all we will see in the log is “download failed” messages.
Now, let’s click the “Configure” button:
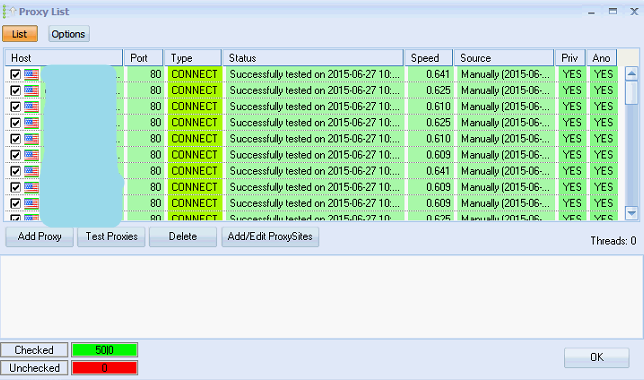
You see the “Proxy List” window with the “List” tab selected? This is where you will actually add your proxies. I strongly recommend using private proxies from BuyProxies (check out our honest review), but hey, that’s your choice. If you want to expose your GSA Search Engine Ranker to some gamma rays, private proxies are mandatory. Now, from bottom to top.
The “List” Tab
The “Checked” and “Unchecked” numbers indicate how many of the proxies which you have imported into GSA SER are actually checked (the 1st column in the proxies table above with the little “tick”). Now, you can check/uncheck proxies manually, or you can allow GSA SER to do this automatically when certain conditions are met (like with the “Disable banned proxies” checkbox a little bit above).
Adding New Proxies
Clicking the “Add Proxy” button will show the following menu:
- Find online – GSA SER will go out and use pre-defined proxy sources lists to find and add new proxies. You can test these new proxies and hope that at least some of them work.
- Find online + Test – this will do the same as above, but test the proxies before adding them to the “Proxies” table. I’d go for that one if you do not have proxies of your own, because this will filter dead proxies right off the bat.
- Parse URL – this will allow you to enter a URL from which GSA SER will try and extract proxies.
- Add Single Proxy – this will add one new proxy to the “Proxies” table and let you choose its type – Web, Transparent, Socks4 or Socks5.
- Use SolidProxies.com API – third-party service for 100% automated private proxies (never tried it, so no comment).
- Use Pro.Mazury.pl API – same as above.
- Use Luminati – again, third-party proxy service.
- Import from File (login:password@host:port) – this will import your proxies from the selected file which has to have the format specified.
- Import from File (host:port:login:password) – same as above only with different format.
- Import from Clipboard (login:password@host:port) – this will import your proxies from your clipboard which has to have the copied proxies in the specified format.
- Import from Clipboard (host:port:login:password) – this is the one we use, perfect for HTTP proxies (proxies with login, not just restricted by authorized IPs). Again, same function as above, just different format. After your proxies are imported, make sure you mark them as private (if they are actually private, or if you have ticked to use only private proxies from the “Submission” tab.
Testing Proxies
The “Test Proxies” button has two menus:
- Selected – which will test the selected proxies from the “Proxies” table
- All – which will test all proxies
Both of these menus can check the proxies:
- Against Google (search)
- Against Google (PR)
- Against Bing
- Against WhatIsMyipAddress.com
- Against Anonymous Test-URL
- Custom – this will open a small window where you can enter the URL which you want the proxies to be tested against.
Just a quick note here. If you have private proxies setup, and you test them and some of them fail, do not uncheck them (by default GSA SER will uncheck failed proxies). As I said earlier, private proxies might die from time to time (if you have bad ones), but they will come back. We have never had any problems with the proxies from BuyProxies, ever. They have always changed our proxies whenever we needed and also change the proxies automatically every month on the day you pay.
Deleting Proxies
The “Delete” button has 4 sub-menus:
- All
- Selected
- None Anonymous – delete proxies which are not even anonymous
- Unchecked/not working
Keep in mind that it will not ask for confirmation. It will delete the proxies immediately after you click, so think twice – cut once.
Adding or Editing Proxy Sites
Clicking the “Add/Edit ProxySites” button will show the “Proxy Finder” window where you will simply have the power to select from the pre-define proxy sources, add new ones, delete old ones, find new proxy sites using GSA SER, and tweak various settings for each of the proxy sites:
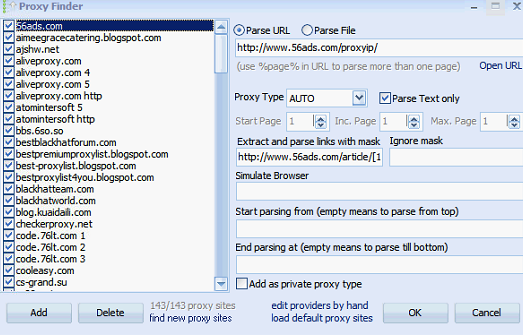
As I have stated a lot of times, we use private proxies, because I like to juice this puppy up a bit. So, there aren’t many tricks I can teach you in finding proxies from sources that would actually work. Maybe there is such a strategy, maybe there isn’t. The point is, that this will take way too much time to tweak everyday, and add and test new proxies constantly. The link building beast likes to build links, not check proxies you know?
There is also a context menu that pops up when you right click any of the proxies from the table, and has the following options:
- Check / Uncheck – this option has 7 sub-menus:
- Check All
- Check None
- Toggle – this will simply turn the checked ones into unchecked ones and vice versa
- Check Selected
- Uncheck Selected
- Uncheck all with a low speed – this will open a window where you will enter a number (in seconds), and will uncheck all proxies which have lower speed than that number (compares with the number in the “Speed” column from the “Proxies” table)
- Check previously working – this will check all proxies that were automatically disabled by GSA SER, but were previous tested and worked
- Toggle Private/Public – will make all private proxies public, and vice versa
- Add – opens a window which will let you enter host and port for the new proxy and adds it to the “Proxies” table
- Change Proxy Type – allows you to change the proxy type into one of the following:
- CONNECT
- WEB
- SOCKS4
- SOCKS5
- Select All
- Delete – has the same sub-menus as the menu which pops up when you click the “Delete” button below the table (don’t forget that GSA SER won’t ask for confirmation when deleting proxies)
- Hide unchecked/not working
- Copy Proxy – this will copy the selected proxy to your clipboard in one of the following formats:
- All Data – copies the entire row of data
- Login:Password@IP:Port
- IP:Port:Login:Password
- Export Checked Proxies – allows you to export all checked proxies and you can choose, again, from the following 3 formats:
- All Data
- IP:Port
- IP:Port:Login:Password
- Test Selected – has the same sub-menus as the menu that pops up when you click the “Test Proxies” button below the “Proxies” table
- Scroll while testing – whether or not to scroll the “Proxies” table while GSA SER is putting the proxies to the test
- Sort by Country
And that’s all for the “List” tab in the “Proxy List” window. Continuing with our ultimate GSA SER tutorial.
The “Options” Tab
The second tab in the “Proxy List” window looks like this:
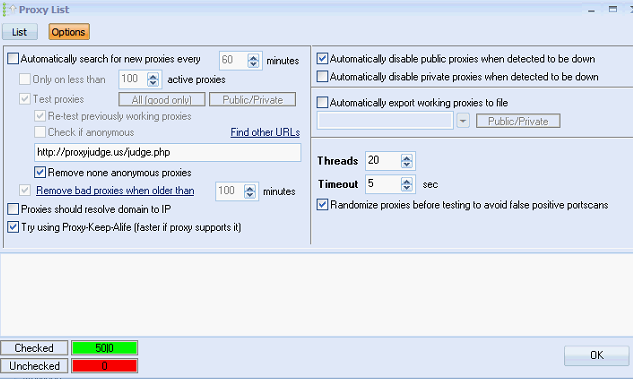
As you can see, there are two section here.
The Left Section
On the left side you can setup various settings which will allow GSA Search Engine Ranker to automatically maintain working public/private proxies. Ticking the “Automatically search for new proxies every” checkbox will simply tell GSA SER to go out and find proxies from the proxy sources you have configured, test them (it is recommended that you tick the “Test proxies” checkbox), and use them for your projects. As you see there are two buttons to the right of the “Test proxies” checkbox:
- All (good only) – this is the default setting which will test only the good proxies i.e. the proxies which are actually still marked as working, however there are 2 other options:
- All (good/bad) – this will test absolutely all proxies in the “Proxies” table
- Only newly added – will test only the ones that have been added after the last iteration of the automatic search for new proxies process ended
- Public/Private – this is the default setting which will test both public and private proxies and has 2 other options:
- Public Only
- Private Only
The rest of the checkboxes in the left section of the “Options” tab:
- Only on less than – will run the automatic new proxies search only if there are less than “x” number of active proxies in the “Proxies” table.
- Re-test previously working proxies – If you have proxies in your list which were previously functional, but failed either automatic or manual testing, ticking this option will force GSA Search Engine Ranker to test them again after the automatic search for new proxies has ended.
- Check if anonymous – will check if the proxies for testing are actually anonymous.
- Find other URLs – this one includes the text input below the “Check if anonymous” checkbox and basically when clicked, will search on Google for the following keyword: “inurl:”/prxjdg.cgi” OR inurl:”/azenv.php””. This search will simply list sites which might possibly qualify as new proxy sources.
- Remove none anonymous proxies – you don’t need proxies which are not at least anonymous, so remove them.
- Remove bad proxies when older than
- Proxies should resolve domain to IP
- Try using Proxy-Keep-Alive (faster if proxy supports it) – this will increase the speed of the proxies which actually support Keep-Alive (if you don’t know what that is, it’s basically a method which allows the same TCP connection for HTTP conversation instead of opening a new one with every new request, in other words, the web server simply tells the web browser that it can grab more than just one file at a time).
The Right Section
You have a few general settings here:
- Automatically disable public proxies when detected to be down – preferably, if you are using public proxies, this options should be checked
- Automatically disable private proxies when detected to be down – do not tick this one, because private proxies are essentially phoenixes
- Automatically export working proxies to file – you can select where you want the proxies to be exported and whether you want both private and public proxies to exported or just one of the types
- Threads – the number of threads which GSA SER will use to search and test proxies
- Timeout – the timeout for each proxy test
- Randomize proxies before testing to avoid false positive portscans – you want that
Overall, using public proxies for GSA SER, especially if you will be scraping target URLs from Google is not something you want. I have tested this strategy and let me tell you this – it does not work well. When I tried using the automatically scraped proxies which GSA Search Engine Ranker found for me every one hour, the VpM barely reached 3. The proxies were getting tested and came out successful, but just a few minutes later, most of them were already dead.
Maybe there is some unstoppable public proxy source which can be added to make this actually work (I always know there is a way), however, this would require a lot of time for tweaking, always checking, and you can never be sure that GSA SER is actually utilized to its maximum potential. So if you can afford private proxies, or at least semi-dedicated ones, go for it – you won’t go wrong with BuyProxies.
And that wraps it up for the “Proxy List” window. The next stop in our GSA Search Engine Ranker tour is…
The “Captcha” Tab
Okay, we are back to the “Options” menu screen and now, we will look at the “Captcha” tab:
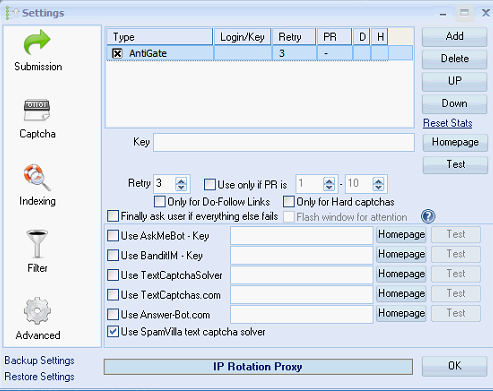
So, the “Captchas” table that you see (with the “AntiGate” captcha type in it) is the table where all of your captcha solving services will show up. Now, in this scenario, we have setup AntiGate, but we are not actually using the captcha solving services of AntiGate. No, no. We are actually using GSA Captcha Breaker which is emulating AntiGate. If you want to know why we are doing it like this, check out our GSA Captcha Breaker Ultimate Tutorial, but in short, it is more efficient that way.
Let’s look at the buttons on the right-hand side of the “Captchas” table:
- Add – This will allow you to add a new captcha solving service. The supported ones are:
- GSA Captcha Breaker – recommended as 1st service (emulate it as AntiGate or some other captcha solving software)
- 2Captcha.com
- 9kw.eu – slow
- AntiGate
- AntiGate API with IP
- Best DeCaptcha
- Beat Captchas
- Bolo API
- Bypass Captcha
- Captcha 24
- Captcha Bot
- Captcha Infinity – outdated
- Captcha Sniper – GSA CB is much better than Captcha Sniper
- Captcha Trader
- Captcha Tronix
- Captcha X
- CheapCaptcha
- Death by Captcha
- DeCaptcher
- DeCaptcher API with IP
- Eve – specializes in ReCaptcha OCR
- Expert Decoders
- HiCaptcha
- Image Typerz
- Image Decoders
- Mega OCR – unstable and slow
- PixoDrom
- ReversProxies OCR – recommended as 2nd service (import through the GSA Captcha Breaker options, do not add it from GSA Search Engine Ranker – see why)
- RipCaptcha
- RuCaptcha
- ShaniBPO – unstable
- SpamVilla
- Delete – deletes the captcha you have selected from the “Captchas” table.
- UP – movies the selected captcha up in the “Captchas” table hierarchy (the order of the captcha solving services in the table is the order in which they will be used by GSA SER).
- Down – opposite to “UP”.
- Reset Stats – resets the captcha stats for the selected captcha solving service in the “Statistics” bar.
- Homepage – opens the homepage of the selected captcha solving service.
- Test – tests the selected captcha (if you are using GSA Captcha Breaker and connecting it with GSA Search Engine Ranker by emulating some third-party captcha solving software, if the test is successful, it should show something like this: “Your balance is: 999”). Keep in mind that if you are connecting GSA SER with GSA CB directly i.e. using the “Add” -> “GSA Captcha Breaker” combination of actions, sometimes, they might lose connection to each other and GSA SER will stop building links or at least will lose a lot of VpM. So either emulate AntiGate using GSA CB (see how) and connect the two tools this way, or test the connection regularly to make sure the captchas are being sent to GSA CB. You can also quickly look at the captcha numbers down in the “Statistics” bar, and if they are moving up, all is good.
Below the buttons you can see the configuration of the selected captcha service – for each captcha, these fields might differ: some have logins, some keys, some API keys, etc. However, there are a few settings which apply to all captchas:
- Retry – the number of times the selected captcha solving service will try and solve each captcha (we keep this at 3, but keep in mind that the higher the number, the lower the LpM, but the lower the number, the lower the success rate you will have i.e. successful registrations on target websites).
- Use only if PR is – this is good if you are using some high paid captcha solving service such as Death by Captcha and you want to utilize it only for the important sites.
- Only for Do-Follow Links – useful in the same way as the above option.
- Only for Hard captchas – again, useful in the same way as the above option.
- Finally ask user if everything else fails – Pay close attention to this one, because you will be wondering why the fuck do these captcha windows keep popping up. GSA SER gives you the chance to manually solve a captcha if all other captcha solving services fail – it will open a small window with the captcha image and a simple input. However, if you run a lot of projects, or even just a few, this will get overwhelming and annoying. By default, this option is ticked, so make sure you go and disable it.
- Flash window for attention – this will flash the window if you have ticked the above option and a new captcha window pops up. Enjoy the lightning show if you have several projects.
At the bottom of the “Captcha” tab we have several API key input fields, again for services which solve captchas. I haven’t used any of these so I really can’t comment on them. All I know is that GSA Captcha Breaker combined with ReverseProxies OCR is the shit.
The “Use SpamVilla text captcha solver” is ticked by default, but we have not added this service, so it doesn’t matter anyway. However, if you have SpamVilla added, this checkbox will force captchas which are simple questions (not images) to be answered by SpamVilla’s text captcha solver.
That’s it for the “Captcha” tab. Moving along the waves of this GSA SER tutorial.
The “Indexing” Tab
Next stop – the “Indexing” tab:
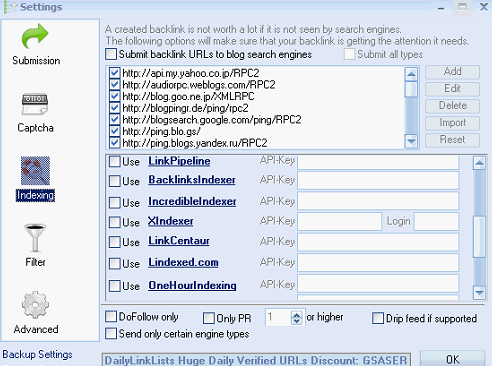
This tab doesn’t need much explanation. As you can see, you have a general checkbox – “Submit backlink URLs to blog search engines”, which if ticked, will send all verified backlinks to the selected blog search engines from the list you see below the checkbox. Now, the way this works is, when a project gets a new verified URL, it is simply pinged by all the selected blog engines. We have disabled this function because pinging links may or may not speed up their indexation (and if it does something it will be minor), which is why it is not worth the time GSA Search Engine Ranker will invest in running this functionality. Just my humbled opinion. Beside the list, as you can see, you can add, edit, delete, import, or reset blog search engines. Simple as that.
The next part of the “Indexing” tab is where you can configure various indexing services. Supported ones are:
- GSA SEO Indexer – while it is very cheap, we do not use it because in my opinion, from reading and understanding what it does, it is not worth the resources it will use from our VPS. However, I might be missing something (check this out).
- GSA URL redirect PRO – This GSA SEO tool quite simply builds 301 redirect URLs to your website (this one is not an indexation tool specifically)
- InstantLinkIndexer
- Indexification
- Linklicious.me
- ExpressIndexer
- LinkHuggers
- NuclearLinkIndexer
- LinkPipeline
- BacklinksIndexer
- IncredibleIndexer
- XIndexer
- LinkCentaur
- Lindexed.com
- OneHourIndexing – recommended if you are into faster indexing of backlinks, however, be careful with this power – Google might or might not detect this trick (yes, it is in superposition).
- LinkProcessor
- Crazy Indexer
- WitchIndexer
- FastLinkIndexer
- LinkIndexr
When you choose your indexing service (if you choose to use one at all), you can then select from a few settings below the list of supported indexing softwares:
- DoFollow only – will send only DoFollow links to the indexing services.
- Only PR – will only send backlinks with PR above the specified number.
- Drip feed if supported – some of the indexing services above support drip feed, which you can take advantage of, and you should.
- Send only certain engine types – this will open a window where you will be able to choose from the engines supported by GSA Search Engine Ranker i.e. WordPress, Joomla, etc (we will list all very soon). Only the selected ones will be send to the indexing services you have setup.
And you are ready with the “Indexing” configuration of your GSA SER.
The “Filter” Tab
Next we move onto the “Filter” tab:
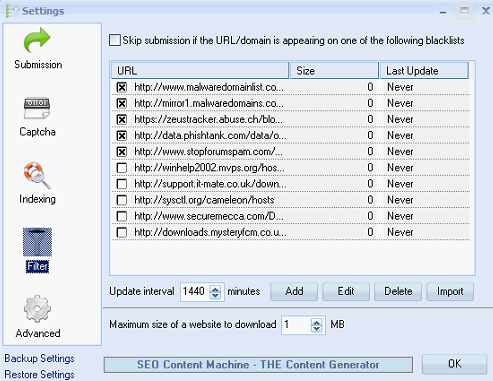
You can use this tab to filter out some potentially spammy and dangerous websites which appear on the blacklists you have marked from the “Blacklists” table. We have disabled this because, I can’t remember where I read it (I think it was a post by a SERengines developer), but enabling this might interfere with the Web 2.0 engines supported by SERengines. And we really need those. And besides, we setup each of our projects with filters configured from its project settings, so no worries there. And we also save GSA SER some time by avoiding this blacklist check.
If you do choose to use this functionality:
- Update interval – the number of minutes which will have to pass before the selected blacklists get automatically updated
- Add – add a new blacklist URL
- Edit – edit the selected blacklist URL from the “Blacklists” table
- Delete – delete the selected blacklist URL
- Import – import blacklists from a .txt file
The final setting in the “Filter” tab is separate from the blacklists settings. The “Maximum size of a website to download” option simply sets the limit (in megabytes) which a website’s HTML code can be in order for GSA Search Engine Ranker to download it and parse it using one of its engines. So, for example, if you have a target URL which GSA SER is going to download, but it is some guestbook which has tens of thousands of comments on it, making its HTML way too fucking big (maybe 1.1 MB), SER will simply ignore it because of this filter.
And now you know how to use the “Filter” tab of GSA SER. Moving on with the ultimate tutorial of this link building beast.
The “Advanced” Tab
Finally. This is where a lot of the magic happens. Read this section thoroughly, because it is of vital importance! The “Advanced” tab:
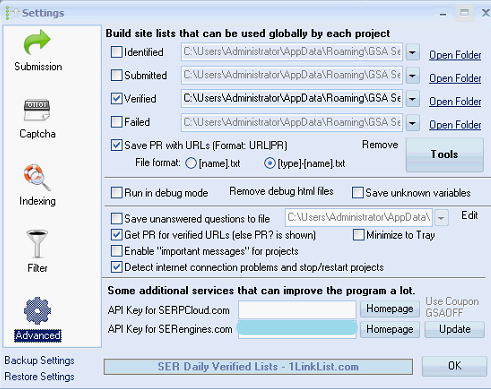
Let’s begin with the first 4 rows of this tab i.e. the ones with the input fields filled in with paths to directories.
Understanding GSA Search Engine Ranker Lists
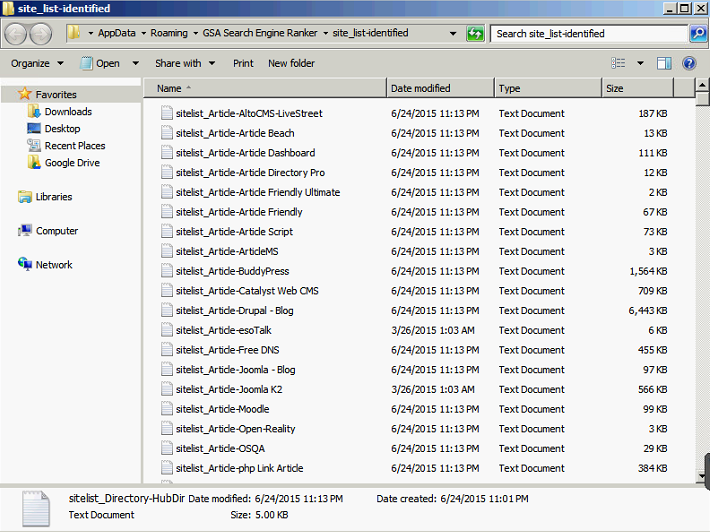
This is a screenshot of some of the files inside the “Identified” lists folder. Each of the .txt files you see is full of possible target URLs which you can later use in your projects to try and post a backlink on each of them (we will see how in a moment). As you see, there is a file for each of the GSA SER engines – Drupal, esoTalk, Joomla, etc. This means that in each of these files, you will find all URLs that were identified by SER as websites using that certain engine. Makes sense right?
Now, as you can see from the “Advanced” tab, we have 4 lists:
- Identified – keeps the site lists containing possible target URLs which have matched a GSA SER engine like WordPress, Joomla, etc.
- Submitted – keeps the site lists containing the websites where GSA Search Engine Ranker managed to submit a link.
- Verified – keeps the site lists containing the websites on which GSA SER managed to verify the submitted backlinks.
- Failed – keeps the site lists containing websites where GSA SER failed to submit a link to, however the website did match an engine.
Now, as you can see, we have ticked only the “Verified” site lists, which means that our GSA SER will only store verified links (this increases performance of the software as well, because it will not waste time to store links at almost every action, only when a verification process was successful). If you open the other list folders on our GSA SER, there will be nothing inside, except for the “Identified” folder. Why? We will get back to this later on in the section where you will learn how to build huge lists with verified URLs in no time – just as we do it.
Below the lists settings, you can see a few options:
- Save PR with URLs (Format: URL|PR) – by default, GSA SER saves the plain URLs (each on a new line) into the text files for the site lists, but ticking this will add the PR of the website at the end of the line. This is useful if you will be using PR filters in your projects, for example, if you are creating projects, and you want them to post only to PR1+ websites, because that way, SER will avoid checking the PR of the website at the time of submission.
- File format – this is the format of the names of the text files in the site lists directories. As you saw above, by default, files are named “sitelist_Social Bookmark+Pligg”, for example, but you can get rid of the “Social Bookmark” part by selecting the “[name].txt” format, however, I do not recommend that. It is much easier to navigate through your lists with the “[type]+[name].txt” format.
The “Tools” Button
This one deserves its own section, because there is a lot to tell about it (this is the menu you will see once you click on the “Tools” button):

All of the menus you see perform some sort of tasks with the site lists in GSA Search Engine Ranker. So, from top to bottom:
- Add URLs from Projects – adds URLs from the projects you select (a window pops up where you can tick the projects you want to use) to the “Identified” site lists. It has two sub-menus:
- Submitted – adds the submitted URLs from the selected project(s).
- Verified – same as above, but uses the verified URLs instead.
- Add URLs from Backups – same as the above functionality, however, instead of you using projects running in GSA SER, you will be able to select a .ser file which is basically a file with backed up GSA Search Engine Ranker project(s). This menu has two sub-menus, again, same as above.
- Import URLs (identify platform and sort in) – imports URLs either from file or from clipboard, and automatically identifies the engine for each of the URLs (if any match) and adds them to their respective .txt file in the “Identified” site lists.
- Import URLs (holding site lists) – suppose you have a list if sites each of which holds AA lists (for example, you can have a .txt file with 5 URLs pointing to these sites, and on each of these 5 URLs, there will be a huge list with AA URLs). In that case, you can use this GSA Search Engine Ranker functionality to import this .txt file with the 5 URLs, and SER will automatically open each of the URLs, scan all of the AA links on them and import and sort them into the “Identified” site lists.
- Search Online for URLs – allows you to add your keywords, combine them with pre-defined GSA SER engines footprints, and then search online for target URLs. Again, at the end of the search, these will be imported into the “Identified” site lists.
- Search Online for site lists – same as above, however this function will search for whole site lists as opposed to single URLs. The GSA SER community is very active, and people constantly share stuff with one another. Site lists are no exception. I really recommend you making your own lists, because shared ones are spammed as hell.
- Parse verified URLs (others linking on same URL) – Suppose that you have a project which successfully posted a blog comment on a certain blog post on a particular website. Chances are, other people using GSA SER have also posted blog comments on the same blog posts. This function will parse all the verified URLs from engines such as guestbooks, blog comments, etc (these are usually the lower tiers) from the projects you select, then find all of the outgoing links on each of the URLs i.e. the links pointing to the upper tiers of other GSA SER users (so for example a blog comment can be a Tier 3 link and will point to a Tier 2 link from the same GSA SER user’s pyramid), and will add them to the “Identified” site lists. You can also specify only certain engines for which you wish to add URLs to the site lists, and you can also specify a custom location where a file with all of the new target URLs will be stored (you can later inspect those for example). So basically what this does is find you thousands of target URLs from other GSA SER users’ lower tier backlinks.
- Import site lists – you can import either “Identified”, “Submitted’, “Verified”, or “Failed” site lists by selecting an .sl file, which is the extension of exported GSA SER site lists.
- Export site lists – the opposite to the above functionality i.e. creates a .sl file from the site lists you chose.
- Manage site lists – you can perform various tasks with your site lists:
- Move
- Merge
- Move + Merge
- Footprint Studio – allows you to import target URLs, select a pre-defined GSA Search Engine Ranker engine, and then analyze these URLs for possible new footprints. If found, you can add them to the present footprints for the selected engine. You can then use these new footprints with the “Search Online for URLs” functionality to find more potential target URLs.
- Remove duplicate URLs – removes all duplicate URLs from the site lists you select.
- Remove duplicate Domains – removes all duplicated domains from the site lists you select. It is extremely important that you run this and the above function at least once a week, otherwise your VpM will keep on dropping as your site lists become flooded with duplicate URLs. You see, GSA SER doesn’t check if an URL is already existent in the site lists before adding it as this would take up way too much time, so you have to clean your lists manually. Do not forget this! Just for reference, we clean the lists on all of our VPS-s on a daily basis. First run the “Remove duplicate Domains” function and then, the “Remove duplicate URLs”.
- Clean-Up (Check and Remove none working) – removes all of the URLs (you can select specific engine only) from the selected site lists which no longer seem to work i.e. GSA SER checks them and if they do not match any engine, they will be removed. We usually perform such a cleanup once every one or two months. If you start getting way too many “no engine matches” messages in your log, you should run this. It takes a while, but it is well worth it. Your site lists will become clean as a whistle.
- Remove duplicates from file – allows you to import a file and removes all duplicates from it and then exports it to a location of your choice.
- Join/Merge many files to one
- Filter entries from file – you can import a file and filter it:
- Remove lines present in other file – will remove all the lines from the file you imported which are present in another file
- Remove by Mask – removes all lines matching the Mask you enter
- Disavow Tool – creates a listing you can use in Google Webmaster Tool to force Google to not count the links present in the listing.
- Show Stats – shows the number of URLs for each engine in the selected site list (you choose from the sub-menus). There is also a sub-menu which allows you to compare two site lists side by side.
And so ends the tale of how you learned to work with GSA Search Engine Ranker’s site lists. Moving on.
Debugging in GSA Search Engine Ranker
In the next section, you can see 3 options:
- Run in debug mode – opens a debug window. This one is only useful if you were to code your own scripts, so if you are not aware of the GSA SER scripts engine, do not mess with that.
- Remove debug html files – similar to the above functionality.
- Save unknown variables – saves things for analysis later on. Also for debugging purposes. Sometimes, when GSA SER tries to register on a certain site, it might miss some input fields (maybe new ones were added), so enabling this feature will save these new fields to a file for later review and engine optimization.
General GSA SER Settings
The rest of the options in the “Advanced” tab are more of a general type of settings:
- Save unanswered questions to file – Some websites use simple questions instead of captcha images, and the ones which GSA Search Engine Ranker fails to answer can be saved by enabling this feature. Later, you can later fill in the answers manually to increase submission success rates.
- Get PR for verified URLs (else PR? is shown) – if this is ticked, you will see the exact PR of the verified URLs in the “Live Links” table.
- Minimize to Tray
- Enable “important messages” – ticking this will enable certain messages for each of the projects you are running in SER. Usually you will mostly see some failed email login attempts, a notification that there are no more target URLs left to post to (this is not always accurate), etc. We have it disabled, because I have setup templates for our projects, and there is pretty much nothing that can go wrong, and also, our “Verified” lists have grown so big that a project would have to run for months to get to the end of them and remain without any target URLs. But the biggest reason (not really) I have removed them is because they show some bloody red warning signs before each projects’ name and frankly, this annoys me and doesn’t look clean.
- Detect internet connection problems and stop/restart projects
What’s left are the two API keys – for SERPCloud.com and for SERengines.com. If you will be using GSA SER for some quality link building, I strongly recommend subscribing to SERengines. This will allow your projects to create some really nice Web 2.0 posts and profiles on high PR and DA sites. Keep in mind that if you want to post to most of the engines which come with SERengines, you will need ReverseProxies OCR or some other third-party captcha solving service which has high success rate with difficult captchas such as ReCaptcha (Death by Captcha is also an option, but a more expensive solution than ReverseProxies OCR).
And now, we are almost done with the “Advanced” tab, and with the “Options” menu as a whole. All that’s left are these two options:
- Backup Settings – creates a backup file of the GSA SER settings you select. You can choose from (or all):
- Global Settings
- Answered Questions
- Proxy Settings
- Proxy Selection
- Site list (identified)
- Site list (submitted)
- Site list (verified)
- Site list (failed)
- Restore Settings – imports a GSA SER settings backup file
These two are useful if you have more than one instance of GSA SER, or you have a brand new GSA Search Engine Ranker, and you don’t want to waste time configuring everything manually. Simply export the settings from your old GSA SER instance and import them into your brand new one.
The “Start/Stop” Menu
Clicking on the button will simply start/stop all of the projects which have a status “Active” or any of the similar active statuses. Now, if you click on the arrow next to the button, you will see the following menu:
- Stop/Start – acts in the same manner as clicking the button itself
- Scheduler (All with Status Active) – will apply the scheduler to all projects with status “Active”
- Scheduler (All Selected) – will apply the scheduler to all projects which are currently selected
- Scheduler (Select by Mask) – will apply the scheduler to all projects which get selected according to the Mask you enter
Once you click any of the last 3 options, and you have the projects you want to run the scheduler for selected, you will see the GSA SER Scheduler itself:
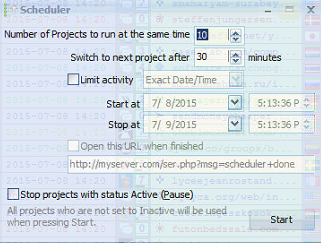
By choosing the appropriate settings, you can run only a selection of your projects, or the projects you selected at a time, allowing GSA SER to apply extra focus only on the currently running projects. So for example, if you have 100 active projects and you want to run only 10 at a time, you would simply click the “Scheduler (All with Status Active)” option and then allow it to run only 10 projects at a time, select the number of minutes which would have to pass before the next batch of these 100 projects will be started and the previous one stopped, set a start and an end date, and you are good to go.
We do not use this GSA SER functionality simply because all of our VPS-s have more than enough proxies and resources to handle probably about a thousand projects each. At 100 private proxies, 700 threads, 4 GB RAM, 4 CPU-s, and a 20GB SSD, you can understand why we do not need any schedulers. All projects can run at the same time and still build tens of thousands of links every day. And because we clean and keep our “Verified” site lists clean all the time, we get an incredibly high score on the submitted/verified links ratio.
The “Start/Stop” Menu is wrapped up as well. The GSA Search Engine Ranker tutorial continues after the paragraph break.
The “Help” Menu
The “Help” menu has the following drop-down menus show up when you click the button:
- View Manual – takes you to the GSA Search Engine Ranker “Manual” web page
- View Script Manual – takes you to the “Script Manual” page of GSA SER (you can understand more about the engine they created and how it can theoretically post to any platform if you simply configured it the right way)
- View Macro Guide – takes you to the “Macro Guide” of GSA SER i.e. what will “%your e-mail%” insert into an article if you used it, etc
- View Version History – opens a .txt file where you can see the changelog (I always check this one after an update to see what’s new)
- Homepage
- Forum
- Suggestion/Feedback
- Create Bugreport
- Check for Updates
- Change License
- Lock
- About
The ones I didn’t write an explanation for really don’t need one in my opinion. And that means, that we are done with GSA Search Engine Ranker’s “Main Menu”. Now it’s time for the real party.
The “Projects” Table
Finally, we got to the section where most of GSA Search Engine Ranker’s magic happens:
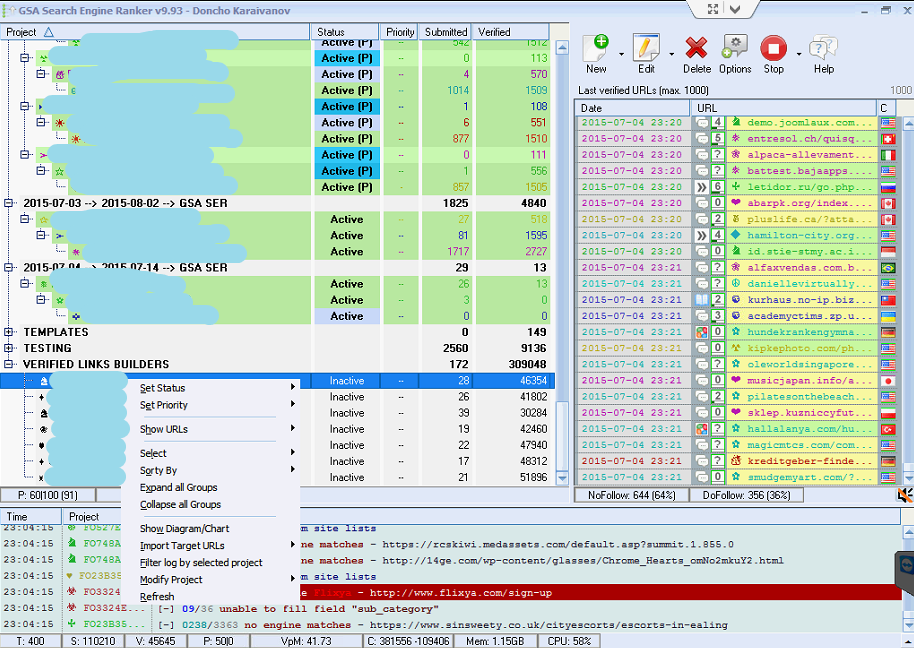
Each row is a single GSA SER project except for the project group rows i.e. “TEMPLATES”, “TESTING”, etc, which simply help group a set of projects for an easier navigation and a few other things we’ll talk about later. So, the “Projects” table has 5 columns:
- Project – name of the project/project group. For the love of god, please come up with a really smart naming convention for your projects, because if you don’t, you will be wasting a lot of time in search of a project you want to perform some action on. The font size of the project names is quite small in my opinion, so always use project groups, because, as you can see, they have a much bigger font size, and are bolded. You can easily spot a project group you are looking for compared to a project name you are looking for. This is why we put every single campaign of ours (usually consists of 3 projects i.e. a link pyramid of 3 tiers) into project groups.
- Status – your projects can have 1 of 9 statuses:
- Active – the project is active and is in the process of creating backlinks.
- Inactive – the project does nothing.
- Active (Verify Only) – the project is active, but is not submitting new links, only trying to verify already submitted backlinks.
- Active (Verify E-Mails Only) – the project is active, but is only verifying email messages so that the the accounts on sites which require verification of email get activated and ready for submission.
- Active (Use global list only) – the project is active and will only use global site lists (“Verified”, “Submitted”, etc, whichever ones you told it to use from its settings) when gathering target URLs.
- Active (Search Only) – the project is active, but will only search for target URLs according to your project settings, without trying to submit a backlink on them.
- Active (Search and Verify) – this is basically a combination of the “Active (Verify Only)” and the “Active (Search Only)” statuses.
- Active (Remove Links) – the project will try to remove all of the backlinks it has created. Keep in mind that this functionality only works for certain engines.
- Active (Re-Verify) – the project is active, but will only re-check if the already verified links are still live. Some GSA SER links might get verified at the time of their creation, but after a while, they might die for whatever reason – removed manually by webmasters, website is down, etc. This option will help you sort out which ones are actually still breathing.
- Priority – this will determine how much attention your project will get from GSA Search Engine Ranker:
- High (++)
- Normal (+)
- Low (-)
- Lowest (–) – I want to share a little trick with you here. All of our projects start with the lowest priority. This way, all projects are equal and will all get enough attention from GSA Search Engine Ranker. However, we constantly check the campaigns, and when some project is falling behind on backlinks, we simply increase its priority. If we were to start our projects with different priorities i.e. Tier 1 projects with with high, Tier 2 projects with normal, etc, when the time comes and some project falls behind, we would have to go to each project with high priority and change it to a lower one, so that we can give more attention to the one that’s lagging.
- Submitted – number of submitted backlinks. When a link from this column gets verified, it is subtracted from it and moved into the “Verified” backlinks column. So don’t panic when you see your submitted links drop down. If they drop down and you don’t see an increase in the number of verified backlinks, this means that the submitted link failed to get verified.
- Verified – number of verified backlinks.
The “Projects Context Menu”
Now let’s look at the context menu for each project. You saw from the snapshot a little bit above that it has the following options:
- Set Status – changes the status of the project.
- Set Priority – changes the priority of the project.
- Show URLs – has 5 sub-menus:
- Submitted – shows a table containing all of the submitted backlinks for the selected project. You can see important data such as date time of submission, URL to the submitted backlink, engine, and type. You can also export or view detailed statistics about the backlinks.
- Verified – shows a table containing all of the verified backlinks for the selected project. You can see important info such as date time of creation, anchor text, engine, type, dofollow or nofollow indicator, internal links, external links, and date time of verification. You can also export, check out detailed statistics, update PR, re-verify backlinks, and check if the backlinks are indexed.
- Show remaining Target URLs – shows you a table with all of the remaining target URLs. Keep in mind that if you see, for example, 10 backlinks remaining, this doesn’t mean that after these are over, the project will have no more to submit to. You see, GSA SER loads a certain amount of target URLs from your site lists, or from scraping on search engines, but not too much in order to not take up too much resources. Once the current target URLs cache gets close to its end, GSA Search Engine Ranker will go out and find some more.
- Show failed Re-Verifications – if you tried to re-verify the already verified backlinks for the project, some might fail and this is where they will be stored.
- Show Stats about remaining Target URLs
- Select – you can select projects using the following sub-menus:
- All
- None
- Toggle – selects all non-selected projects and deselects all selected projects.
- By Status
- Main Projects – selects all projects which are not tiers i.e. Tier 1 projects.
- Main projects that have Tiers – will select only main projects that actually have lower tiers.
- Main projects with no Tiers – selects only main projects that have no lower tiers.
- Tier projects – selects all projects of the lower tiers i.e. Tier 2, Tier 3, etc.
- By Mask
- Search in project data – allows you to enter a string in an input field, and then selects all projects that actually contain that string in their project data i.e. their content (descriptions, blog comments, blog abouts, etc).
- Sort By – allows you to sort all the projects by:
- Name
- Status
- Priority
- Submitted
- Verified
- Date Created
- Date Modified
- Expand all Groups
- Collapse all Groups
- Show Diagram/Chart – shows a window with detailed statistics about the selected project(s) such as a diagram of the number of links built every day, and a pie chart showing the distribution of backlinks. For the pie chart you can choose to show the distribution for engines, anchor texts, types, or TL domains. Over the pie chart you will be able to see the number of backlinks which are DoFollow, and the total number of unique domains. The window also give you the power to either save or print these images.
- Import target URLs – this one has the following sub-menus:
- From File – imports target URLs from file. This is useful if you, for example, scraped some target URLs using Scrapebox (we will see how to do that a little bit later on), and then you can simply import the text file through this menu.
- From Clipboard – imports target URLs from the clipboard.
- From Site Lists – imports target URLs from the site lists of your choice.
- From other Projects – imports target URLs from other projects. You can select the other projects’ submitted or verified links to be imported.
- Remove Duplicate URLs – removes all duplicate URLs from the target URLs of the selected project. If you do not perform that, you might see a lot of “already parsed” messages in the GSA SER “Log” table and plus, this can slow down performance of the software.
- Remove Duplicate Domains – same as above, but for domains.
- Remove Domains being in Failed Sitelist – removes all the target URLs which are contained in your “Failed” site list. We do not save our failed backlinks, so we do not use this functionality.
- Buy URLs to post to – you can buy target URLs from the following providers (I do not recommend this, unless you do not have the time to build your own site lists):
- 1LinkList
- Asia Virtual Solutions
- SerSync
- Daily Link Lists
- Auto Approve List
- GSA List
- ScrapeBroker
- ASPDotNetGuru
- IdentifiedURLs.com
- Filter log by selected project – this will show the log only for the selected project.
- Modify Project – very important menu, so pay close attention. It has the following sub-menus:
- Edit – shows you the “Edit Project” window, which we will look at in the next section of this GSA SER tutorial.
- Edit Only Engines/Options – this menu is only active if you have selected more than one project and this is how it works. Let’s say you have selected two Tier 1 projects, and you want to set a filter on both which will create backlinks only on PR3+ sites. So you select both projects from the “Projects” table, and click on this menu. You will then see a limited version of the “Edit Projects” window, where you will only be able to edit, well, the options for the selected projects. Then you can simply change the PR filter and it will apply to both projects. This is useful if you want to change the same option for many projects, instead of editing every single one of them. Keep in mind that the projects should have identical options (engines selected and all of their settings) to begin with, because if they don’t, after you apply the option changes, they will have identical settings, which will mess up your projects individual configurations.
- Edit single Option for All – this menu is active only if you have selected more than one project and this is how it works. Similar to the one above, but instead of opening a window where you can edit all options for the selected projects, it will simply allow you to select a single option i.e. PR filter, and then apply it to all the projects. This is the one you want to use if you have many projects which you want to edit, but are not using the same exact settings.
- Edit in Notepad – this menu is also active if you have selected more than one project. It will simply open the selected projects’ full data into notepad, so you can edit them side by side. This is a more advanced feature, so if you are not familiar with how GSA SER stores project data, you should avoid that.
- Edit Engines Selection – allows you to edit the engines selection for the selected project. It has two sub-menus – “Choose Engine Selection”, and “Use all Engines for a partly used Category”.
- Import – you can import different data and settings into the selected project either from file or from clipboard. You will learn what each of these represents in the next section. So, you can import:
- Keywords
- Categories
- Word Filter
- URL Filter
- E-Mail Accounts
- Account Data
- Articles
- KontentMachine Data – imports a Kontent Machine generated file, designed specifically for GSA SER.
- SEO Content Machine Data – imports an SCM generated file, designed specifically for GSA Search Engine Ranker.
- Exported Data Fields – imports data fields which were exported from some other SER projects.
- Export – you can export email accounts and account data (this is data containing login details for all the accounts created for the selected project).
- Verify all Links – attempts to verify all the links for the selected project.
- Delete – deletes the selected project(s). Don’t worry, you will be asked to confirm first.
- Delete Target URL Cache – As I told you a little bit above, GSA SER takes a certain amount of target URLs and puts them into the project’s target URLs cache. You can remove that if you want to force GSA SER to collect new target URLs. This is useful if you will be importing new target URLs which you scraped using Scrapebox for example, and you want the project to start posting to the new target URLs asap, otherwise it would have to first get through the previous target URLs.
- Delete Target URL History – if you are getting a lot of “already parsed” messages, it’s time to remove your target URL history. This means that the project will start taking target URLs from the top of your site lists. Keep in mind that you will get asked twice when you click this – the first one is if you are sure you want to delete the target URL history, and the second one is if you are sure you want to delete all of the account data. Do not agree to the second one, unless you want all of the login details for all of the accounts created by the project to be removed.
- Rename
- Duplicate – you can copy the selected project’s data/options, everything, or you can add a tier project to it.
- Move to Group – you can move the project to a group of your choice, move it to root i.e. no group, or create a brand new projects group for it.
- Merge Projects – merges the projects you have selected.
- Backup All Projects – backs up all of the projects in the “Projects” table.
- Backup Selected Project – backs up only the selected project(s).
- Restore – allows you to import a .ser file which is created by the above two functions, so it basically allows you to import exported projects.
- Refresh – refreshes the “Projects” table.
Wow, that was a big menu. I hope you remembered most of the useful functions in it, because they can save you a lot of time. Next stop in our GSA Search Engine Ranker tutorial is the “Edit Project” window. Now you will see all of the data and settings which you can configure when you setup a new GSA SER project. Let’s get it on.
The “Edit Project” Window
This is the same window which opens up when you are about to create a new GSA SER project as well, with the only difference that the fields are filled in for edition. The example screenshots we will use are also filled in for a better understanding of each of the options of GSA Search Engine Ranker’s projects. Here you go:
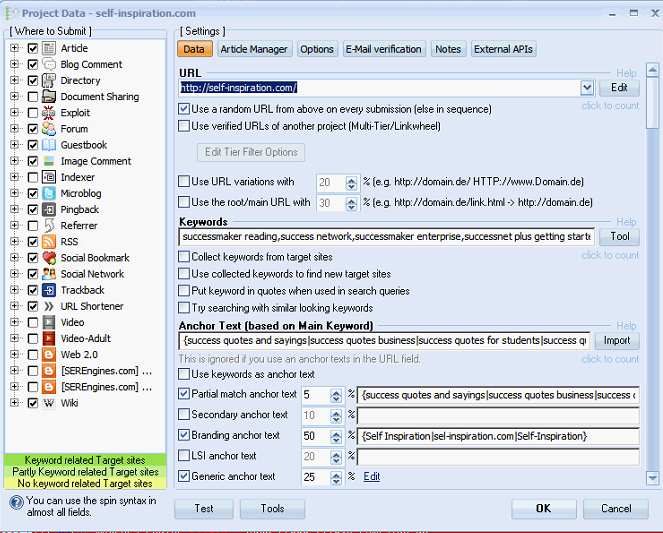
I want yo to first notice the 6 tabs – “Data”, “Article Manager”, “Options”, “E-Mail verification”, “Notes”, and “External APIs”. We will look into each of them in a minute, but I just want you to know that the “Article Manager” tab can sometimes be non-existent depending on the engines you have selected for the project. Now, divert your attention to the section on the left-hand side i.e. the “Where to Submit” section.
The “Where to Submit” Section
The collapsed sections you see are the engine types. Each of these when expanded has a bunch of engines which are grouped under it. Here are all of the supported GSA Search Engine Ranker engines:
Not too shabby huh? With the right GSA Search Engine Ranker configuration, you will be able to post to all of these. And I will tell you the right configuration a little later. Remember, this is the only GSA SER tutorial you will ever need to read.
Now, you can either manually select engines, or you can use the “Engines Context Menu” (shows up when you right-click anywhere in the “Where to Submit” section) which has the following options:
- Check All
- Check None
- Toggle – checks non-selected engines and unchecks selected ones.
- Uncheck Engines with No-Follow Links – unchecks all engines that would create nofollow links.
- Uncheck Engines that use no anchor text – unchecks engines that are unable to create backlinks with anchor text.
- Uncheck Engines that use pages – removes all engines that use already existing pages to create backlinks i.e. blog comments, forum posts, guestbooks, etc.
- Uncheck Engines that use no keywords – removes all engines which are unable to insert your keywords as anchors.
- Uncheck Engines that use no contextual links
- Uncheck Engines that use no html – removes all engines which do not use HTML to create their backlinks i.e. short URLs, RSS, pingbacks, etc.
- Uncheck Engines that create their own page – unchecks all engines which create their own pages i.e. Web 2.0 blogs, articles, etc.
- Uncheck Engines with empty fields
- Uncheck Engines using E-Mail verification – removes all engines which require the account created on them to be verified via an email.
- Uncheck Engines with fixed URLs – removes all engines that are actually specified for a single website such as WordPress, Scribd, etc. In contrast, the engines that are left checked match platforms, not single websites.
- Uncheck Engines not being able to remove Links – removes all engines which do not support GSA SER’s functionality of removing the links it created i.e. the status “Active (Remove Links)”.
- Uncheck Engines based on performance – allows you to select a number of days for which GSA SER will analyze the engines you selected and will uncheck the low performance ones i.e. the ones that failed way too much.
- Copy Engine Selection
- Paste Engine Selection
- Load/Save Engine Selection – exports or imports an engine selection.
Now that you have your engines chosen, let’s dive into the “Settings” section and each one of its tabs. I just want you to know that all of the best practices and configurations for GSA Search Engine Ranker will be gathered in a section right after we have covered each and every element of this GSA SEO tool.
The “Data” Tab
This is where you will be filling in most of the content for your GSA SER project (We use Kontent Machine to generate the content for our campaigns) . Let’s look at each of the elements on this tab:
- URL – This is where you will enter your website URLs i.e. the URLs you will build backlinks to (let’s call them client URLs). You can enter the URLs via the “Edit” button which has the following options:
- Add URL – adds a single URL
- Add URL and Anchor Text – adds a single URL and the associated anchor text with it. GSA SER allows you to bind specific URLs with a specific set of keywords. So for example, if you’d like the backlinks to “https://inetsolutions.org” to have only “online marketing”, “SEO”, and “innovation” as anchors, the format is the following: https://inetsolutions.org#{online marketing|SEO|innovation}. And you can do this for as many URLs as you’d like. That way, whenever GSA SER builds a backlink to https://inetsolutions.org, it will use one of these 3 keywords as an anchor text and will completely ignore the configuration of partial match anchors, branding anchors, generic anchors, etc, which is a little lower on the “Data” tab.
- Add URL and Anchor Text + Secondary Anchor – adds an URL and its respective anchor text + secondary anchor.
- Add RSS Feed (uses <title> and <link>) – you can add an RSS feed and GSA SER will get URLs from it and build links to them.
- Edit All – displays a window with all of your client URLs where you can edit old ones and add new ones. Keep in mind that the client URLs must contain the “http” or “https” headers in front of each URL.
- Delete
- Clear – removes all client URLs.
- Check URLs – checks all client URLs if they are actually live and then asks you if you first want to remove all links with errors or empty replies, and then if you want to remove all links that are redirect URLs.
- Import – you can import client URLs from file or clipboard.
- Export – you can export client URLs to file or clipboard.
- Crawl Online – allows you to crawl each of your client URLs to find more client URLs. For example, if you have added just the root domain of your website, this will scan internal URLs and add them to the client URLs.
- Use a random URL from above on every submission (else in sequence)
- Use verified URLs of another project (Multi-Tier/Linkwheel) – allows you to make the project into a tiered project by selecting one or more projects whose verified links will be used as client URLs. This is the only option you need to make a project into a tier project. See how simple it is?
- Edit Tier Filter Options – if you selected the above option, you will have the power to select different settings to manipulate which verified links from the parent project(s) you will build tiered links for – dofollow only, PR limit, OBL limit, internal links limit, URL age, minimum number of URLs that the parent project(s) must have, only URLs from certain engines, and only verified URLs with specified anchor text.
- Use URL variations with x % – useful option for randomness, but we rarely use it.
- Use the root/main URL with x % – same as the option above.
- Keywords – these are the keywords which GSA SER will use in order to scrape target URLs from the selected search engines (you select these in the “Options” tab).
- Collect keywords from target sites – collects additional keywords from the meta tag of a target site.
- Use collected keywords to find new target sites – finds new target sites via the selected search engines for the extracted keywords from the HTML of previous target sites.
- Put keyword in quotes when used in search queries – this makes sure that the keywords GSA SER is searching for actually appear on possible future target URLs.
- Try searching with similar looking keywords – uses “~” in Google to return results for similar keywords.
- Anchor Text (based on Main Keyword) – the anchor texts which were generated, in our case, by Kontent Machine. You can also import them from file or clipboard.
- Use keywords as anchor text – will use the keywords from the “Keywords” field as anchors.
- Partial match anchor text – this is where you choose the percentage of anchors which will be partial anchors (we will tell you the ratio of percentages we use in the GSA SER best practices section). Also, all of the anchor texts are filled in by hand, since they are not generated by Kontent Machine.
- Secondary anchor text
- Branding anchor text
- LSI anchor text
- Generic anchor text – these are anchors such as “click here”, “check this out”, etc.
- Domain as anchor text – this will put the plain URL as anchor i.e. https://inetsolutions.org.
- Use Citation – if you have entered branding anchors or have chosen the “Domain as anchor text” option, this will remove the link and simply place a plain text containing your brand’s name. This is really good for establishing your brand. At the current stage in the online marketing world, branding is the shit.
- Anchor text variations – this will simply transform your anchor keywords by playing with upper and lowercase letters i.e. Inet Solutions becomes inet solutions.
- Try to use domain/generic anchor with main anchor – keeps the articles of your project more readable.
Now that we have configured the client data of our project, it is time to fill in the content. The rest of the “Data” tab simply contains various fields which you will rarely need to manipulate if you are using a content creation software such as Kontent Machine 3. You will simply generate the content from KM, import it into your GSA Search Engine Ranker project, and let it rip. However, if you decide to play with your content, there are a few things you can do in each field. When you right-click on any of the inputs, a context menu pops up;
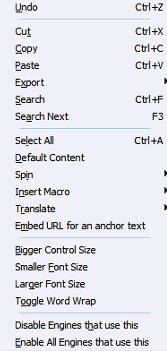
Most options are self-explanatory, but there are a few ones that deserve some attention:
- Default Content – this will replace the field for which you popped out the context menu with its pre-defined value. GSA SER has pre-defined content for fields such as blog comments, guestbook comments, etc. I strongly recommend that you never use pre-defined content because so will another ten thousand people. And do you know what Google does to patterns in link building? Yep, you get a one-way ticket to Penalty City.
- Spin – You can spin the content by using some of the free spinners which GSA SER provides, or you can use your own third-party spinning software. Supported ones are:
- BestFreeSpinner
- ESPinner
- ForoBlackhat
- Internal Spinner
- SpinBandit
- SpinnerChief
- SpinnerChimp
- SpinRewriter
- TheBestSpinner
- WordAI
- XSpinner
- Insert Macro – you can insert macros which will be replaced with real values at the time of backlinks creation. Check out the complete GSA SER macros guide – GSA SER Macros Guide.
- Translate – you can translate the content of your project into almost any language. However, keep in mind that if your content is already spun, and then you translate it, there will be a lot of bugs such as unclosed “{“, missing “|”, etc. Basically, the spintax gets fucked up if you translate highly spun content.
- Disable Engines that use this – disables all engines which use the data field you have opened the context menu for.
- Enable All Engines that use this – the opposite to the above functionality.
Next to each of the data fields there is a “Help” label, which when hovered, will show you the engines for which this content will be used. And that wraps it up for the “Data” tab.
The “Article Manager” Tab
This tab is where you will manage all of the articles for the GSA SER project:
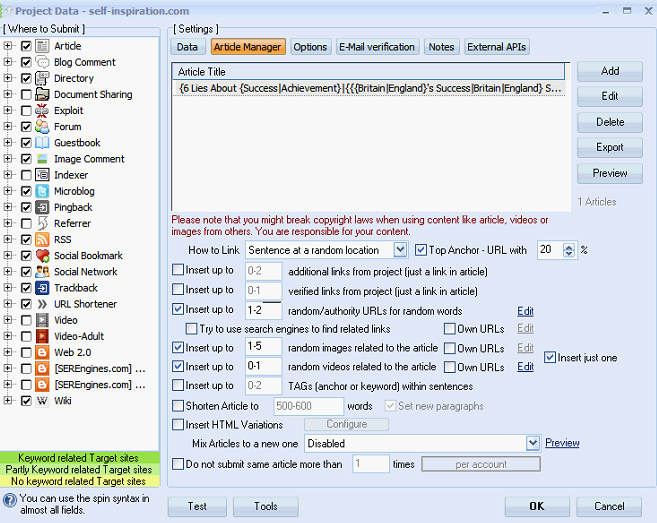
Each row in the table is a single article. As you can see, I have added one highly spun article that can probably make millions of unique versions of itself. GSA Search Engine Ranker articles are structured in the following manner – they have a title, a body, and a summary. Let’s look at the buttons on the right:
- Add – you can add article(s) using the following sub-menus:
- Enter Manually – opens a window where you will be able to enter your article manually. Has 3 inputs – title, summary, and body.
- Search Online – allows you to enter a keyword, choose article directories (ezinearticles.com, bbc.co.uk, etc), after which GSA SER will go out and search for relevant articles. Once the search is over, the software will ask you if you’d like to spin the content it has gathered, and will then finally add the articles to your project.
- Search Online + Mix – does the same thing as the functionality above, but will mix the articles found either by paragraphs, sentences, or both. Your choice.
- Import from Folder – imports all articles from the folder you select. Keep in mind that the title for each of the articles should either be the first sentence in the file or the file name. You can also manually enter the article titles, or let GSA SER generate them for you.
- Import from other projects
- Mix selected to a new Article – allows you to mix the articles you have selected by paragraphs, sentences, or both in order to create brand new unique articles.
- Use Article Builder
- Use Big Content Search
- Use KontentMachine
- Use PLR Articles
- Use RoboArticles
- Use Ultra Spinnable Articles
- Use WAC
- Use XRContent
- Buy Ready Made Data Packs – this and the above 8 options are third-party solutions, which, if you can afford, are really good for your campaigns.
- Edit – opens a window where you can edit the title, body, and summary of the selected article. You can also let GSA SER generate a new title for it, spin it (if you haven’t done so already), and finally, you can preview an unspun version of the article so you can make sure all is good.
- Delete – deletes either all or only the selected articles. Don’t worry, the software will first ask you for a confirmation.
- Export – you can export the articles to a folder of your choice.
- Preview – you can preview an unspun version of the selected article in the browser.
Below the buttons you can see the number of articles you have imported into the current project. And right below all this is where we will configure the settings for the backlinks, videos, images, and everything else which is required to make your article(s) look natural (the below options will be applied to all of the articles you have imported into your GSA SER project). One by one:
- How to Link – you have 4 options here:
- Sentence at a random location – this will insert the sentence with the backlink at a random location into each article.
- Sentence at the bottom – inserts the sentence with the backlink at the bottom of the article i.e. “If you enjoyed this post, check out…”.
- Just a link at a random location – GSA SER will simply place links on your target keywords in the article.
- No Link
- Top Anchor – URL with – inserts the following at the beginning of your articles: “anchor text – URL”. Remember that the first link gets the most link juice, plus, this one is useful for the randomization of the position of your backlinks in your articles. Play with the percentage.
- Insert up to x-x additional links from project (just a link in article) – picks up random links from the client URLs you setup in the “Data” tab, and inserts them into the article.
- Insert up to x-x verified links from project (just a link in article) – inserts already verified links from the same project into the article, basically enabling you to make a link wheel quite easily.
- Insert up to x-x random/authority URLs for random words – inserts random URLs from sites such as Wikipedia, to make the article look more natural. You can also edit the list with generic URLs by clicking on the “Edit” link to the right of this option.
- Try to use search engines to find related links – instead of using GSA SER’s pre-defined authority links, you can let the software search for unique ones, or you can even import your own authority URLs by ticking the “Own URLs” checkbox and then clicking on the “Edit” link next to it.
- Insert up to x-x random images related to the article – again, you can use your own URLs for images, otherwise, GSA SER will simply search on Google using relevant keywords to the project, and insert the images it finds.
- Insert up to x-x random videos related to the article – same as above, but instead will embed videos from YouTube.
- Insert just one – if selected, will force GSA Search Engine Ranker to insert either image(s) or video(s) into each article, but not both at the same time.
- Insert up to x-x TAGs (anchor or keyword within sentences) – adds your keywords or anchor text (depending on the project options you chose in the “Data” tab) into a random location in the article (not a link, just text), which might be good for SEO in some cases.
- Shorten Article to x-x words – cuts the article to the specified number of words.
- Set new paragraphs – this will remove old paragraphs and add new ones.
- Insert HTML Variations – allows you to edit various HTML properties for the article such as font-family, font-size, decoration, etc. You can also edit or add your own variations as well.
- Mix Articles to a new one – mixes the articles you have imported into your project into new ones. You can choose to mix them by paragraph, sentence, or both.
- Do not submit same article more than x times – limits the number of times each of the articles can be submitted per account, per site/domain, or anywhere. Keep in mind that every row from the table with articles above is counted as a single article. It might have millions of unique versions because of the spintax, but GSA SER will still count it as a single article. So if you import one highly spun article, and then select this option with the “anywhere” filter to the right of it, do not be surprised if your project stops creating contextual backlinks. In most cases, you won’t need this, because you will be importing articles that have probably millions of unique versions such as the ones generated by using Kontent Machine and a nice spinner like WordAI or Spin Rewriter.
And that wraps it up for the “Article Manager” tab. Now it’s time to configure the main settings of our GSA Search Engine Ranker project.
The “Options” Tab
The “Options” tab consists of 4 separate sections. GSA SER tutorial to the rescue.
The “How to submit/verify” Section
Here is the first section of the “Options” tab:

As you can see, you can minimize the section using the “[-]” symbol to the left of the heading. Anyway, from top to bottom:
- Pause the project after x+/- x submissions for x minutes – quite simply will pause the project if it reaches the specified number of links (you can choose either number of submitted backlinks, or number of verified backlinks). The “per URL” checkbox means that this rule will be applied not to the project, but to each client URL you have added in the “Data” tab.
- Ask all services/user to fill captchas – you can select which service should solve captchas for this project, or if you’d like to solve the captchas yourself. You have the following options to choose from:
- Ask 1st service/user to fill captchas
- Ask 2nd service/user to fill captchas
- Ask all services to fill captchas
- Ask 1st service to fill captchas
- As 2nd service to fill captchas
- Ask user only to fill captchas
- Custom Retry x times – you can override the number of retries you set globally in the “Options” menu from the “Main Menu” in GSA SER by specifying a different number of retries for the captcha solving process through this option.
- If a form field can’t be filled – if some form input on the target site is not recognized and cannot be filled automatically by GSA SER, this is where you can handle it. You can either skip it or set it to “Choose Random”. I strongly recommend the latter, because many target sites will fail (Social Bookmarks for example), where GSA SER can’t simply fill in the category. The “Choose Random” option will simply fill in something random and manage to register on the target site.
- Skip hard to solve captchas – you know it
- Enable Custom Mode – allows you to customize content before GSA SER submits your backlinks. For example, you can customize blog comments before they are posted.
- Verified Links must have exact URL – if you don’t check this option, GSA SER will count a link as verified if the domain of your submitted URL is present as a link.
- Automatically export verified URLs – if checked, the project’s verified URLs will be automatically exported to a location of your choice. This is useful if you will be checking these links constantly for whatever purpose.
- When to verify – this setting specifies when SER will verify the submitted links. You have three options:
- Automatically – default setting and recommended. GSA SER has some pre-defined settings and knows when to run a verification process in an optimized manner.
- Never / Disabled – will never verify submitted backlinks.
- Custom time x minutes – you can select a number of minutes to pass after which GSA SER will start verifying submissions.
- Don’t remove URLs – basically, this tells GSA SER to continuously try and verify submitted backlinks even though they have already failed verification.
- Remove after 1st verification try – removes a submission from the “to-be-verified” links if it fails after the first verification try.
- Check E-Mails Only – will only check for verification links in the email accounts of the project. This setting and the one above will only be available if you choose a custom time of verification as opposed to letting GSA Search Engine Ranker handle the process automatically.
- Re-verify existing backlinks every x minutes – Will re-verify the already verified backlinks after the specified amount of time passes by.
- Skip engines with moving pages – will skip engines which have moving pages i.e. blog comments (the comment might have moved to the next page), guestbooks, etc.
- Send verified Links to Indexer Services – will send all verified links either to GSA SEO Indexer or the third-party indexing services you have configured in the “Indexing” tab of the “Options” menu of GSA SER.
- Use character spinning when possible – tries to replace some characters in your content right before the submission with some text that looks almost the same to the naked eye, but is in fact some other character.
- For stop words only – you can use the above functionality and tell it to focus only on stop words. You can also edit the “stop_words.dat” file by clicking the “Edit” link to the right. This one contains all of the pre-defined stop words of GSA Search Engine Ranker.
- Randomly use typos/spell errors in descriptions (fight duplicate content) – creates grammar mistakes on purpose. It will still be readable by humans, but not look perfect at all. However, it is expected of humans to make typos and spell errors so this setting contributes to the project’s natural credibility.
- Try to always place an URL with an anchor text in descriptions/comments – this will force SER to always try and place your URL with the anchor text in blog comments and other similar engines as opposed to just placing the URL in the name of the blog commenter’s profile.
- Continuously try to post to a site even if failed before – will constantly try to post on target URLs even if it has failed before, and will do so indefinitely. Link building beasts never give up.
- Try to locate new URL on “no engine match” (only useful for Comment Engines) – GSA SER will try to locate a new blog entry on the domain of the target URL that failed to match an engine, or will download the root URL to see if there is something useful there.
- For TAGs use: – some of the engines require Search Engine Ranker to enter relevant tags. You can choose from anchor texts and keywords.
- Folder with data files to use – basically allows you to specify a folder where you have created a modified version of the .dat files from the engines folder of GSA SER and you want to apply them for this specific project.
The “How to get Target URLs” Section
This is where you will tell the software how it will gather target URLs for this project:

As you can see, the first option you get is to allow GSA Search Engine Ranker to use search engines of your choice to find target URLs for the project. You can choose from pre-defined search engines or you can add new ones and select them instead. You can also edit existing search engines or even delete some which you won’t need in order to more easily navigate through them, because as you can see, there are 852 pre-defined at the moment – GSA SER Supported Search Engines.
However, the good people over at GSA SER have given you the power of filtering. If you right click on the table with the search engines, you will be able to use the power of the following context menu:
- Check All
- Check None
- Toggle
- Sort by check state – sorts the search engines with the checked ones on top.
- Check by Mask
- Check by Country – let’s you choose from a list of countries and selects all search engines matching your selection.
- Check by Language – supported ones are:
- Arabic
- Chinese
- English
- French
- Italian
- Russian
- Spanish
- German
- Check by extended Syntax – this will check all search engines which are capable of understanding common search “magic words” such as:
- site:
- inurl:
- link:
- intitle:
- Uncheck by Mask
- Uncheck by Country
- Load Selection – loads an .ses (Search Engine Selection) file with an already pre-defined selection of search engines.
- Save Selection – creates an .ses file from the current selection of search engines.
Remember that if you will be scraping target URLs from search engines, especially from Google, you will need some really nice private proxies which won’t let you down. For those that are not aware, the way GSA SER scrapes target URLs from search engines is by using pre-defined footprints which are nothing more than a set of strings found on certain sites (each of the GSA SER engines has its own set of footprints). For example, the footprint “Powered by FluxBB” is found on sites created using this platform and will be matched if we search on search engines for this keyword. So you see, SER simply does searches on search engines using these footprints as keywords, and saves the returned SERPs as target URLs.
Below the “Search Engines Selection” table, there are several GSA SER options which will further configure the way this project will gather target URLs:
- Always use keywords to find target sites – if you have allowed GSA SER to scrape target URLs from search engines, i.e. you have selected at least one search engine from the “Search Engines Selection” table, it will go out and find target sites, but for some of the engines, it will use general footprints such as “Powered by FluxBB”, etc. If you check this option, the software will append your keywords (the keywords from the “Data” tab) to the search query.
- Add stop words to query with x % – adds words such as “and”, “the”, etc to get a better variation of the SERPs returned by search engines.
- Use URLs for global site lists if enabled – Instead of using search engines to get target URLs for your project, you can use your global site lists i.e. “Identified”, “Submitted”, “Verified”, and “Failed”. Preferably, you’d only want to use the “Verified” site lists because you know that GSA SER has already been successful in posting to the links contained in it. This will significantly increase your VpM and will help you build more backlinks much more quickly whereas if you use search engines to get target URLs, this process will be much, much slower.
- Use URLs linking on same verified URL (supported by some engines only) – For example, if GSA SER has successfully verified a blog comment, there are probably a lot of other comments on the same page. This option will allow the software to find where these other people’s blog comments point to, and get all these as target URLs. These new found target URLs have a high chance of matching some GSA SER engine because they are probably one of the upper tiers of other GSA SER users’ link pyramids. The supported engines obviously are blog comments, guestbooks, and the such.
- Don’t add – by default, GSA SER adds links to the site lists you have enabled from the “Advanced” tab in the “Options” menu. However, if you tick this checkbox, the software will not add any links to your site lists.
- Analyse and post to competitor backlinks – this will analyze your competitor’s backlinks and try to post on them, but is not recommend as it might actually end up hurting your campaign. The results from this are a little sketchy at hand.
The “Scheduled Posting” Section
First of all, you need to have the “Allow posting on same site again” checkbox enable in order for this section to work at all. Basically, this is where you will setup your scheduled posting on sites. If unique domains is not your thing, this is where you will be applying your evil powers:
- Allow posting on same site again – enables the scheduled posting functionality of GSA Search Engine Ranker.
- per URL – will apply the settings below for each of the client URLs of your project instead of applying them to the project itself.
- Post first article without links – this one is useful if you will, for example, be creating a nice niche relevant Web 2.0 PBN from SERengines’ Web 2.0 posts and profiles supported platforms. You wouldn’t want all of the links on the account to be backlinking to somewhere. You would also want some plain articles on the topic.
- Link only on x % of all posted articles
- Time to wait on further registrations x minutes – the number of minutes GSA SER will wait before registering a new account on the same website.
- Time to wait before first post x minutes – you wouldn’t want to be posting an article 5 seconds after you have registered a new account on a website. Or would you?
- Time to wait between two posts x minutes – the number of minutes GSA SER will wait before it posts a new article on the same account.
- Maximum posts per account x +/- x – the maximum number of posts on each of the accounts.
- Maximum accounts per site x +/- x – the maximum number of accounts on each of the target sites.
The “Filter URLs” Section
GSA Search Engine Ranker is a blaster by nature. That’s what it is – a link building beast. However, you really can filter out the more quality backlinks using this section, of course depending on the type of campaign you are about to run:
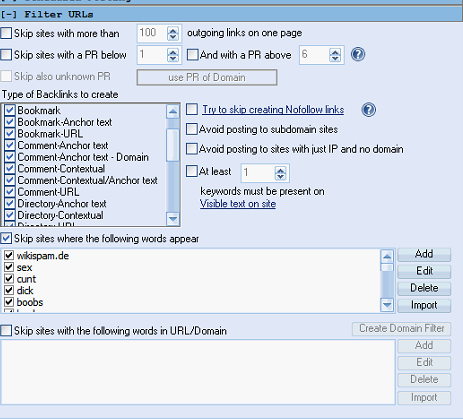
From top to bottom:
- Skip sites with more than x outgoing links on one page – this will force GSA SER to skip all target URLs where it finds more than the specified number of outbound links. This is useful if, for example, you want to create blog comments on URLs which have not been spammed so much yet.
- Skip sites with a PR below x – skips all sites with a PR below the specified number. Keep in mind that Google still updates its PR (don’t listen to all the fuss around), but does that very rarely to the public. On the back-end however, the PR is updated on a daily basis. So using this filter might not be completely accurate in determining the quality of the website, but, it is a good indicator if a website has a higher PR, because it means that Google gave authority to the site at some point during its existence.
- And with a PR above x – you can also skip sites that have too high PR. Why would you want to do that? Well, because GSA Search Engine Ranker is an automated link building tool, and posting on such sites might fail a lot because of their supposed customization and protection.
- Skip also unknown PR – will skip sites which don’t yet have any PR. You have 3 options when telling GSA Search Engine Ranker how it should determine the PR of a target site:
- use PR of Domain – will use only the PR of the root domain of the target URL when determining its PR – example: wordpress.com.
- use PR of SubDomain – same as above, but will use the sub-domain – example: fuark.wordpress.com.
- use PR of Page – this will use the PR of the target URL as it is – example: fuark.wordpress.com/aesthetic-post.
- Type of Backlinks to create – this is the box where you will select the types of backlinks you want the project to create. By default, some are unchecked, so make sure to look at that. I think wiki articles are unchecked by default.
- Try to skip creating Nofollow links
- Avoid posting to subdomain sites
- Avoid posting to sites with just IP and no domain – some of your target URLs might have no domain name (just the IP address of the web server), and you can avoid using these since most of them will probably go down soon enough.
- At least x keywords must be present on – will check each of your target URLs’ content for the keywords you entered in the “Data” tab, and if the specified number is not met, the target site will be ignored. However, this is only good for blog comments and other similar engines, because it will then have content to search in and find your keywords i.e. the blog post you will be commenting on. However, if you turn this setting on, articles, Web 2.0 posts and profiles, and other similar engines which create their own pages on the target site will most probably fail because the keyword might not be existent on the homepage or on the target site’s registration page.
- Skip sites where the following words appear
- Skip sites with the following words in URL/Domain – you can skip sites where the words you enter appear in the domain. You also have another option here. For example if you want this project to be creating backlinks only on .edu sites, you can enter a new rule – “!.edu” (notice the “!” in front), which will skip all target sites not containing .edu in their domain.
From the snapshot above you cannot see, but there are 2 other sub-sections in the “Filter URLs” section.
In the first one you can filter out target URLs from countries you do not want. Basically, it is a checklist with all the countries in the world and you can simply tick the ones you do not want the project to be backlinking on.
In the second one you can skip sites from selected languages. Again, like the skip sites from countries sub-section, this is a checklist of all the languages and GSA SER will skip sites containing words from the languages you have selected.
And that wraps it up for the “Options” tab.
The “E-Mail verification” Tab
This is where you will manage all of the email accounts of your project:
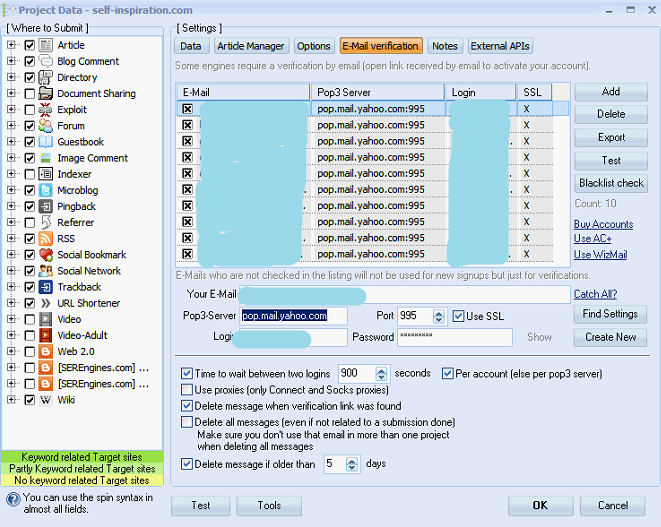
You need emails in order to allow GSA SER to register on target sites that require registration, and then login to that email and verify the account, if the site requires verification at all. We use Yahoo emails mostly because I have found them to be the most stable and they never get deleted either. Keep in mind that the accounts must have POP3 enabled otherwise SER won’t be able to use them properly. The buttons to the right of the “Emails” table:
- Add – you can add new email accounts to your project using the following sub-menus:
- Enter Manually
- Import From File
- Import From Clipboard
- What Format? – shows you a window with the supported formats. So, if you are importing email accounts using the above two options, the file or clipboard contents must be in one of the following formats:
- <email>:<pop3 server>:<login>:<password>:<1=ssl,0=no.ssl> – you would choose either 1 or 0 for the last one depending on the account’s SSL config.
- <email>:<login>:<password>
- <email>:<password>
- Buy Accounts – you can buy email accounts from (we buy them from buyaccs.com):
- Asia Virtual Solutions
- BanditIM
- Buy Bulk Accounts
- CatchAll SEO
- Use Email Account Creator + – opens the thread from the GSA Search Engine Ranker forum where the Account Creator + is sold. We don’t really bother creating our own emails, because it needs an investment of time, and that’s too precious. Besides, buying emails on bulk (1000 for $7) is more than a good deal.
- Use WizMail – Mass Email Account Creator – again, opens a thread from the GSA Search Engine Ranker forum where this particular email account creator resides.
- Delete – you can either delete all email accounts present, or delete just the ones selected.
- Export – exports all email accounts at a location of your choice.
- Test – tests if login to either all accounts or the selected ones is successful.
- Blacklist check – checks if all or just the selected accounts are blacklisted.
Below the “Emails” table you can see an important note, so read that. Then there’s the login details of the selected email account with a few options to the side:
- Catch All? – this will basically create a lot of different possible variations of emails, and all messages sent to any of them will be redirected to the email you have selected as a “catch all” account. The syntax of the catch all email is this: “%spinfile-names.dat%{.|-|_}%spinfile-lnames.dat%{%random-1-100%|}@domain.com”. Quite simply, it will output something like john.thompson7@domain.com. That is just one variation possible and there are a lot of them. This feature is useful if you cannot afford to buy email accounts, but if you could, use other emails. You will get much better results, and much more backlinks. We usually setup a completely new email account (a virgin), with no action on it whatsoever, for each of our projects. When the project is done, we do not use this email again. Keep it clean.
- Find Settings – automatically fills in the settings to the left by using the selected email account.
- Create New – you can also manually create new email accounts. When you click on the email platform of your choice, a new row will be added to the “Emails” table (with empty login details), and the browser will open the homepage of the email platform you chose so you can register and then fill in the login details in SER. The supported platforms are:
- DirectBox
- GoogleMail
- Hotmail
- Inbox.lv
- Mail.ru
- mailcatch.com
- nokiamail
- rediffmail.com
- Smart-Mail.de
- spamavert.com
- spambog.com
- Web.de
- webmail.de
- Yahoo
The last section of this tab consists of various settings which will tweak the way GSA Search Engine Ranker handles your email accounts:
- Time to wait between two logins x seconds – It is strongly recommended that you tick this checkbox, otherwise you will see a lot of errors and fails in the logins to your email accounts, and they might also start getting deleted and removed.
- Use proxies (only Connect and Socks proxies) – whether or not proxies should be used for the logging in and verification of emails – there’s no need for that.
- Delete message when verification link was found – when GSA SER logs into your email account and verifies a certain account it created on some target site, you don’t need the verification email anymore, so you might as well allow SER to delete it.
- Delete all messages (even if not related to a submission done) – will delete all of the messages in the email account, regardless of their source.
- Delete message if older than x days – removes all messages older than the specified number of days so as to not clutter the email account.
And the “E-Mail verification” tab has been covered as will in this GSA Search Engine Ranker tutorial.
The “Notes” Tab
Quite simply, you can type in some notes about the project here. We use it to write in the creation time of the project (which SER does by default), and also other stuff which is used for our automated reporting system. The note you write here will show up when you hover over the project in the “Projects” table which is quite useful. You can write reminders what this project is about, when it should be stopped, etc, and then you can simply hover it if you are wondering what the fuck that is.
You can also change the color of the project i.e. the color which appears in the “Log” of GSA Search Engine Ranker so that you can easily see which messages are for that project. The alternative would be to simply use the “Filter log by selected project” option from the “Projects Context Menu”.
The “External APIs” Tab
Search Engine Ranker can take advantage of two third-party internet marketing tools in this tab. The first one is serpcloud.com which can be used to track the rankings of a certain URL for certain keyword(s).
The second one is the FCS Networker high quality link building software. You can use links build by FCSN projects by simply adding your FCS Networker API key, and then adding the project ID(s). Once you enter your FCSN project ID(s), the current GSA SER project will extract all verified URLs from the FCS Networker projects with the selected project ID(s) and add them to the verified URLs of the current project. I say it again, it adds them to the verified URLs of the current project, not to the client URLs of the project. So now, you can simply add a tiered project to this one, and it will build backlinks to all of the verified URLs of this project including the FCS Networker project(s)’ backlinks.
And with that we are done with the 6 tabs of the “Edit Project” window. However, there are two things left which we have not covered – 2 buttons at the bottom:
- Test – Clicking test will open a window where you will be able to check what the content of your project looks like – client URL (randomly selected from the ones you entered), keywords, anchor text, image comments, descriptions, an unspun version of the article, etc. Check that all is good and start the project. You can also click the “Test Again” button to create a new test version of your content.
- Tools – allows you to use various tools to manipulate the project’s data:
- Auto Fill – will automatically fill in data fields by using one of the following sub-menus:
- From URL
- Use Article Builder
- Use Big Content Search
- Use Kontent Machine – you can either import a file created by KM, or you can use the API directly to get access to the content.
- Use PLR Articles
- Use SEO Content Machine – you can import a file generated by SCM which will fill in all of the data fields automatically.
- Use Ultra Spinnable Articles
- Use WAC
- Use XRContent
- Buy Ready Made Data Packs – if you do not wish to use any of the third-party content creation softwares above, you can simply buy ready data packs.
- Spin Convert – opens a window where you will be able to enter some text, and then spin it using one of the supported spinners by GSA SER.
- Footprint Studio – we already know what this does from the “Tools” button in the “Advanced” tab of the “Options” menu.
- Import
- Data fields – imports a file containing data fields and then fills them into the current project.
- Options – imports a .gsaset file which is basically an exported options file from another GSA SER project and will fill in all of the settings in the “Options” tab.
- Template – imports a .gsatml file which is basically an entire project template with all of its settings and data fields.
- Account Data – imports account data either form file, from the clipboard, or from other projects.
- Export – you can export all of the files which will be used for the import functionalities above plus you can also export the who project backup.
- Show URLs – shows either submitted or verified backlinks for the project.
- Import Target URLs – imports target URLs either from file, from the clipboard, or from site lists of your choice.
- Delete Target URL Cache – deletes the cached target sites for the current project.
- Delete Target URL History – deletes the target URL history for the current project. Again, be careful when you are prompted if you are sure if you want to delete the account data as well.
- Delete Unused Accounts
- Verify all Links – attempts to verify all the submissions of the project.
- Auto Fill – will automatically fill in data fields by using one of the following sub-menus:
And with that, our ultimate GSA Search Engine Ranker tutorial ends. Now it’s time for the GSA SER best practices and optimal configuration, after which you will learn how to build huge lists with verified URLs quickly and easily, how we use the link building tool for beasts, a battle of the top notch automated link building softwares, and our final verdict for this GSA SEO tool.
GSA Search Engine Ranker Best Practices and Optimal Configuration
In the tutorial, we explained absolutely every element of GSA SER, and now, we will look at the best practices for each of the software’s components.
For each of them there will be a list of radio buttons with all of the Search Engine Ranker tricks we use to inject some steroids into this internet marketing tool. Knowing these is absolutely vital if you ever wish to utilize the full potential of this software. Here we go.
The “Statistics Bar”
- Restart GSA SER from time to time to reset the Captcha stats.
- Use VpM combined with downloads failed per minute to always know if there is something wrong with your proxies. If your VpM is too low, you should clean your “Verified” site lists, and also remove duplicate domains and URLs from them.
The “Log” Table
- Disable the log if you are not debugging anything.
- If you are seeing low performance, for example, not a lot of verified links per day, or a bad submitted/verified links ratio, enable the log and save it to a file. Inspect it and deal with the errors accordingly. Most errors will be related to captchas and proxies.
The “Live Links” Table
- Do not increase the number of verified links which are stored in the table unless you really need to.
The “Options” Menu
Each tab as a separate section.
The “Submission” Tab
- If you are scraping target URLs from Google, use private proxies at 1 thread per proxy.
- If you are using your “Verified” site lists to get target URLs, use 6 – 10 threads per proxy. Again, private proxies are strongly recommended as they will have a much higher success rate of submission and verification when compared to semi-dedicated proxies. Using the “Verified” site lists to get target URLs is by far much better for performance when compared to using search engines to gather target URLs.
- Set the HTML timeout to 120 seconds to make sure GSA SER manages to register accounts on more complex websites.
- Use proxies for search engines always.
- Use proxies for submission as well.
- Tick the option to stop projects on no active proxies and then to restart projects on active proxies.
- Do not disable inactive private proxies. They will be resurrected not long after.
The “Captcha” Tab
- Emulate GSA Captcha Breaker as some other captcha solving service, for example AntiGate, and connect it to GSA SER that way.
- Use ReverseProxies OCR as a second captcha solving service. Add it through GSA Captcha breaker’s “Options” menu. This will solve hard captchas such as ReCaptcha.
- Set the retries to 3 to make balance between speed and success.
- Uncheck the “Finally ask user if everything else fails” option so you can stop getting all the captcha windows to popup.
The “Indexing” Tab
- Uncheck the “Submit backlink URLs to blog search engines” option.
- A third party indexation service is useful, but not mandatory. We do not use any. We simply allow the lower tiers to act as indexers for the upper tiers’ backlinks.
The “Filter” Tab
- Uncheck the “Skip submission if the URL/domain is appearing on one of the following blacklists” option. You can filter out target URLs via each project’s settings and anyway, these might conflict with SERengines.
The “Advanced” Tab
- Save only the “Verified” site lists to increase the performance of GSA SER and besides, these are the lists you actually need in order to run this software more efficiently.
- Check the “Save PR with URLs” option if you will be using a lot of PR filters on your projects.
- Backup your “Verified” site lists regularly, just in case.
- If you have the time, find new footprints for the various engines using the “Footprint Studio” option from the “Tools” button.
- Use “Remove duplicate Domains” and “Remove duplicate URLs” on a daily basis.
- Use “Clean-Up” whenever you start seeing way too many “no engine matches” and “download failed” messages in the GSA Search Engine Ranker log.
- Tick the “Detect internet connection problems and stop/restart projects” checkbox to make sure that SER is not trying to submit backlinks when your machine has no access to the Internet.
- Use SERengines to create some really nice Web 2.0 posts and profiles on a lot of platforms.
The “Start/Stop” Menu
- Make use of GSA Search Engine Ranker’s Scheduler to run only a certain amount of projects at a time. Useful if you do not have the capacity to run many projects on your SER instance i.e. not enough proxies, not enough RAM, weak CPU, etc.
The “Help” Menu
- Always check out the version history after an update to see what’s changed and what’s new in the world of this GSA SEO tool.
- Read through the macro guide if you got the time. It’s well worth it.
The “Projects” Table
- Group your projects into project groups for a much easier navigation through GSA SER.
- Come up with a good and smart naming convention for both your projects and your project groups.
- Set the priority of all of your projects to start at the lowest so that you can easily give more attention to lagging projects later on.
- Duplicate projects via the “Projects Context Menu” if you need a quick replica or a similar project.
- Delete Target URL History so that the project can start getting target URLs from the top of the “Verified” site lists. Be careful not to delete your account data.
The “Edit Projects” Window
We will look at Tier 1, Tier 2, and Tier 3+ optimal configurations for your GSA SER projects.
GSA Search Engine Ranker Tier 1 Optimal Configuration
- Engines – Article, Directory, Social Bookmark, Social Network, SEREngines posts and profiles, and Wikis. You could also use only SEREngines to make the Tier 1 project even safer, but I have run hundreds of tier 1 projects and never had anyone complain about penalties or anything.
- Anchor text ratio – 1% exact match, 4% partial match and LSI, 50% branding, 25% generic, 20% naked URLs. If you will be running the Tier 1 towards a parasite site i.e. YouTube, you can simply move the 50% from branding to the partial match and LSI anchors.
- Articles – backlinks at random locations, 0 – 2 authority URLs, 0 – 2 images or 0 – 1 videos.
- Filters – Minimum PR of 3 and also skip unknown PR.
GSA Search Engine Ranker Tier 2 Optimal Configuration
- Engines – Article, Forum, Image Comment, Microblog, Social Bookmark, Social Network, Wikis, SEREngines posts and profiles (optional).
- Anchor text ratio – 5% exact match, 25% LSI, 40% generic, 30% naked URLs.
- Articles – backlinks at random locations with 33% using the “Top Anchor – URL” option, 0 – 1 authority URLs, 1 – 3 images or 1 – 2 videos.
- Filter – No limit on the PR, let the link building beast throw some link juice down to the Tier 1 backlinks.
GSA Search Engine Ranker Tier 3 Optimal Configuration
- Engines – Blog Comment, Guestbook, Pingback, Trackback, URL Shortener.
- Anchor text ratio – 30% exact match, 70% LSI.
- No articles for these projects
- No limit on the PR
Common Settings for all the Tiers
- Content – Generate the content for your GSA SER projects using Kontent Machine and its pre-defined Tier 1, Tier 2, and Tier 3+ templates. Combining it with WordAI’s powerful spinning properties and here and there mixing it up with Spin Rewriter, gives you the content you will need. The results from this are decent and the content is quite good. If you got the time, you can also add a manual touch to make it even better.
- Check the “Skip sites where the following words appear” option and also add a few exceptions in the “Skip sites with the following words in URL/Domain” area, for example – “porn”, “sex”, etc.
- Depending on the age of the site, configure the amount of backlinks allowed to be created each day. For a brand new site, 10 verified backlinks per day for Tier 1, 50 verified links per day for Tier 2, and 200 verified links per day for Tier 3 is a good start, and for an older one, it will depend on the condition of your “Verified” site lists – if yours are really good and clean, you better put in some limit to the daily link or you might end up blasting your site and causing a link spike. Use your intuition here.
- Tier 2 and Tier 3 should link only to DoFollow backlinks from their parent project i.e. the upper Tier they point at. No point in linking to Social Bookmarks and other nofollow platforms. Yes, they are good for indexation and social proof, but not so much for link juice (at this point in the space-time continuum).
- Check the “Use a random URL from above on every submission (else in sequence)” checkbox from the “Data” tab to make sure there is randomness in the backlinks created towards your client URLs. Randomness equals Nature.
- Use “Choose Random” for the “If a form field can’t be filled” option.
- “Verified Links must have exact URL” setting should be checked
- The “When to verify” setting should be set to “Automatically”.
- We do not use search engines to scrape target URLs, so uncheck all search engines – by default, 8 are selected.
- Only use “Verified” site lists as sources of target URLs of your project. This will skyrocket your VpM and the overall performance of GSA SER.
- Uncheck the “Use URLs linking on same verified URL (supported by some engines only)”. You want to use this option only for your verified links builders projects (you’ll see what these are in a minute).
- We never use scheduled posts, only unique domains. Only in the case of creating Tier 1 projects with SEREngines posts and profiles exclusively. Only then do we allow scheduled posting.
- Check all types of backlinks to create.
- Check the “Time to wait between two logins” option and set it to at least 900 seconds.
- Use Yahoo emails.
- Add notes to your project whenever you can to remind your future self of the purpose of your creation.
- Always test your project before you start it to make sure all is good.
- Do not select the Web 2.0 engine type ever, because it is not supported anymore. Use SEREngines instead. This was the answer I got from the SEREngines support when I asked them why I had so many error messages in my log for my Web 2.0 only projects.
You can check the example link pyramids we have come up with, that are optimized for GSA SER by going to our Services page.
Another very important thing you should do is go to the “Engines” folder inside your GSA Search Engine Ranker installation folder, and edit the following .dat files (these are default texts which GSA SER will use if you do not explicitly specify your own content for your projects):
- about_yourself.dat
- auto_anchor-article.dat
- comments.dat
- comments_forum.data
- comments_guestbook.dat
- comments_guestbook_german.dat
- comments_image.dat
Generate your own highly spun content and replace the one already existing inside of these files. Be careful because in some of them, there are macros used, so first, take a look at this and become aware of the approach GSA SER uses by default, and only then exchange them with your own content. This takes time, but will do a lot for you in the future. Change these on a weekly or monthly basis to leave no footprints on search engines. This is extremely important otherwise you risk leaving content the same as thousands of other unaware GSA SER users, which will one day come back and bite you on the ass. Not the other SER users, but the consequences. Just wanted to be clear on that one.
How to Quickly Create Huge GSA SER Lists with Verified URLs
First of all, I want you to know that if you really don’t have the time to build your own lists and filter them the right way, you will have to take advantage of the services of some GSA SER site lists provider – check out this case study of the top 4 GSA SER site lists providers which will help you make an informed decision or take a look at our site lists.
But if you do have the time, I’d suggest you stick with building your own lists. Now, when you first iopnstall GSA Search Engine Ranker, the folder with the “Verified” site lists is completely empty. Not for long though. In this section I will teach you how you can build tens of thousands of verified backlinks in a matter of days, and then grow them exponentially. Within a few weeks you will probably have upwards of a million verified URLs in your GSA SER. Without a further a due, here’s how you will do it.
First of all, you will need Scrapebox. GScraper will also work, but we use Scrapebox. Now, since you have no verified URLs in your GSA SER yet, you will need some head start, after which the lists will grow exponentially. First you will start by selecting some target keywords. For example, you can use all of the article categories from ezinearticles.com – Arts and Entertainment, Business, etc. Copy all of them and paste them into a file called “keywords.txt”.
Now open Scrapebox and import the “keywords.txt” file into the Harvester section. Select “Custom Footprint”, and leave it at that for now, because it’s time to get the engines footprints from GSA SER.
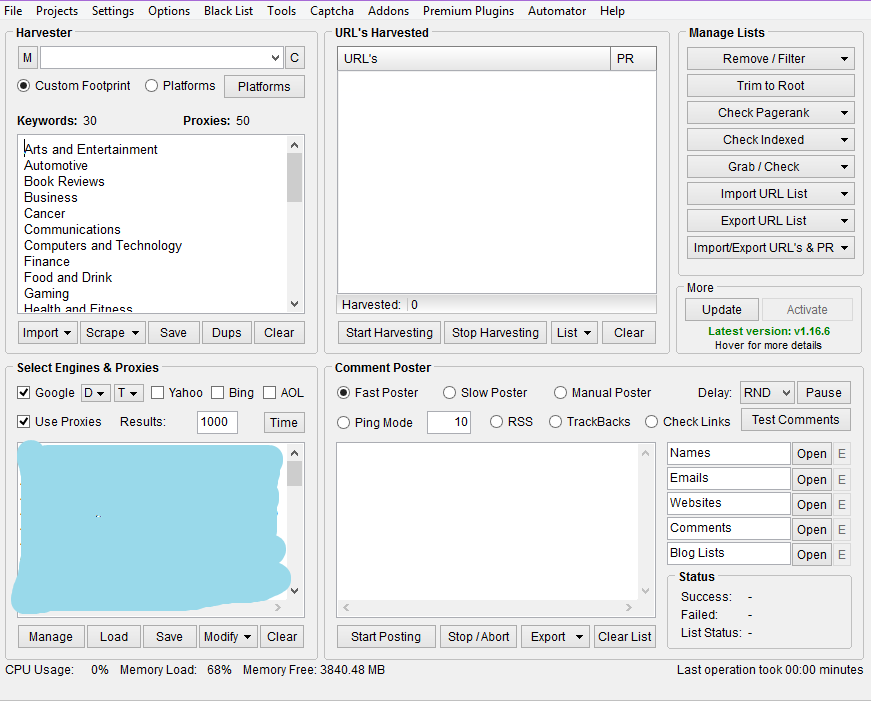
Go to your GSA Search Engine Ranker -> “Options” -> “Advanced” -> “Tools” -> “Search Online for URLs”. Once the window opens, click on the “Add predefined Footprints” button, and add all footprints from the following engines:
- Article
- Blog Comment
- Directory
- Forum
- Guestbook
- Image Comment
- Microblog
- Social Bookmark
- Social Network
- Trackback
- URL Shortener
- Wiki
All of the footprints should appear in the textarea above.
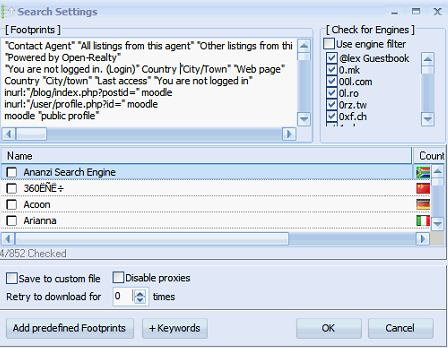
Right click on the “Footprints” textarea and select all. Copy and paste them into a file called “footprints.txt”. So far so good. Now go back to Scrapebox and click the “M” button above the “Custom Footprint” radio button. This will simply add each of your keywords to each of the entries in the “footprints.txt” file:
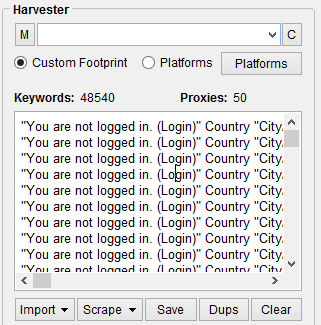
Now, select all the 48540 keywords (you will have much more because I just added footprints from one engine), and copy and paste them into a new file called “footprints and keywords.txt”. Now open Scrapebox’s DupRemove tool (you can install it for free from the “Addons” menu), and look at the last section where it says “Randomize url list”. Simply select the “footprints and keywords.txt” file as the source file, and name the target file “footprints and keywords rand.txt”. Then click “Randomize”.
This will simply randomize each line from the source file, so as to not tip off search engine of any search patterns. As you can see from the above snapshot, it will search numerous times for the same footprint, and only changes the keyword. However, after the randomization:
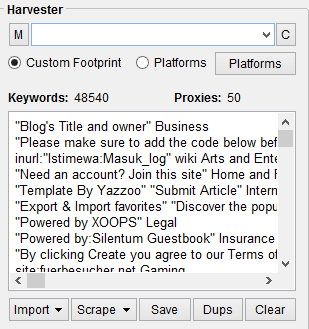
I have found that the proxies tend to burn out more slowly when I randomize the keywords in the harvester. At this point we are ready to scrape our target URLs. Make sure you have some nice and juice private proxies (BuyProxies are the ones I recommend for this purpose as well), and let it roll. At 50 private proxies, I let Scrapebox run at 7 connections. At this rate, my proxies have never died, and have always scraped till the very end of the list of keywords. Now, just click “Start Harvesting”, and watch the show. Keep in mind that this may take quite a while. At the end, considering you got yourself some nice proxies, you will be looking at millions of target URLs. And now it’s time to create verified URLs from them.
Go back to GSA Search Engine Ranker, and create a new project selecting the engines for which you exported footprints. Generate some content for it using Kontent Machine 3, and then spin it with some spinner – the content doesn’t have to be highly spun and human readable, this campaign will just be, what I call it, a “verified links builder”. Okay so far so good. Now these are the rest of the steps to take in order to start the verified links building process:
- Select some client URL – might be https://google.com or something else you will blast with pointless links.
- Choose some random anchor texts, ratios, etc.
- Again, random config for the articles, just do not tick the “Do not submit same article more than x times”, because we will be submitting a lot of articles, a lot of times.
- Tick the “Continuously try to post to a site even if failed before” option.
- Deselect all search engines.
- Uncheck the “Use URLs from global site lists if enabled” checkbox. We will only be using manually imported target URLs.
- Leave the “Use URLs linking on same verified URL” which will give some bonus target URLs.
- Allow scheduled posting at its default values – 5 accounts and 5 posts per account.
- Remove all filters and select all types of backlinks to create.
- Add 5 – 10 emails (preferably Yahoo) to the campaign and tick the “time to wait between two logins” (the default 900 seconds is good).
- Click “OK” and watch your new creation spur into existence.
- Right-click it, and rename it accordingly – “verified links builder 0”. Yes, this will not be the only one.
- Right-click it again -> “Modify Project” -> “Duplicate” -> “Everything”, and duplicate the project 6 times for a total of 7 verified link builders.
- Select the 6 new duplicated projects, copy 30 – 60 new email accounts, and then: right-click -> “Modify Project” -> “Import” -> “E-Mail Accounts” -> “From Clipboard”. Delete all existing emails and split the new ones equally.
- Now, select all of the 7 projects, right-click, “Import Target URLs” -> “From File”, and select the batch file which Scrapebox generated containing all of the scraped URLs. Randomize the links, and split them to each of the projects.
- Put all of the projects into a project group – from our GSA SER – “VERIFIED LINKS BUILDERS”. I always use caps-lock on the project group names as it is much easier to spot them that way.
At this point, you are ready to let it roll. Set your threads at 6 – 10 per proxy, set the projects to “Active” status, and click the “Start” button. Leave the projects running until there are no more target URLs left to try and post to. You can check remaining target URLs for all of the 7 projects by right-clicking on the project group -> “Show URLs” -> “Show remaining Target URLs”. Now, all you have to do is wait. Once all of the target URLs are extinct, you will have a nice starting amount of “Verified” site lists. Now it’s time to grow them exponentially.
The next process I will teach you has helped me make around 50,000 verified backlinks in just a single day:
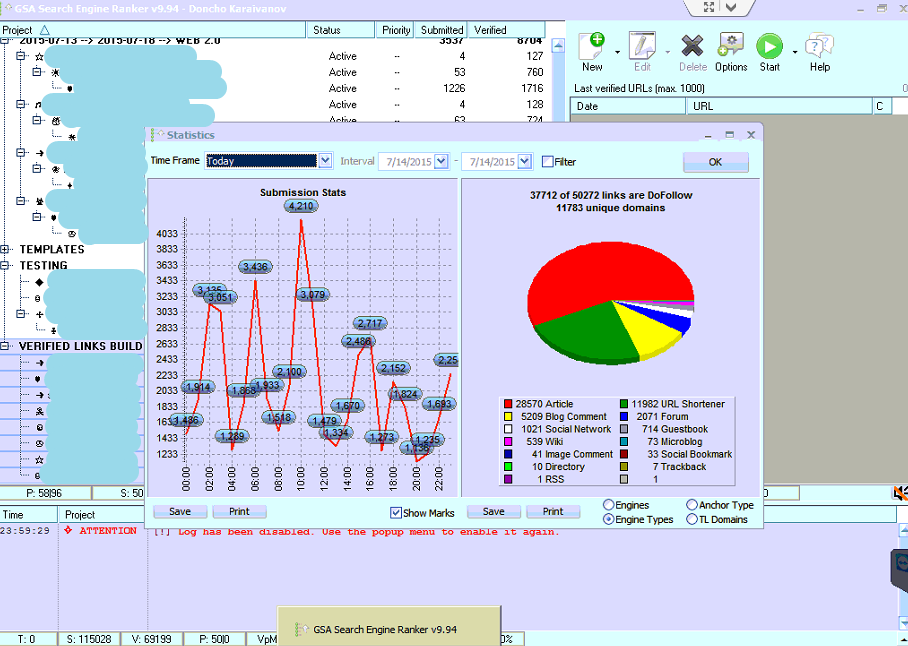
In just a single day while writing this, I scraped some new target URLs using the next simple method I’m about to share with you, and this is the number of backlinks it added to our “Verified” site lists. Don’t focus that much on the number of backlinks, but rather, on the number of unique domains. Close to 12k for a day – not too shabby, not too shabby at all.
First of all I want you to understand the concept of this strategy. We already explained this one a little in a similar GSA SER functionality, but that’s cool. Let’s say you have created a link pyramid campaign in GSA SER consisting of 3 tiers. Now, let’s say you used the configurations we suggested in the GSA Search Engine Ranker Best Practices and Optimal Configuration section. Your Tier 3 backlinks point to your Tier 2 backlinks right? Okay.
Now, there are probably thousands of other users out there who are using GSA SER and also have created similar link pyramids. Their Tier 3 backlinks will point to their Tier 2 backlinks as well right? Good. However, their Tier 3 backlinks and your Tier 3 backlinks might overlap and be on the same sites i.e. blog comments on the same blog posts, guestbook comments, etc. What you will do is simply take all the outbound links on your Tier 3 URLs i.e. the URL of the blog post you left a comment on. These outbound links have a very, very high chance to be pointing towards the Tier 2 of some other GSA SER user. You with me still? Good.
So you see, these outbound links have a good chance of being matched by a GSA SER engine. Now, let’s say that your Tier 3 managed to create 3,000 blog comments. Scraping the outbound links of all these 3k URLs will leave you with millions of new target URLs, quite simply, because Tier 3 projects are mostly spam and there are a lot of these links. So basically, you will be posting to websites where other GSA SER users have posted. Hope you got the concept.
Now here’s how you do that. First you export all of the verified blog comments and guestbooks from all of the 7 verified link builders. Here’s how you do that:
- Select all the 7 projects and right-click on them -> “Show URLs” -> “Verified”.
- Right-click on the table of verified backlinks -> “Select” -> “Engine Type”. Then simply select “Blog Comment” and “Guestbook”.
Name the file “verified blog comments and guestbooks.txt”. Now open Scrapebox again. Go to “Addons” -> “ScrapeBox Link Extractor” (if you don’t see it, install it, it’s free):
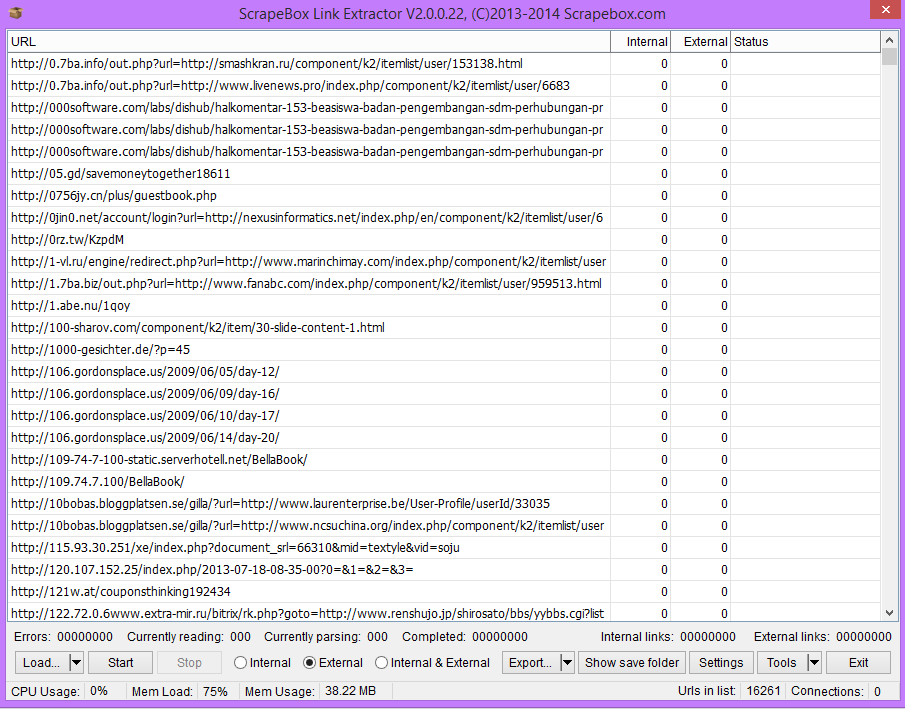
Load the “verified blog comments and guestbooks.txt” file into the Link Extractor. Then click “Tools” -> “Randomize the loaded urls in the grid”. Make sure you have selected the “External” radio button which means that the addon will extract the outbound links on the loaded URLs. 50 – 100 connections should suffice, then simply click the “Start” button and watch the show.
Once this is done, you must import the file with all of the outbound links into the 7 verified link builders projects, and let them ride again. Your VpM will skyrocket, because a huge percentage of these target URLs will be eligible for GSA SER to post on. Yesterday, the VpM on one of our VPS-s reached 240+ for a few minutes. That’s 4 links per second. Yep, my math is amazing as well.
The third and final strategy you can employ is simply using all of the target URLs from the second strategy as keywords in Scrapebox’s Harvester. The concept is simple. Since these are most probably Tier 2 or even Tier 1 backlinks, they will be linked to by other backlinks as well. This time, we will be targeting the upper tiers of other GSA SER users. Hope you understood this one as well. Then you simply scrape for these target URLs on search engines (you have to put each of them in quotes to make sure the target URLs which you scrape actually contain this URL), and import the new found target URLs into your 7 verified link builders again.
You do strategy 2 and 3 over and over again, until you get millions of verified URLs into your “Verified” site lists. Now, you can use GSA Search Engine Ranker as it was meant to be used. I can’t tell you how calming and awesome the feeling is of just watching the links get verified by the dozens. I don’t know, there’s just something about it.
GSA Search Engine Ranker vs SEnuke XCr vs Ultimate Demon
Let’s start with GSA SER vs SEnuke XCr. While in the past, SEnuke had some advantage over SER, nowadays that’s not the case. With SERengines supporting more and more Web 2.0 platforms and the level of customization, GSA Search Engine Ranker has long surpassed XCr. But, hey, if that doesn’t convince you, this will – while GSA SER is a one-time payment (don’t forget about the upcoming godly GSA SER discount), SEnuke XCr costs $147. Nope, not a one-time – per month! And really, I think that while it really is good, it’s not a bad link building tool at all, GSA SER is so much more cost-effective, and you can do pretty much anything with it. Plus, it’s much more noob friendly, and with this ultimate GSA Search Engine Ranker tutorial, there will be no more GSA SER noobs out there.
Then there’s Ultimate Demon. Again, great link building tool, but it comes with a price once more – $47 monthly fee or a one-time payment of $397 – while you can get SER which is light years ahead in cost-effectiveness. Just take a quick look around through forums for battles between these great internet marketing tools. You will see that 90% of the people recommend SER. And it’s for a reason guys. It really is the crown jewel of automated link building at this point.
How we Use GSA Search Engine Ranker and its Gamma Rays
We have been using GSA SER since the very launch of the software and simply love it. Sure it was much more buggy back then, but it has come a long way. Basically, if you know how to use it, you can create all types of campaigns and rank almost anything. How do we use the link building beast?
Well, we have come up with a few optimized link building campaigns for different purposes which you can check out in full detail on our Services page.
We have several VPS-s each one with a different purpose – personal projects, client projects, custom projects, etc. We use Power Up Hosting as a VPS provider, and I can confidently say that we have not had any problems at all, and we use up a ton of bandwidth each month. Their support is lightning fast as well, so if there are any questions, the guys quickly let me know. And since GSA SER plays a lot with files, the SSD’s which our VPS-s use come in real handy.
In short, we use GSA Search Engine Ranker to rank our own websites, and the websites of our clients.
Honest GSA Search Engine Ranker Review and Final Verdict
Watching how GSA SER has improved over the years really makes me trust in this software’s developers. Constantly, there are new updates adding new features, new engines, and improving already existing functionality. With more and more platforms being added to SEREngines, and with the already existing pre-defined engines in GSA SER being improved constantly, this link building beast is steadily becoming an all-in-one link building solution.
If the GSA guys keep this tempo up, I wouldn’t be surprised if in 2 – 3 years, GSA Search Engine Ranker becomes the only link building software internet marketing warriors will use for website ranking. And on the other side, GSA Captcha Breaker is also constantly getting better and better, so it is striving to become an all-in-one captcha solving solution. The GSA SER and GSA CB combo might just completely dominate the stage of link building one day. But hey, those are just predictions coming from the assessment of the current situation in the online marketing world. It only takes into account smart presumptions of the future changes in SEO. But, who really knows what actually will happen?
Back to the present, and in the present, GSA Search Engine Ranker is the shit. I mean, just look at all of the functionality we have covered in this tutorial. You will get access to that with a one time payment. That really sold the software for me. Most of the link building tools of this level are still monthly payments, or have one-time payments which are much, much more expensive.
But let’s get to the point – does it really help in ranking websites. You fucking bet! When you become a master of GSA SER, you will be able to create such specific and quality campaigns, which will finally make you believe that automated link building software really can be used for Tier 1, if you first, use your brain, and understand the software completely. But, if you have other plans for your Tier 1 campaigns, that’s cool. Search Engine Ranker can easily take care of the lower tiers and will pass on a ton of link juice to your Tier 1 links, and ultimately, to your main site.
You can also use this GSA SEO tool to run churn and burn campaigns, campaigns for ranking YouTube videos not only on Google, but on YouTube itself, rank parasite sites, and pretty much any type of campaign due to the level of customization provided by Search Engine Ranker.
Bottom line is, GSA Search Engine Ranker is one of the top automated link building tools on the market (the best one balance-wise if you ask me), and it looks like it will remain there for the times to come, even after winter comes.
An Exclusive GSA Search Engine Ranker Discount
How much will this software with all of its functionality cost you? Probably not even close to what you think, because of our GSA SER discount. The software also comes with a 5-day completely free trial with access to all of the functionality. You can download GSA Search Engine Ranker by clicking here. Test it out and make an informed decision.
However, if the ultimate GSA SER tutorial was enough for you, you can instantly take advantage of our GSA Search Engine Ranker discount by either entering our GSA SER discount coupon code manually (“inetsolutions“, without the quotes), or clicking on the button below:
- GSA Search Engine Ranker Lifetime License
- $
99 - $84.15
- Grab your own copy of this innovative internet marketing tool and put your link building process on auto-pilot. GSA Search Engine Ranker is steadily becoming the only link building beast you will ever need to tame. The question is – will you miss the train?
If you purchase GSA SER you will most certainly need to buy GSA Captcha Breaker as well, because without it, Search Engine Ranker will never reach its full potential – click here to take advantage of our special GSA CB discount.
Anyway, once you have GSA Search Engine Ranker, and you become fully aware of all of the different possibilities it gives you, your link building skills will get to a whole new level. You will be able to do so much more in so much less time. And one day, I will share with you our GSA SER projects generator software, which will allow you to create new projects in just a few seconds. No bullshit. Until then, remember – in the game of rankings you either win, or you try harder.